Saturday, August 27, 2011

Glue and Wrap Dressing Technique for Paperclay Dolls

This is a continuation of my last tutorial in which I gave instructions on how to make a Paperclay doll. This tutorial I will give simple instructions for dressing your doll without sewing!

So, last time I wrote a tutorial, we made this kitty doll:


I've decided that this kitty is a lady. Therefore, she needs a pretty dress.

What You'll Need
Paperclay Doll
(Make your own with this tutorial: http://creativepaperclay.blogspot.com/2011/08/paperclay-kitty-doll-tutorial.html)
Fabric - at least two complementary prints, colors, and/or shades
6" of Lace or Wide Ribbon
12" of Thin Ribbon
Aleene's Tacky Glue
Broken jewelry, glass beads, buttons, or anything else you may want to embellish with


What To Do
1. Decide which fabric will be your doll's skirt. Cut a 4 inch X 4 inch piece and fold in half. Cut a half moon shape being careful not to cut through the fold completely.


2. Place your doll in the middle of this fabric. Trim and cut down to size if necessary.


3. Play around with the fabric to determine how it will fall on the doll. Once you have a good idea of how you want the skirt to look, place a small drop of glue on the belly of your doll and wrap one side of the fabric across. Make sure the fabric is secured with the glue. Wrap the opposite side securing with another drop of glue.


4. Take your other fabric and repeat step 1. However, make this piece a smaller half-moon, leaf shape, or wide triangle. Whatever suits your fancy.


5. Again, play around with the fabric to see how it will fall. Make sure you place the fabric under the dolls little arms. When you are happy with your fabric placement, place a drop of glue on the doll's chest, wrap the fabric, place a drop of glue on the doll's back, wrap again. You may need a teeny drop of glue at the end of the fabric to secure it to the doll's body.


6. Now take your lace around the middle and fashion an apron, belt, or sash around your doll's middle using the same glue and wrap technique. You made need to use a bit more glue to adhere the fabrics together. Cut and remove excess as needed. Feel free to glue and wrap as much, or as little, as you please!


7. Take your thin ribbon and tie a bow in the back of your doll.


8. Use the same ribbon to make your doll a hair bow. Take your broken jewelry, beads, etc. to fashion a necklace by gluing the findings directly to your doll. Glue the hair bow to the doll's head. And congratulations! You've just successfully dressed your paperclay doll without sewing a thing!

Tuesday, August 23, 2011

Creative Paperclay Bracelet Cuff

Good morning friends

Today I want to share a project that was thought up almost last minute.  I love working with it for embellishments for my scrapbooking and cardmaking, but recently I've begun to think a bit outside the box and experiment a little.  This was extremely  fun to make.

Here are my step by step instructions, kinda picture heavy.
First I layed out my paper clay and cut it with my blade
in the shape I wanted for the cuff
The I cut the ends off
I added some texture and wrapped the clay
around a bottle that was a close fit to my wrist.  
The paperclay will shrink a bit so make sure you have 
something a tad pit bigger than your wrist.
I didn't let it completely dry so that I wouldn't
be able to get it off the bottle.
I also added some holes for a chain if it didn't hold well.
I painted it with a glossy paint in black
and added a glossy pink over 
the top to seal it
and there is my cuff and it fits perfectly.
No chain needed, it actually fits tight enough.

Isn't it just gorgeous?  Well, I think so anyway.  I hope you liked my Creative Paperclay project today and I will see you again in about 2 weeks for another project.  I hope I've inspired you to create your own bracelet cuff using some Creative Paperclay.  You can view more of my designs here on my blog.

Friday, August 19, 2011

Creative PaperClay Frame


I had fun making this project - I really like the look of the Jewelry I made a couple weeks ago for you and had to see what it would look like as a frame. Very happy with the results.

If you missed the projects - Paperclay Jewelry that was post here on August 5, 2011
Here is the video that when with that Jewerly I made, but this frame was made the same way... Check out more of my video on Youtube


First I cover a wood frame from Michael's with paperclay. While Paperclay is still wet, I stamped Swirl stamp from Viva las Vegastamps into the clay. Set aside to dry.
Next day, I painted with Purple Mica mixed with 3-D Crystal Lacquer as I did the the video. it's that easy... Added a ribbon and bow.

Now let your imagination go wild and let see what you do...

Stop by my blog and see what else I might be up too. CLICK HERE

Terri Sproul

Thursday, August 18, 2011

Paperclay Owl Ornaments How To

by Amanda Marks

I decided that I wanted to make hollow ornaments this year (to sell and for family) I usually make flat ornaments.  I will say this tutorial is a little more advance that most of the ones I do, but with a little practice I promise you can make an ornament as well.  Also for this project I did Webcam shots touching my camera with clay hands is not advisable so this was the best hands free method I could think of.

Materials:
Un-Sharpened Pencil or Bamboo Skewer
Water Balloon with no water
Creative Paperclay
Spray Bottle
Sculpting Tools
Circle Cutters (1/2" and 1")
Fondant Roller (Rolling Pin)
Exacto Knife (to place the ornament in to dry)
Sand Paper
Old Piece of a Panty Hose
Dust Mask
Acrylic Paint
Ornament Hanger

1.  Blow up the balloon.  Since this is a water balloon you do need a good set of lungs to do this.  Tie the balloon to an un-sharpened pencil or bamboo skewer.

2.  Roll out Creative Paperclay using either a clay roller, fondant roller, or a rolling pin.  Spray Balloon with water, place Paperclay around the balloon merge seams together with water and sculpting tools.  Leaving the top opened so the balloon can be pulled out.
3.  Taking a 1" circle clay cutter or the top of a pill bottle (I used that because I couldn't find my 1" circle cutter.  Make an imprint on the left side of the owl and again on the right.  It is important that you do not push too hard (one you don't want to break the balloon or make a hole in the clay).  Taking the 1/2" circle cutter - I eyeball the small circle into the bigger circle.

4.  Taking a small piece of clay I formed a beak and attached the beak to the owl with some water.  Take two more small pieces of clay and make to equal cone shapes attach to the owl with a little water and sculpting tool.  These cones will be the horns for the owl.

5.  Rolling out another piece of clay cut two tear shaped pieces (these will be the wings).  Taking a sculpting tool make Xs across the top of the wing add a little water and place onto the owl, smooth with sculpting tool.
6.  Take another piece of clay cut out a moon shape and attach it to the backside of the owl.  Roll out a snake out of Paperclay and cut six equal pieces.  Use water to attach them to the underside of the owl (this will be the feet).
7.  Take a sculpting tool and refine all the edges of the eyes and add mouth to the beak.

8.  Allow to dry for 24 hours.  Pop the balloon.  Allow to dry for another 24 hours.

9.  Add the top of the head.  You may have to perform basic surgery on the owl with an Exacto knife to ensure proper smoothness of the Owl's head.  Add a piece of clay so you can add an ornament hanger.  Allow to dry for 24 hours.

10.  Now that your owl is dry let the fun begin with Dust Mask on.  It is now time to sand your owl - it is up to you how much or how little you

11.  Paint your owl with acrylic paint - I used PLAID Apple Barrel Paints and seal with a sealer.


I want to apologize for the lack of finished photos - we had a bad storm and our internet has been out for a couple of days.  I published what I had.

Monday, August 15, 2011

Creative Paperclay Necklace

I must say that I totally enjoy going to other people's blogs and reading about their creative endeavors in whatever the mediums and techniques are that they use and I hope that you enjoy mine. Today I'll be showing you how easy it is to make a necklace. You can just use your imagination to design your own.

To begin with I rolled out some paperclay and cut it into this shape:

(Don't pay attention to the marbling in the clay, it had a little paint mixed in it by mistake)


Also don't pay attention to the splotches under the clay as that is on the plastic covering the table. The clay has a piece of stencil material under it and you can see through it. Anyways after cutting out the piece for my necklace, I used a rubber stamp and stamped this on it:


I then took some of the paperclay and rolled out a thin rope that I placed around the other clay piece like so:


After I reached that stage of the necklace I let the piece dry for a couple of days. I didn't have to, I just went on to other things for awhile. It probably would have been dry in just a few hours as it wasn't very thick.


Once I was ready to work on the piece again, I painted it, sealed it, and hung it on a chain. Here's what it looked like when I finished it:


I'm telling you again folks, you're only limited by your imagination. Remember that you can purchase Creative Paperclay at Hobby Lobby, Michaels and of course: Creative Paperclay! I hope that you give this clay a try and let me know how you like it!

Barbara

Saturday, August 13, 2011

Paperclay Kitty Doll Tutorial

I love my cat. His name is Wylie, he is two years old, and he is always dressed to impress in his tuxedo. He inspired me to make a kitty doll out of paperclay. Here's how you can make your own!


What You'll Need

Creative Paperclay - about 4 ounces - preferably new, fresh package
Small cup of warm water
Non-stick Craft Pad or Wax Paper Taped on Work Surface
1 Styrofoam Ball - 3" or a 3" Aluminum Foil Ball
6" - 14 gauge jewelry or garden wire
12" - 22 gauge jewelry wire
4 - jewelry head pins, corsage pins, or sewing pins
Wire cutters
Pottery cutting tool or butter knife
Acrylic paint, paint pens, pencil
Matte Spray Varnish

What To Do
1. Start by inserting the 14 gauge jewelry wire into the styrofoam ball. Make sure that you insert the wire a little bit behind center as this will be the doll's neck.

2. Open your package of Creative Paperclay if you haven't already!!!

3. Remove a clump of paperclay and smooth a layer of it over the styrofoam ball. Use the warm water to really smooth it.


4. Sculpt a small cylinder shape and two triangles out of the paperclay for the neck, top half of torso, and bottom half of torso.

5. Insert the small cylinder shape onto the 14 gauge wire below the styrofoam ball and blend the edges in to the head.

6. Add two triangles with the tips touching each other.

7. Dampen fingers and break off small pieces of paperclay to fill in gaps between the cylinder and two triangles. Smooth the clay as you go using slip which simply means that you take a small amount of paperclay, dampen it in your cup of water, and smoothing it between the two body pieces.


8. Insert a pin across the new little body you have created. Create a hole through the top where the shoulders will be, and create a hole through the body where the hips will be. Make sure you work the pin in a circular motion to widen the hole just a bit.


9. Depending on how big you made the doll body parts, you should have at least a 1/2" of wire sticking out of the bottom of the body you just created. Use this to pick the doll body up and place the doll on a clean baking sheet.

10. Bake the doll at 200 degrees for 10-25 minutes. VERY IMPORTANT! Everyone's oven is different...Make sure you closely monitor the baking of this doll body. Check every 5 minutes. Otherwise, you may step away and come back to an alien-looking thing with a blown up and melted styrofoam head!
Paperclay turns white when dry.

11. While the body bakes, you can make the arms and legs. Just don't forget about it!!! :) Roll out a long snake of paperclay. Use water to keep the paperclay moist, workable, and smooth.


Okay, you have lots of room for personal preference with the arms and legs. I tend to make my arms and legs long. Sometimes I make all the limbs the same length, sometimes I make the legs much longer, etc. You want to use a doubled-up cut of 22" gauge wire that is twisted for these parts. This gives the clay a better armature to hold on to and less chance of these delicate appendages from cracking. If you choose to make arms and legs longer than 4 inches, you may want to consider using a heavier gauge wire.

12. Cut wire into two pairs of equal length for the arms and legs so you should have eight separate pieces of wire. Twist equal cuts of wire together. You should now have two arms worth of twisted wire, and two legs worth of twisted wire.

13. Cut snake with of paperclay with butterknife into two arms and two legs.

14. Insert wire through individual snakes of clay and then roll on non-stick craft pad for smooth finish. Use water to further smoothing.

15. For the arms, round one end of the snake for shoulder and flatten the other end for a little hand, or in this case a paw.

16. For the feet, round one end of the snake for hip and form a foot by pinching a little ankle and making a little pointed foot. More clay can also be added to make shoes.


17. Take those pins that you used earlier to create the holes for shoulder and hips and create holes in the four limbs you just made. These holes can be close to pin holes...just make sure you have a little movement in the hole, otherwise your doll limbs won't move easily!


18. Now you can bake your doll limbs! These parts do not take long at all...Bake at 200 degree for 5-7 minutes. Look for that nice, white color that indicates the paperclay is dry.

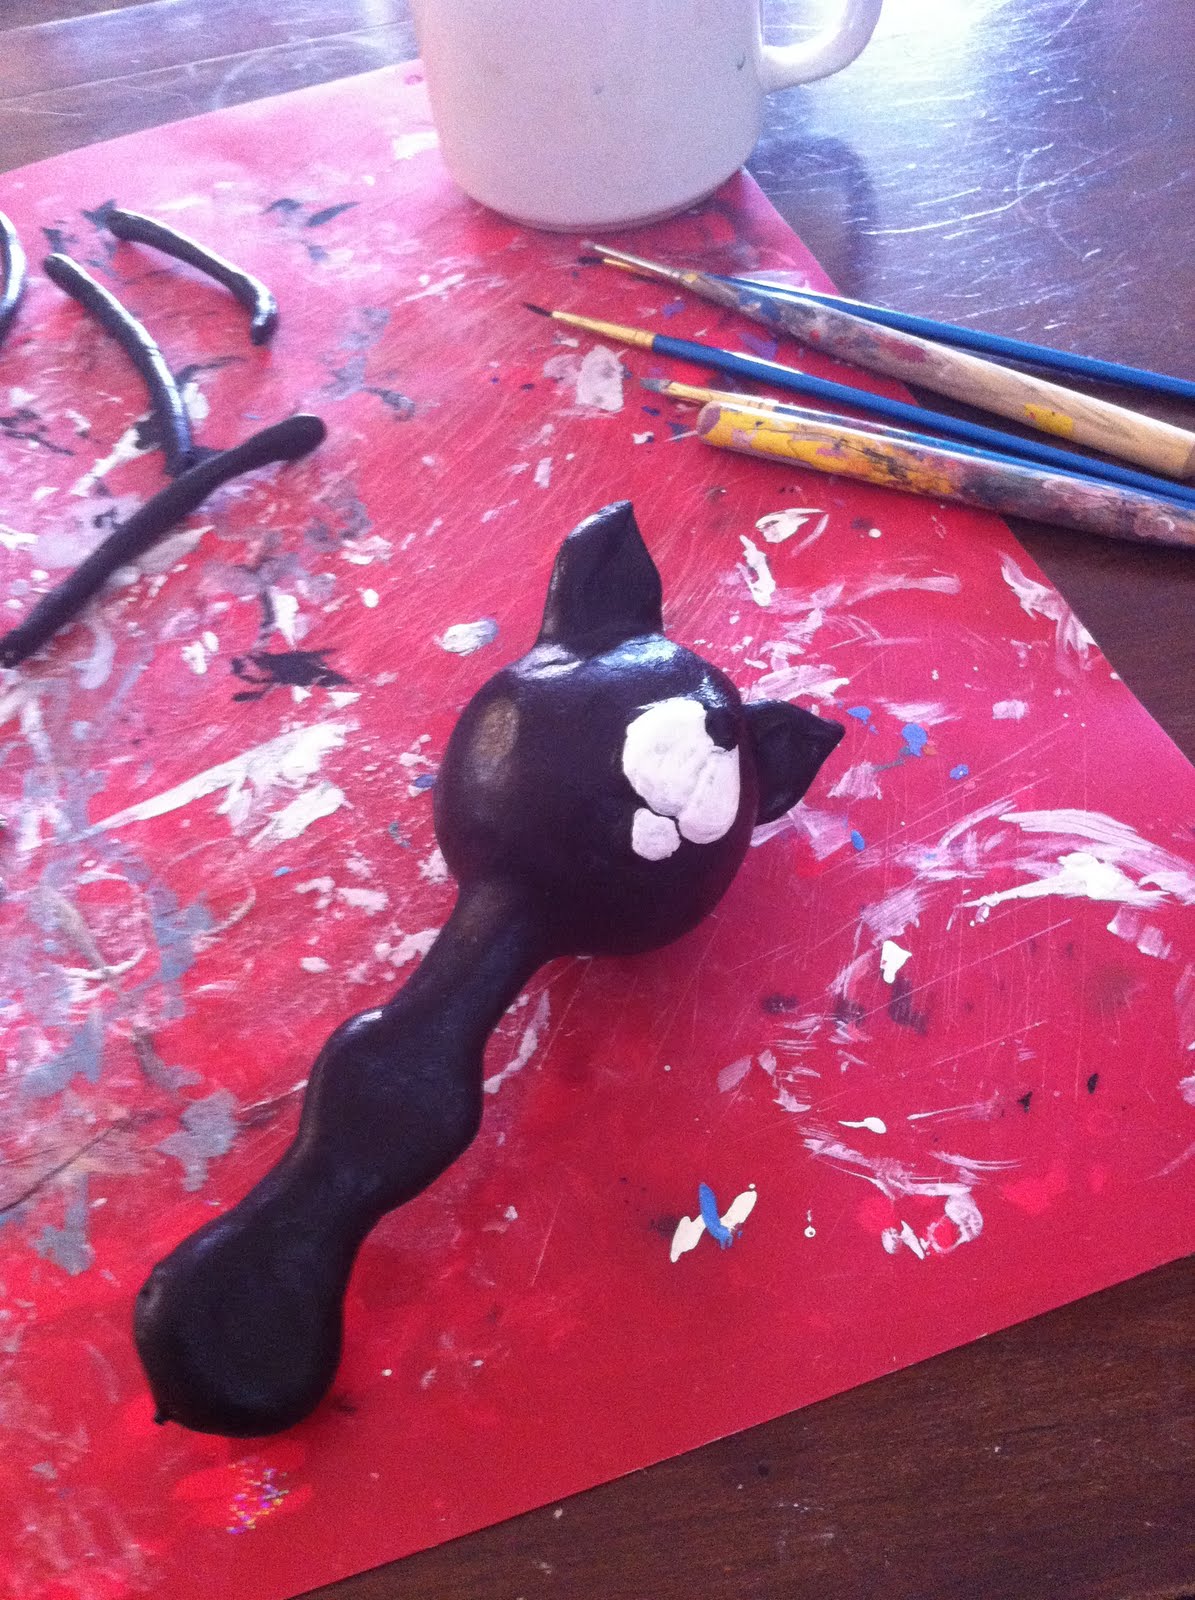
19. While your doll's arms and legs are baking, determine whether or not you want your doll to have kitty features, puppy features, doll features witht sculpted hair. If you do, this is the time add features to your doll's head.You have full creative control here...Play around with it. The best thing about this step is that wet paperclay can easily be added to dried paperclay...and vice versa. If you don't like what you see, remove the wet paperclay and start again.

20. Once your doll parts are dry, it's time to assemble them. (For this doll, I waited until after the parts were painted before I assembled the doll. Sometimes this is best, especially with dark, contrasting paint!) First, you'll need to cut your pins so that they each fit inside the doll body. It is safe to cut about half of each pin off. Next, thread a pin from through the holes in each limb, and then secure the limb to the body with the pin. Use a drop of superglue inside the body holes, and then add a bit of paperclay to really secure the pin inside the hole. Make sure the limb has a little movement on its post. You can cut off the excess wire off of the body in this step as well. Once you have completed this step, place your assembled doll body into the oven for 2-3 minutes to dry, longer if you have added some hair and features.


21. Congratulations! You now have a blank doll body to paint, detail, dress, and embellish! I typically sew clothes onto my dolls, but you can certainly glue fabric, paper, beads, or any other findings that may interest you! I use a pencil to draw in facial features, and paint pens to design the face and small details.


I hope you have enjoyed my tutorial on making a doll similar to the one pictured above. Please feel free to ask questions and leave comments! I'd love to see your creations as well! Cheers!