Pages

Sunday, April 28, 2013

Meet our Design Team

Meet our New Design Team
Terri Sproul - Team Leader

Terri Sproul is the force behind a fun paint called “Terri Sproul Mixers” from Sakura Hobby Craft and of a DVD called "MasquePen Magic" to see more of her video check out her Youtube Channel at http://www.youtube.com/terrisproul and a Tuesday Night Live stream. http://www.linqto.com/rooms/terrisproul
She is a diverse and experienced designer, design team leader  and instructor for multiple companies in the paper craft world including “ Robin Nest” “Creative Paperclay®”, “Sakura Hobby Craft” and Amazing Mold Putty ” to name a few.  Terri and her husband Marc have the pleasure of living in San Diego County On top Of Palomar Mountain. She has received a Bachelor of Scrapbooking Arts from Creating Keepsakes and Bachelor of Scrapbooking Education from EK Success. Terri’s passion is teaching fellow Scrapbooker’s and Stamper’s new techniques and to think ‘out of the box’ and ‘off the Page.’  Visit her website and blog to see all the exciting stuff she does at http://www.terrisproul.com – link to blog is also there.  

Rachel Whetzel
I specialize in creativity and mixed media art through thrifting, up-cycling, re-purposing and new design.. I am the owner of A Year in the Life of an Art Journal and Monday Mugshots! I am also MADLY in love with Creative Paperclay® . I am: Thrift junkie. Free Spirit. Believer. Artist. Photographer. Mom to boys. Rust Lover. Worm Farmer. Blogger. Creative Soul. Rule Bender. Spider Saver. Coffee Drinker. Cream Lover. Chook Farmer. Goat Milker. Sailor Mouth. Music Listener. Phone Talker. Garden Grower. Beek. Mess Maker. Risk Taker. Chewy Mom. Gritty Gramma. Good Intender.
You can find me on line
BLOG:
http://MineToThine.com
FACEBOOK:
http://Facebook.com/RachelWhetzel


Jessica Baker

Hi, I am Jessica Baker a/k/a Jess B. I am a mother of 3, a wife and die hard crafter living in the Midwest. My styles have evolved throughout the years from flat to mixed media to 3D Altered designs. I love getting my hands dirty; touching all kinds of paints and textures. Steampunk has bolted gears into my heart. I dream, daydream, and vision many designs that I will create. Most times I am working on three projects at one sitting. I wish I could say that I have an organized craft room but I would be lying. I love challenges and discovering new materials. This product is PHENOMENAL and so user friendly. So excited to be apart of the Creative Paperclay™ design team for a second term. Take this journey with me, let's think outside the box and become a fan of Creative Paperclay ™products too.

 
Diana Gonzalez
Diana Gonzalez is a self taught artist, writer, and maker of things. She has been writing since childhood, and loves to paint and make things. She is an avid knitter, and crocheter, and spins her own yarn which she sells on etsy. Her art and poems can be found both on her blog and on etsy.

Dawn
 Hey...Do you know what time it is?  It's time to get artsy fartsy...along with the other designers for Creative Paperclay Products. I'm ready to take crafting to another dimension...the third dimension!  After years of paper crafting, I am eager to break out of flat...and start to design and create using this three dimensional products.  I loved using clay in college and I'm so ready to roll up my sleeves and get some dirt under my fingernails.  Oh, how I love the process of making something!  Come follow me on my blog: "Sunnyside Up" and you just might be amused! 
 Barbara Rankin
 My name is Barbara Rankin, and I am so excited to be a part of the Creative Paperclay Design Team. I have been a crafter since early childhood... always making things. After pursuing many different artistic endeavors, such as sewing, needlework, and Pergamano (embossing on parchment), I found my way into rubber stamping and graduated into becoming a self-taught, mixed-media artist. I have taught classes at my local scrapbook store, as well as teaching the members of my local stamp club. I have also been a guest instructor at another out-of-state stamp club on several occasions. I love making cards, tags, ATCs (Artist Trading Cards), as well as making and altering books and mini albums. My style is usually vintage or shabby chic, with a sprinkling of steampunk whenever possible. I am also currently a design team member for The Robin's Nest and Sin City Scraps. I have been published in Altered Arts Magazine, as well as in a book "Make it in Minutes: Mini Books". I was also recently published in the Just Steampunk Volume II magazine. I have a wonderful, supportive husband of thirty years, and we share our home with our two cute little Yorkie fur babies, Chloe and Zoe.
Lynda Jeffs
My name is Lynda Jeffs, owner and designer at Memories in Tyme! I have been creating for over 22 years now, my first project was my daughter's birth announcements! 7 years later - I moved home to Utah where I found out about scrapbooking. I went to 2 classes with my sister, re-organized all of my stuff and have been scrapbooking now for 15 years. I love to do all types of projects from 12 x 12 layouts to cards to altered projects... I love to do it all!
I have three awesome "kids", my sons are 27 and 20, and my daughter is 22! I have a wonderful husband named Del - who truly was my knight in shining armor and came in my life when I really needed him the most. He was taken out of work 10 years ago, so I've lived in the current economy and learned a lot along the way! Del and I moved to Sacramento, California area in June, 2012 to put him through school...now that we are done with that part - the rebuild process begins!

 Linda Hess
In 1994 I purchased my first pieces of polymer clay jewelry. The artist told me about the material and how easy it was to work with. I immediately purchased some of the clay at my local craft store and went home to experiment. From that experimentation an addiction to polymer clay was born!

Tired of "cookie cutter" looking arts & crafts, I decided to create pieces that were unique and all handmade. Similar pieces each have their own personality and style. Designs range from jewelry to wearable art to home decor to scrapbooking & cards. I do LOVE a challenge!

Through the years I developed my style and began to teach children & adults. Passing along the love of this medium is one of the best jobs on this Earth!

In the past few years the title of designer has been added to my resume. Designs and tutorials can be found in magazines, books, and online. Working with many different companies and products has transformed my CRAFT into ART.
  Thanks for stopping by and we hope you continue to stop by and see our creations. 

Friday, April 26, 2013

DawnMercedes' April Tip

Here's my quick tip for today.  

Nails...

Cut them off... Super quick, right?


I have found that if I keep my fingernails trimmed, I am better able to manipulate my Creative Paperclay © without getting "fingernail" marks embedded in my wet paperclay!  So, today, I trimmed my nails.  Once I get caught up on housework and my craft work, I am going to break out some Creative Paperclay ©.  

Be sure to scroll through this blog. There are so many fabulous craft ideas and tutorials that you will be eager to try.  I know I do!!

Thanks for stopping by!
Dawn Mercedes, of Sunnyside Up

Thursday, April 18, 2013

Jess B's - Mini Wedding Dress

Hello Everyone

someone posted this on facebook yesterday
which inspired me to make

Mini Wedding Dress
I am in the middle of completing
custom wedding invitations for a client this weekend
so it was only suiting to create this


This wedding dress has a vintage feel to it and my flowers are not the best

 
The seems could have been smoother but since
I have long acrylic nails my knuckles were the next best thing
sports length next trip to nail tech. lol
Bake Creative Paperclay® according to instruction on the
package

 Once dried I kept it in its natural color and added
Plaid Folk Art Hologram acrylic paint and pearls
 
you can catch a glimpse of shimmer
 
 Thanks for stopping by


Saturday, April 13, 2013

Brenda's April Quick Tip

Hi, Brenda here from Creativity is a State of Mind...did you know that you can bake your paperclay project?  I had to get 22 of those dart pins done last month in a matter of a couple of days.  I cut my paperclay "ribbons" out and then laid them on some tin foil on a baking sheet.  I put them in my oven at 325 for about 3 minutes and flipped them over and baked them for another 3 minutes.  I guess you would have to play with the projects you have because depending on the thickness of the clay or project it could take longer or shorter.  Then I laid them on some newspaper to get any leftover moisture out and within 20 minutes I was able to start painting them.  This was I didn't have to wait 24 hours or so.  Hope you find this quick tip useful.  Until next time, have a great day and God Bless.

Friday, April 12, 2013

Creative Paperclay ® Card Embellishments

Today, I'd like to show you how you can incorporate Creative Paperclay ® into your card making (and scrapping) projects!  It's a great way to put a little of your own handicraft into your designs.


Supplies:
small plastic rolling pin
plastic knife (or cookie cutters for the faint of heart)
stamps for texture
sponge daubers, Qtips
colored ink pads
adhesive (I found that UHU Twist & Glue was very effective.)


Directions:
1.  Roll out your Creative Paperclay fairly thinly.
2. Use a plastic knife or sharp instrument to cut out the desired shape. 
You can do it!! Just go with the flow!
(Or, resort to cookie cutters if you need a little reassurance.)
3.  Press your stamp into the clay to create texture.
4. Let dry. Flipping image over after a time to ensure even drying.
5. Lightly sand if needed. Then use sponge daubers to add color to your piece.
If you want to add color inside the impression, you may want to use a Qtip.
6.  Adhere your finished piece to your paper crafting project.
You may want to add a few embellies as well. I chose to add a few black rhinestones 
to my hearts in the first project.


I hope that you are inspired to use this technique
on your own cards and scrapbook pages very soon!
Thanks for stopping by!

Dawn Mercedes, of Sunnyside Up


Friday, April 5, 2013

Garden Gnome by Rachel Whetzel


Hello! It's Rachel here! Today, I'm going to show you how I made this little garden gnome using Creative Paperclay® modeling material. I'm seriously excited about SPRING!! So when I got to thinking about something Springish to make, I figured gnomes fit the bill!!

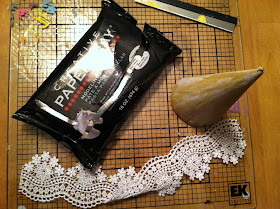
WHAT YOU WILL NEED
I started by creating the same core technique that I used in last month's post. The reason I'm sharing this technique again, is because I want you to see how truly EASY
Once I had my core, I covered my core in Creative Paperclay. I wet it all a little bit, to help the clay stick, and spread it as evenly as I could around the outside. Not too thin! I want to sand it later.
Once everything was dry, I knew I wanted to make a hat for my guy, so I screwed a screw into the whole deal, to anchor my second layer of newspaper. Now, If I had planned a little better, I could have skipped the nail, and just made my core in the right shape. This way turned out fine, though.
 Now, I wrap my newspaper around the screw and tape it in the general shape I'm trying to achieve. (in this case, a pointy hat)
You can see that there was some cracking in my clay when it dried, so I'll fill that with a little wet clay.
 Once again, I tried to get my clay as smooth as I could, but I also don't worry about EVERY little lump. We can sand those out later.
before sandpaper
Once everything is dry again, I sand the whole thing until it's smooth. I also made sure to keep the bottom flat, so my little guy doesn't turn into a weeble wobble!
after sandpaper
Next. I painted the little guy!
Once I was done with that, I added some shading and his little face. I finished him with some matte sealant. I don't think he'd be fit to sit outside, but he's definitely ready to cheer me up on the shelf inside with my house plants! 
I think he needs a name... any ideas? If you create something inspired by my project, please leave a comment with a link here, so I can come and visit to see! I would love for you to visit me at my "house" too!! Thank you so much for reading!!  ~rachel

Thursday, April 4, 2013

Jess B's - Tropical Under the Sea

Hello 
Hope everyone enjoyed their
weekend!
As if summer couldn't get here any sooner
Nautical and Beach themed
decor is fast approaching

Gingham and flip flops
sands and pools 
and tans....
I also collect cookie tins
wonderful storage, home decor, treasure chest
Wish I had different embellies
but I have to work with what I have


                           rolled outCreative Paper Clay®           used Wilton Cake tools to add
                                                                                             texture and patterns
I embedded pearls and baked Creative Paper Clay® with tin top according to the 
package instructions
 
 Baked added gesso
sprayed with Dylusion, Adironack, Lindsay's Stamp Gang Sprays


sand textured molding paste
Pictures don't give it's true brilliance and vibrance

INGREDIENTS
Creative Paperclay®
Cookie tin
Graphics 45 - Tropical Travelogue
Gesso
Adirondack Color washes, dylusions, Lindsay's Stamp Gang
TH Distress Inks

Wilton - Candy mold and carving tools
Pearls from own stash
Bling - Recollections

Design Team Call
APRIL 10th
Creative Paper Clay® is looking for a few awesome Mixed Media Artists to showcase Creative Paperclay® Paperclay® and Delight Products!! If you LOVE play with Paperclay and find the idea of making your own Embellishments and Sculptures show us what you can do!!

Good Luck Everyone!