Last month I showed you how to get the look of bone & teeth with Creative Paperclay® modeling material, this month I'm going to show you how to make a skull model. You can add as much or as little detail as you like - even if you don't do detailed sculpting, it will still make a fun Halloween decoration. If you follow along with this post, you can create the top part of the skull this time, then have time for it to dry before making the lower portion of the skull and the jaw.
For this project you will need:
Creative Paperclay® modeling material
A small balloon
newsprint paper or similar
white glue
rolling pin
self adhesive plastic wrap such as Cling-Wrap
reference photos or drawings
masking tape
I'll be using lots of photos as opposed to descriptions, because I think for this project it is easier to following along with sculpting pictures - scroll along and follow along :)
Sculpting pointers: work on both sides of the skull at once, check for symmetry by looking at the top and bottom of the piece, and looking at it in a mirror. Step back from the work frequently to analyze what needs to be adjusted.
First make the form for the head - start by blowing up the balloon and tying it off. Tear off a strip of newsprint about an inch wide, then tear the strip into pieces an inch or two long. Use a mixture of white glue thinned with water to dip the strips in and apply them to the balloon. Cover the entire balloon except the knot. Allow the paper to dry, then add another layer and let that dry.
When the paper is dry, draw a curved line that would "finish" the rounded circle from the top of the balloon, then draw a line up the center of the balloon from knot to top, and a line dividing the circle in half horizontally, as shown.
Now start drawing dashes to extend the horizontal line to the sides, and extend the base of the circle. Do a few dashes on each side of the balloon, then go back and forth while judging the distance from top and bottom of the balloon- this will give a more accurate line than trying to draw each line with a single stroke all the way around.
draw a vertical center line on the back of the balloon as well.
Wad up some newsprint to a bun shape and tape to the back of the skull as shown.

Add some tape to the sides.
Fill in the gaps with small wads of paper and tape to smooth.
This is what it should look like from the top of the balloon/head
sketch in the features - draw eye sockets slightly below the center of the circle, make an upside down heart shape for the nose at the bottom of the circle, then mark a line about half-way between the bottom of the nose and the bottom of the balloon. Extend the line horizontally until each edge is approximately in line with the center of the eye socket above it, then draw upwards to connect the edges to the circle, making the upper teeth area.
Cover the balloon with plastic wrap.
Roll paperclay out to a circle large enough to cover the back of the head and about 1/16" thick
place it on the back of the head, sculpt two folds on the bottom into bumps about marble size, remove some clay from between these lumps as shown.
Pinch off extra clay and smooth it down.

Roll out another circle for the front, cut one edge in a straight line, the apply it to the head form, aligning it to the tooth line on the front.
remove a little bit of clay from each side until you reached the guidelines on the form.
remove a little bit of clay from where you think the nose is, remove little pieces at a time until you've uncovered the guidelines.
Continue removing clay in this manner until you've uncovered the guidelines drawn on the form.
Pinch off the excess clay and smooth onto the form onto the back section of clay.
Add a flattened rope of clay over the eye area and smooth down to create the brow line.
Make a thick, curved "C" shape for each side and apply to the sides of eye sockets.
Smooth them onto the skull and around outer edges to create the outer area of the eye sockets and part of the cheekbones, as shown.
(don't try to use this for the entire cheek bone - we will be adding more to the cheeks and sides of the skull in the next part of this tutorial)

Add a small roll of clay at the top of each eye socket and smooth towards the back of the head.
Make a thin triangle of clay as shown
Attach the top of the triangle to the section between the eye sockets, fold it down along the sides and attach over the nose area.
Looking at your reference material, trim the front of the nose along the sides as shown. Don't worry about getting it perfectly sculpted at this point, since it may get pushed around a bit in the next sculpting stages.
The last step in this part is to create the dental arch and teeth.
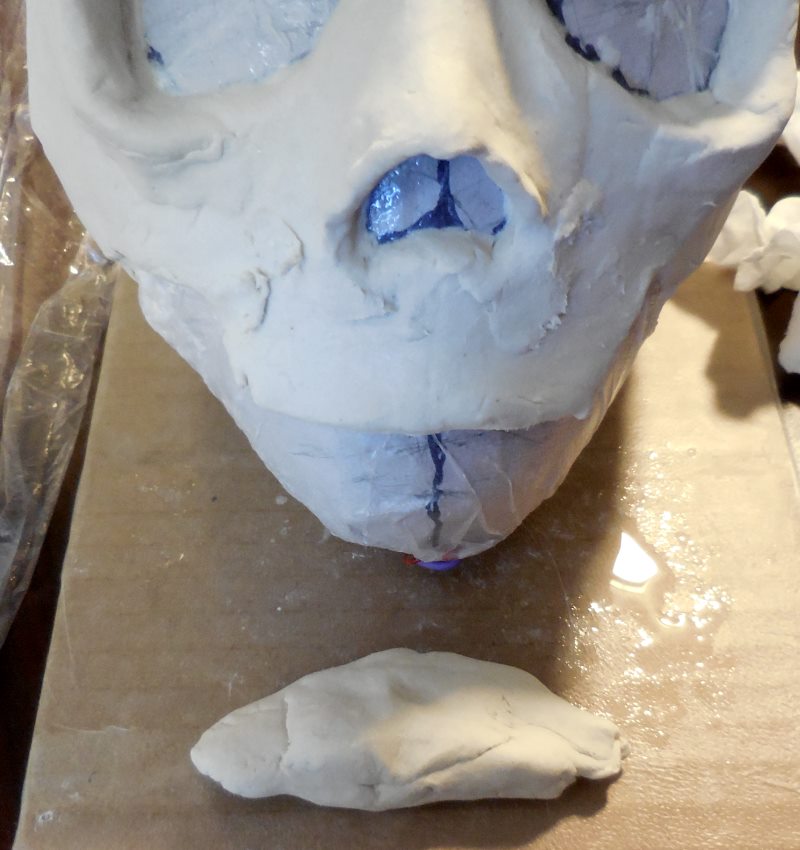
Make another triangle shape - this one should be thick on the long edge and thin towards the sides and point of the triangle.
Gently loosen and lift the edge of clay at the teeth line. Insert the triangle wedge up underneath the clay top point first.
Push the clay down underneath the nose and pinch together at the center. Add more clay under the arch as needed to support the clay, then smooth the clay as shown to create the top/front of the palate.
Press your fingers along the edge of the clay to thin it and start defining the bone ridges for the teeth. Trim and smooth the sides of clay so the sides are in line with the centers of your eye sockets, as you drew out on the head form.
When you are done with the general shaping of the dental arch, cut a strip of paper, align on side with the side of the arch, wrap it to the other side and fold the edge to mark it and create an accurate measurement of the arch. Trim the strip of paper to this measurement.
Fold paper in half and draw out the teeth - from the fold back, one front incisor, one secondary incisor, "canine tooth", two pre-molars, and three molars.
Cut out the teeth pattern and tap it onto the clay lightly to hold it in place while you mark the edges with a sculpting tool (hint - a round toothpick works well for marking and sculpting!)
Remove the pattern and begin sculpting the teeth. Lightly scrape a layer of clay from the front to make sure the teeth will look like they are going into the bone.
sculpt the individual teeth by removing some of the clay between each one, then rounding and shaping the sides and top. Sculpt the "gum line" by sculpting the individual teeth - look at the reference material and in the mirror to see how the gum line varies and isn't a straight line all the way across.
If you haven't already done so, decide what kind of character your skull is representative of - did this guy have a tough life? maybe you want to make him have crooked teeth, "buck teeth", vampire teeth? Sculpt accordingly.
When you've finished, smooth out the model, brush some water over the teeth section to smooth them (be careful not to get the clay too wet and lose some sculpting)
Ta-da! You've finished this lesson! Let the clay dry completely.
Thanks for joining me here again! As always, play, experiment, and have fun!


 As
it cools down it will become white again. At this point, you can remove
it from the stamp. If you don't like the design, just reheat it and
start again.
As
it cools down it will become white again. At this point, you can remove
it from the stamp. If you don't like the design, just reheat it and
start again.