Pages

Wednesday, February 29, 2012

A Wonderful Art Book made with Creative Paperclay® !

I absolutely love the way this project turned out! I’ve seen much larger books made for art journaling and for art in general and wanted to try something on my own. As just about everyone knows who reads my blog (maybe not the new followers) I love Creative Paperclay®! This is such a versatile clay and works for many different projects.

To begin with I rolled out my clay with a fondant roller and pressed in a design stamp:

Paperclay  book 005          Paperclay  book 006

I used  a clay cutter to cut the back and front out for the clay book and let the clay dry:

Paperclay  book 003          Paperclay  book 004

I made the holes in the book cover while the clay was still wet. Once the clay was dry, I painted the front and back with Sakura Hobby Craft-Crystal Lacquer mixed with the Terri Sproul Mixer, Tanzanite. While that color was still damp I added the Crystal Lacquer with the Terri Sproul Mixer, Bronze, just highlighting but not completely covering the Tanzanite.

Paperclay  book 009

When this was dry I painted the inside of the book cover with the Tanzanite. I then cut some Mixed Media paper to fit the book (3”X31/2”) and used an awl to make the holes. I took the papers and held them pressed together with small clamps while I brushed some Crystal Lacquer on the edge to act as binding.

Paperclay  book 010

Once everything was all dry I used some ribbon to hold everything together and attached a little butterfly to the front. Tell me what you think:

Paperclay  book 015               Paperclay  book 014

Paperclay  book 016                       Paperclay  book 017

Isn’t this just so neat? By using the Mixed Media Paper (400#) you can write, paint, decoupage, etc. and just about anything that you want to use and it won’t bleed through. I think this will be most fun to work in.

Barbara

Monday, February 27, 2012

Our Refuge


My favorite way to use Creative Paperclay® modeling material is with a mold - and my favorite things to mold come from my jewelry chest. I have a beautiful, antique carved Victorian cross and thought it would make a fantastic centerpiece for a card. I made the mold using Amazing Mold Putty and used the Delight™ air dry modeling compound to cast it. After it was dry, I painted the cross with Creative Inspirations Paint in Sea Foam, which really went great with my papers. I think this card is one of those that would be lovely framed.


Patterned Papers: Bo Bunny
Cardstock: Worldwin Papers
Dies: Cheery Lynn (Victorian Romance Flourish; Border Carnivale; Cherry Blossoms)
Creative Inspirations Paint: Sea Foam
Stamps: Verve
Delight™ Air Drying Modeling Compound
Amazing Mold Putty

Saturday, February 25, 2012

Paper Blooms with Paperclay®


Hi Everyone, Lori here and I so excited to share a great new tutorial with you using Paperclay®.  I'm going to show you how easy it is to create these elegant flower/blooms.


First step is to gather the supplies above


Roll out a thin sheet of Paperclay® and cut out your flower petal.  This is actually a die cut used for making sugar paste flowers and you can find them in many larger craft stores.

Layer two petals and press down with ball tool.  This will make the flower cup inward.


Pinch your third petal inward and glue into the center of your flower.


Flower before coloring


Spray your flower with base coat of glimmer mist.


Take a paint brush and sprinkle wet flower with fairy dust


Spray again with glimmer mist to make the fairy dust run and blend.


Let dry and you have a beautiful finished flower to add to your projects.


Hugs


Thursday, February 23, 2012

Switch Plate Cover Using Articus Studio™


For this project I needed to use a mold from Articus Studio - I chose the Frozen Charlotte Mold.

Materials:
Creative Paperclay® Modeling Materials
Articus Studio™
Stamp
Fondant Roller
Switch Plate Cover
Terri Sproul's Mixers

 Roll out the clay and stamp the clay (I used a Close to my Heart Daisy Stamp)
 Trim the clay to fit around the switch plate
 Form the clay around the switch plate 
 Add the molded dolls to the switch plate and paint (I used Terri Sproul's Mixers)
Finished Switch Plate 

Tuesday, February 21, 2012

Creative Paperclay® and Articus Studio Molds!

This month I had the opportunity to use Creative Paperclay® with an Articus Studio™ mold.  I choose to use the Frozen Charlotte Art Doll Mold  as I love adding them in my art. Finding them can be a challenge, once you find one they can be pretty expensive.  If you have priced a Frozen Charlotte lately you would know what I mean. So, now I am able to make them as needed with Creative Paperclay® for my projects.
First, take a ball of Creative Paperclay® and press into the mold. It is very important to work the areas that have deeper depressions, like the feet and face.  Once you have filled the mold then set aside to dry, at least overnight (12-24 hours) in the mold, depending on humidity.  
Once released if they are cool to the touch they are still damp. Let them set another 12-24 hours to completely dry.
When the Frozen Charlotte is dry, prepare for use.  With an emery board or small file clean up the edges of the doll.  Then with a bit of ink add a little color to age it. Seal it, this one was sealed with USArtQuest PPA Matte.  Sealing product depends on the project and the effect you are after.
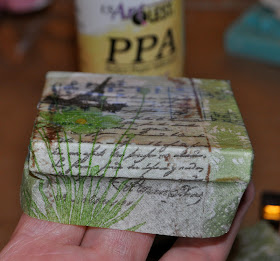
Recently I read in one of the Stampington magazines about a technique using paper napkins in mixed media projects.  I saw this beautiful Kleenex packet with the Eiffel Tower and thought "wonder if they would work," as they say, the rest is history.
Supplies:
USArt Quest PPA Matte
Viva Las Vegastamps! "I Love Paris"
Stewart Superior Memories Ink - Black
Small Canvas- 2 1/2" X 2 1/2"
Old sheet music
Printed Kleenex
Heart Cut from Creative Paperclay®
Lace
Craft Paint - Burgundy
Paint brush
Separate the tissue layers of the Kleenex or napkin.  There are usually three layers of tissue. The first is easy to separate. Getting the second and third apart can be tricky.  Be sure to separate. If left in tack the extra layer of tissue could cause problems when adhering. 
Prepare canvas with USArtQuest PPA Matte adhesive. The first layer of paper on the canvas is old sheet music adhered with USArt Quest PPA Matte. Be sure to spread the PPA it evenly on the top and sides of the canvas. Let it set. Then spread a second layer of USArt Quest PPA Matte.
Carefully lay your tissue on the surface of your canvas. Once the tissue makes contact with the glue it is in place, trying to move the tissue will rip it. Make nice crisp corners, you may need additional adhesive. Carefully paint the PPA Matte over the surface of the tissue. Let it set to dry.

While the canvas is setting cut lace (3 1/4"), long enough to wrap around the back.  Stamp Viva Las Vegastamps! sentiment "I Love Paris in the Springtime!"  Earlier I had cut small hearts from Creative Paperclay®, paint one burgundy, any craft paint will do and let dry.  
Once the adhesive is barely tacky,  cover the canvas with Sakura Crystal Lacquer, attach the lace and "I Love Paris." Also, the Creative Paperclay® Frozen Charlotte and heart.  Cover the heart with Sakura Crystal Lacquer.  Set aside to dry overnight!
Finished it is a perfect little gift for that person that loves Paris!!!

Hope you enjoyed this project, please visit my blog HERE for more inspiration! 
Until my next post Happy Creating! 
Lyneen

Sunday, February 19, 2012

I'm A Little Teapot Mini Canvas

This month the Creative Paperclay® design team paired up with Articus Studio and I have the CUTEST thing to share with you!!!!!

I chose the Dollie Dangles Flexible Art Mold, which makes six faces, three sets of feet /shoes, one set of hands, one purse and one crown. These pieces are the perfect size for making ATC’s, ornaments or adding to journal pages or cards. The mold even comes with a handy little chart that shows you approximately how much clay is needed for each space on the mold.


I am downsizing so I decided to take all of my wood mounted rubber stamps off of the wood to save on space. As soon as I picked up my teapot stamp, the song "I'm A Little Teapot" popped into my head. I had just received my Articus Mold in the mail and I immediately envisioned the little hands and head attached to the teapot!

I molded all of the pieces I needed out of Creative Paperclay® air dry modeling material and painted them with acrylic craft paint. I also created a teapot out of Creative Paperclay® by pressing a rubber stamp into rolled out clay. I added color to the canvas using Distress Ink, added embellishments and attached them to a 3 X 3 canvas with a flat screw and bolt. I left the bolt a little bit loose so the teapot can still be turned. I attached her legs and sealed the text with natural bee's wax. You can watch the full video tutorial below :D


Isn’t she soooooooooooo cute?! I plan to make several more of these because I just LOVE the way she turned out.

You can see more of my work by visiting my blog.

ENJOY!!!