Pages

Friday, November 30, 2012

A Cute Little Creative Paperclay® Santa Ornament or Tag


I’m getting in the Christmas spirit now that Thanksgiving is over and this project is just too easy. I’ve got a couple of Santa head molds and thought I would put them to use. I started out by pressing my Creative Paperclay® into the molds and once it dried popping it out.

2023-01-12 11.35.24 

I then painted the Santas…………………..

2023-01-12 18.22.15

Cut out some snowflakes out of different papers on my Cricut machine, put them together and voila’, here you have some wonderful ornaments or tags. You can use these for so many different things.

2023-01-12 19.50.49   2023-01-12 19.51.57   2023-01-12 19.54.29

2023-01-12 19.52.31

See what I mean? So many different things that you could use these on. Easy peasy to make and they look really nice too, I think, what about you? You can purchase Creative Paperclay® at Michaels, Hobby Lobby, or directly from the company. Pick some up and try it out today while you’re working on those Christmas projects, you’ll be happy that you did.

Barbara

Saturday, November 24, 2012

Headwrap Charms


Good morning and welcome to another Creative Paperclay® post.  Today I am showing you a follow up from two weeks ago when I created some paperclay charms from "non" molds.  If you don't know what I am talking about go here.

So I started with one of the charms I created while it was still a bit wet.
When the clay is not yet hardened all the way
I took the original charm 
and laid it onto the clay and gently pressed
it into the clay 
it gives the clay some definition 
see. 
After the clay piece was completely hard
I painted it with Metallic Pure Gold
Acrylic paint. 
Then I used the Shimmering Garnet from 
Terri Sproul's Mixers and you can get 
those here.  Not only does this give the
crown a glitzy effect, but it also seals the
piece when you mix it with the 3D 
Crystal Lacquer.
I wanted to add some glitz to my crown and remembered a purchase 
I recently made from my favorite "Dollar Tree". 
In the health and beauty aisle I came across these
nail art bottles.  I knew I needed them for
my altered art projects and they came in
handy for this project. 
I added some rhinestones and these itty bitty
pink balls from the nail art with the 3D Crystal Lacquer 
and covered them again with it to seal it. 
Then I took an unfinished crown, (yes I
usually make more than 1 piece at a time
in case of mishaps) and traced it onto a scrap
of soft faux leather. 
I cut it out just a bit bigger than the piece itself. 
I also bought these elastic headwraps at 
the Dollar Tree that day, (but not knowing
what I would be doing with them).
I might have a buying problem lol.
I added some glue to the backside of the crown
and glued a part of the headwrap to it.
Then I glued the faux leather piece on top
of the elastic ribbon onto the crown. 
and now I have a gorgeous headwrap charm. 
Close up (it's hard to take a picture of yourself)
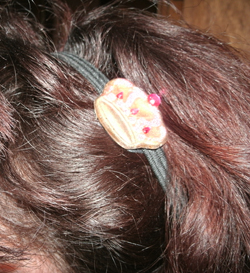
So...what do you think?  I think I might be making some of these for my granddaughter for Christmas.  

Thank you for joining me again today and I hope I've inspired you to use some Creative Paperclay® and make your own hairwrap charms.  
As always, have a great day and God Bless.

Friday, November 23, 2012

DawnMercedes' November Tip!


Welcome back to the Creative Paperclay ®!
Today I have a few tips about how to dry your larger


Earlier this month, I showed you a lovely cornucopia.
In order to keep this shape while my material was drying, I used thick, brown packaging
paper as some what of an armature.  I balled it up somewhat and used it to hold up the opening, as well as the "tail" of the cornucopia.  

Additionally,
I put plastic wrap underneath my piece  for the first two days of drying.
This way, the paper plate would not draw out the moisture.
Another good idea is to place the entire piece in a gallon bag or plastic shopping bag. 
This way, it will slowly dry out and reduce the chances of cracking.
After 2 days, I took out my formed piece and let it try without the plastic covering or the thick brown packing papers.

For larger pieces, you will want a slower, uniform drying time.

Here's another tip for that packing paper...
I used it to rough up the wet modeling material.
This gave interest and texture to my cornucopia.

In cased you missed the finished project, here it is:


I hope your are enjoying a peaceful...and well fed Thanksgiving weekend!
See you next month!


Thursday, November 22, 2012

Anie Bella's November Tip

If you want make something with your Creative Paperclay that has a curve, rounded or bowl shape and your not sure how to do it this is the tip for you.  All you need is your paperclay and something that has a similar shape to the one that you are trying to achieve.  Simply roll out your Creative Paperclay to your desired thickness and lay it over your surface and let it dry.  If you wanted to make something bowl shaped you would lay it over the bowl to dry.  After it is dry your paperclay will retain it's shape.

Monday, November 19, 2012

First tip Nov.

HI
(I'm a bit early but I'm leaving Tue. for my trip.)
Tip for Nov
Being on the Design team we need to do tips also

Here we go If you go the the  Creative Paperclay® Company
There is allot of project to make.
There is gals that are very advanced clay workers.

http://creativepaperclay.blogspot.com
Here is my tip.
I have not been doing allot of  projects. There for I do not have allot of tips
My tips 
When you  are painting,thin the paint with water if you are using acrylic
and smooth the edges if you missed some rough spots
If using Oil use turpentine. 

 This the rough edge
 If the edge is not too much I would use a paint brush and paint ,
This edge is too much so I use the edge of a sponge

Or here is how to use a craft sanding block

I hope this will help some one.Maybe some one that is just starting.
Some time the more experienced forget about the new one .Any way hope it helps


This is a peek at Dec new design team project.
 Remember I like fake food.

Friday, November 16, 2012

Are you working on Christmas Decorations yet?


I would like to show you a project that I completed, using Creative Paperclay® and a few other things. I started out with this:

2003-01-10 13.38.38

I chose the birdhouse on the right to work with. I rolled out some paperclay into the form of a snake and cut equal portions of it. I then rolled the pieces into a ball, flattened them and applied them onto the roof of the birdhouse as shingles. I did use glue underneath to hold the shingles in place. I used another snake of clay to go around the bottom of the birdhouse to make it look like snow. I then painted the shingles with white paint and then with Extreme Glitter. I did the same with the clay on the bottom of the house. I then painted the main part of the house blue and the perch gold. I added some Petaloo flowers and some gifts and look how it turned out:

2003-01-02 09.46.49              2003-01-02 09.45.37

These pictures really don’t do justice to the roof. The shingles that were made out of Creative Paperclay just glittered. It looked like it should be in a Winter Wonderland. What do you folks think? I love to hear your comments and it would be so nice to hear from you.         2003-01-02 08.12.07 Ha, I found a pic before the extras were added. Don’t these shingles look neat?

Barbara

Rachel Whetzel's November Tip

Sand paper is your FRIEND!! It can make a huge difference in fine details, and helping you to create a sharp edge. I use grit ranging from 120 to 380 grit. The higher the number, the more fine your sandpaper is. I use 120 to sand edges and shape, and then I follow behind that with a fine grit to remove sanding lines.
As you can see in the image above, sanding allowed me to sculpt in the "bones" of my bat wing, and then create a crisp edge that made the wing more realistic once it was painted. I also use this trick when sculpting clothing on my art dolls.
Crisp edges on Steampunk Goggles, Sharp corners on hats, Clean and Straight Trim on waistcoats.

Thursday, November 15, 2012

Jess B's Fall Jewlery

Hello Everyone
My name is Jess B. and excited to be a part of the new design team here at
 Creative Paperclay®
I can only say is this stuff is amazing!
Easy to work with and light as a feather.
Decided to make some fall jewelry
Although all autumn colors are
rich in reds, browns, and golds
I had to add my little twist of colors to the mix.

FALL JEWELRY


 This embossing press rocks
I  had extra Creative Paperclay® in my hands
so I just filled the rest for a future project

 I love that mine are not always smooth and clear details
but you can see the splits and missed filled parts - gives it character
 Although I did not take pictures
of all the painting that went into this project
 I encourage you to use any all paints and mixers your heart desires
Loving Terri Sproul's Mixers


INGREDIENTS
Lisa Pavelka Embossing Cutters - Ivy Leaf
Jaquard Lumiere Acrylic Paints - burnt orange, metallic rust, citrine
Chain - Joann's or Michael's

Thanks for stopping by
see you in a couples of weeks
enjoy your holiday

Give Thanks Everyday!

Jess B.

Monday, November 12, 2012

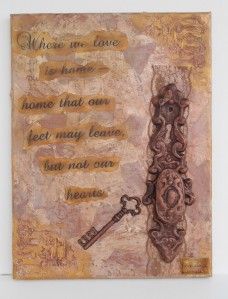
Where We Love Mixed Media Painting

Hey Everybody, It's Edie!
My husband's ship will be returning from an eight month deployment in the next few weeks and we will be having a party the night before homecoming for all of the spouses and family members. There will be snacks and goodies and door prizes. I have donated this painting and it will be given away as one of the door prizes. There *IS* a full video tutorial, but due to an editing NIGHTMARE, let me repeat... NIGHT. MARE, I have been unable to get the video processed in time to share it with you. I AM working on the problem and I will get the video added as soon as possible. Until then, please enjoy this written tutorial :)
Since I am creating a series of these 'HOME' paintings, the process for creating the background will be basically the same for all of them. I layered on torn sections of sheet music, book pages and scrapbook paper, painted the entire canvas with Titan Buff and blotted off the excess. I also aged the entire canvas with a wash of Van Dyke Brown and water.


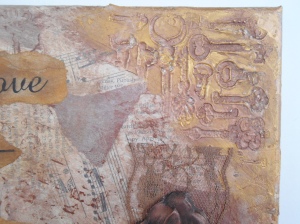
I applied modeling paste to the corners of the canvas and stamped into it with a key stamp. I then added Antique Copper paint to the same stamp and and added it in random places over the entire canvas. I aged the entire canvas with a wash of Van Dyke Brown and water, then I added some Pure Gold paint to the raised bits of the modeling paste debossed keys.


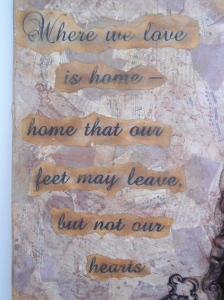
I printed out my text, aged it with Vintage Photo Distress ink and then painted the edges with Pure Gold acrylic craft paint then glued it on using Matte Medium. I painted a strip of lace with Antique Copper then with Pure Gold and attached it to the canvas with clear tacky glue.

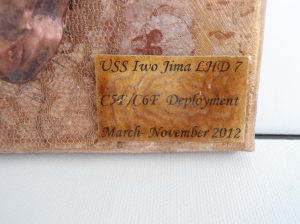
I printed out the ship and deployment information and attached it to chipboard to create a commemorative plaque for the painting. I aged the plaque with Vintage Photo Distress Ink then coated the entire thing with Glossy Accents. I hit it with the heat gun to create a rippled effect in the glue then once it was dry, I attached it to the painting with clear tacky glue.


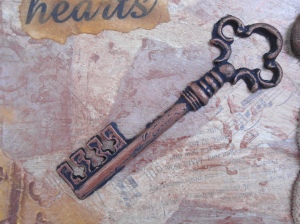
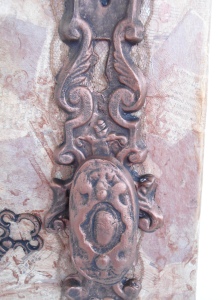
I created the vintage door handle and plate, as well as the key using Creative Paperclay® and let them dry completely. I then coated all of the pieces with Black paint and with a dry brush I applied Antique Copper paint to the raised areas for definition. Lastly, I attached all of the pieces to the canvas using E6000 glue.
 I am very proud of this piece and I really hope the winner of the drawing likes it as well. If you are interested in purchasing a customized "Home" painting for your homecoming, please email me at ediecournoyerartist@live.com
You can join me every Tuesday for my LIVE SHOW and don't forget to check out my blog.
See you next time!