Pages

Friday, October 24, 2014

Kid's Project: Gilded Leaf-shaped Bowls

The autumn weather is definitely here in Ohio!! This project takes advantage of all those beautiful leaves laying on the ground. Chloe and I gathered leaves on one of our walks. We looked for the largest leaves that we could find.

To begin the project, we rolled out a ball of Creative Paperclay® to a thickness of 1/8", and a little larger than the leaf we were using. Place the leaf vein-side down on the clay. With one motion, roll the rolling pin over the leaf, using plenty of pressure to capture the veining. I started at the base of the leaf and rolled all the way to the top without stopping.


Next, gently peel away the leaf. Use a craft knife or scissors to cut around the outer edge. To cut down on finishing sanding, at this point I smooth the edges by dipping a finger or artist brush in water and "painting" along the edges of the clay leaf.

I used bowls that I already had as molds and supports for the clay leaves. I made a donut ring out of plastic kitchen wrap to support the clay leaf while it dried.

Lay the clay leaf into the bowl, and gently form the well of the bowl. I let my leaf bowls dry longer than usual before turning them over. I didn't want to risk the bottoms collapsing by flipping them over too soon.

After the pieces were completely dry, I began the gilding process. The first step was to seal the clay surface with matte PPA. Next, was a coat of Duo adhesive. Duo goes on a milky white liquid, but when it dries clear, it provides a very tacky surface for the gilding. I followed the steps in this short video to gild each of the bowls.

Gilding is a very forgiving process. Here you can see that I missed applying the Duo adhesive to a spot. No problem—I just painted Duo over that area, let it dry, and gilded again. I gilded the top and bottom of the bowls in two step, because you want to avoid touching areas that are coated with Duo.

Hint: Since the Duo is milky white, it's hard to see just where it has been applied when you're gilding white surfaces—like Creative Paperclay®. I found a way to avoid missed spots in the future. Just add the tiniest spec of acrylic paint to the Duo. Now you have tinted Duo, and you can see were you've applied it. 

Here are the finished bowls. The smaller ones are about 5" long and 4 3/4" wide. The larger ones measure 7 1/4" long and 5 1/2" wide.


Carole

Chloe

Table Cell Table Cell

Thursday, October 23, 2014

Looking at Things With New Eyes

I am trying to purge and get rid of needless things but keeping finding cool stuff to use in art so it is "crazy time".  This week it was a Chinese tea block which I have had for years. I decided to use it as a mold then make a mold from it.

Supplies were:

Tea Block
Creative Paperclay®
Brayer
Liquid latex
I just put a pancake of Creative Paperclay® directly on the tea block and brayered it down. I didn't care if tea particles stuck to it as I was going for texture and was just experimenting.

When the Creative Paperclay® had dried it looked like an old architectural shard. I did brush off excess particles with an old toothbrush.
I added a wash then went over it with some dry brushing in raw sienna and burnt umber. At this point I have no idea what I am going to do with this piece but since my work is like creating puzzles I am sure this is just the piece I will need some day for one of my paintings.
The other day I had picked up some liquid latex so decided to see if I could make a mold off the tea block. After applying it to the block I left it on overnight. In the morning it was cured and I could peel it off. The result was so wonderful that I am ready to make tons of molds this way.
Then I decided to see how well it would stamp into the Creative Paperclay®. The mold seemed very thin so I wasn't sure how well this would come out but it worked very well.

Needless to say, I had a great time just playing around.

Play, dream in color and get your hands dirty.

Darlene Olivia McElroy

Tuesday, October 21, 2014

Creating a LPS Phantom of the opera Creative Paperclay® Mask by Gloriann Irizarry

 
Happy Halloween!!!!
 
Soon my friends it will the time were little kids come running from door to door laughing, singing and having fun.
Now for that reason I wanted to make this project a kid friendly one and per suggestion of my own little Rayray we decided to dressed her favorite Littlest Pet shop Raccoon LPS toy has an iconic Masquerade character. Any guess?
 
Yes, it is the Phantom of the Opera.
 
Is so easy to make and all it takes is
 
Creative Paperclay® Material
A roller
Plastic sheet
Your favorite Littlest Pet Shop LPS toy
White Acrylic paint


Grab your Littlest Pet Shop toy collection and  
chose your favorite animal LPS toy.
 
 
We choose the raccoon to be out Phantom Of The Opera character.
 

Choose your favorite Phantom Of The Opera mask design so you can recreated it.
There is many styles to choose from.


Start by rolling a little clay to about 1/4 thickest or less.
 
 
Apply a little spray oil with over the side of the toy head for the mask.
Lay the clay flat over the little toys head. Make sure to cover one ear it will help the mask in place with out the help of any straps.


While the clay still soft use a piece of cloth, fabric or lace and click to learn how to use this fabric stamping technique  it will give the mask some great texture.
 
Let it dry overnight. Once is all dry you can pull it off the toy.
 
Paint the mask the traditional white or feel free to make it your own by making  designs of any kind and let the paint dry.
 
Now you can play pretend Phantom of the Opera with your favorite LPS toy.
Now  imagine the countless stories you can play with your new little friend. The possibilities
 are now endless. My little Rayray can't stop playing with her new one of a kind
Phantom Of the Opera Littlest Petshop  LPS Raccoon toy.
 
 
Thank you kindly for staying tune and feel free to use this technique on any toy you will like
 Zelfs, Trolls, Barbies, Bratz, Monsters High dolls, Ever After High doll and many more .


Have fun creating
 
Sincerely


Feel free to write your comments below or email me any questions.
Have a bless day.

Friday, October 17, 2014

Custom Fireman's Helmet by Rachel Whetzel

Hello, out there in Creativeland!! It's Rachel Whetzel, again! Earlier this year, I was contacted by a woman to make her husband a very unique gift. She wanted a vintage, steam punk style fireman's helmet made as a gift for his birthday. I have been working on the two part piece, and am FINALLY able to share it with you!!

WHAT YOU'LL NEED to make your own Helmet:
  • An old fireman's helmet as a base
  • Some rug hooking canvas, or other fibrous material
  • Creative Paperclay®
  • Sandpaper
  • Paints. I use Folk Art acrylic craft paints and Krylon Spray paints
  • Stain. I used Valspar antiquing stain
  • Paint brushes
I wanted to be sure my Creative Paperclay® stuck to the plastic surface of the helmet I was using, so I glued down some rug hooking canvas to the piece. The fabric of the canvas, and it's large holes were the perfect combination. They allow the clay to fill in nooks and crannies, and get a nice grip on the surface I was working with.
Once the glue was dry, I started layering Creative Paperclay® onto the piece.
I used the metal part that stuck off the top, as the base for an eagle that my client wanted on her helmet.
Once the eagle base had dried, I started layering in feathers, and creating a faux stitched leather look along the ridges of the plastic helmet.

After those layers of Creative Paperclay® had dried well, I started building up the edges of the helmet too.
Once ALL of my layers of  were dry, I sanded... and sanded... and sanded... and FINALLY, a few arm cramps and some raw fingers later, I spray painted the whole piece with a black base. 
Then, I painted the eagle with a few layers of gold paint, put red paint into my faux stitching spots, and used some stain to draw out the detail on my eagle.
When all that was finished, I put my client's custom made leather name plate on the front of the helmet to finish it off!! You can see the second part to this piece on the Amazing Mold Putty blog today! When my customer has given her surprise gift, I'll share the set on my Facebook page!

Thank you for reading! Want to see more of what I'm up to?
Visit me on PINTEREST and INSTAGRAM, or like MY PAGE on Facebook!
 ~ rachel

Thursday, October 16, 2014

Winner of our Link UP Party

We are Creative Paperclay want to thank everyone for Linking UP and all you who took the time to VOTE.

We had a GREAT turn out:  
But now it's time to pick the winner
DRUM ROLL Please


We added her blog link, check out her other amazing projects.  

Thanks again,
 Check out our Facebook Page


Sunday, October 12, 2014

Halloween Fun with Creative Paperclay®!

Hi Everyone!


It's Donna from Memes Art Place.

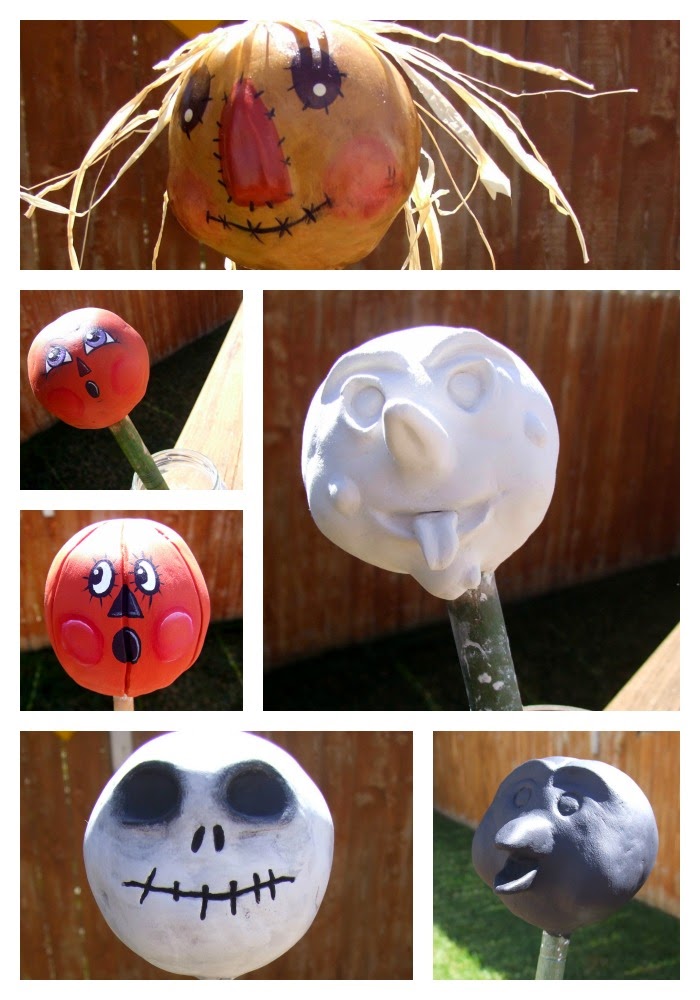
This week I would like to share with you a few projects I have been working on.

Have you ever tried to use Creative Paperclay®? If you have not, now is the time! Bring your kids to the table and have some family time.

Make some easy things. It's October, make some pumpkins, ghosts. The kids would love it!

Here are some of the things I have been playing with this month!

I started with a spring and this leftover piece from a dress form. That's all that it took to start a project that I fell in love with. I hope you do too!
 I added Creative Paperclay® over the top of the finial. Built it up until it was in a circle, then added some triangles for ears.
 Add another triangle for the cats nose, build up the cheeks just a bit. Now you have a cat head.
I let this dry overnight.
 I base coated the head with gesso and once dried I painted and added the detail to the face of the cat.
I adhered the cat head to the spring with E6000 glue and let it dry overnight.
I used a die from Eileen Hull/Sizzix called Blocks/Cube 3D to make the blocks to build my
Halloween tower. Added paper to the blocks, some embellishments.


Here are some of the other things I have been working on!

Most are just round circles, so this is where the kids come in. Look how much fun they could have using a Styrofoam ball, wrap with Creative Paperclay® and paint!

So easy for them and you! Pieces of your child's art that you can use from year to year!


Thanks for stopping by the blog! I hope you take the time to try Creative Paperclay®, it is very easy and fun!

If you ever have any questions, don't hesitate to ask any one of us on the design team. We are here to help you enjoy you experience with Creative Paperclay®.

One Last Thing!!!!  
PLEASE GO VOTE FOR YOUR FAVORITE PROJECT IN OUR LINK UP! GO HERE
Once there, just click on the project you like the most! Thanks!

If you want to ever see what else I am up to, you can visit my blog HERE

Friday, October 10, 2014

Tip: Cut Down on Sanding

I love working with Creative Paperclay®, but I must admit that I'm not a fan of the sanding process. I've discovered a couple ways to eliminate some of the sanding.
  1. After I have a shape cut out, I dip my finger or a soft artist paint brush in water and gently smooth the edges. The paint brush is great for getting in small or intricate area of the clay design.
  2. For the larger surface areas I coat the clay piece with slip. I use a wet artist paint brush to apply the fairly runny slip. Here's a great blog post about slip—how to make it and what it does. 
When I do have to do finish sanding, I've found that jeweler's files and an emery board work on most of the small projects that I create. Every once in a while I need to break out the Dremel for serious sanding, but the two tips from above always cut down on the sanding time.
Carole