Hello and Happy impending Holidays!
Recently I discovered the wonders of the styrofoam aisle at the craft store.
Many years ago I was a cake decorator in a very busy bakery. One of the fun things about being a decorator was making the dummy cakes. We used Royal Icing and made them as extravagant as we could. After all we wanted to show the range of cakes available ;) I have often thought about making a dummy cake for my home during the Holidays. Something fun that wouldn't get gobbled up in 30 minutes after a days work, also something that could stay out all month long.
Here I will show you how to create a faux cake for your home using clay. This is pretty long so I will split it into two projects.
For Part 1
You will need
a 8" styrofoam round
2 packages of Creative PaperClay
water and parchment paper
a cardboard cake round, larger than your styrofoam
a cake spatula
a clay roller
acrylic gesso
a plastic cake bag
decorator tips if you like ;)
1 package of clay will cover your round
start by rolling it out onto the parchment paper.
make it larger than the round.
place the round on top of the sheet of clay
placing your hand under the parchment paper invert your round
then place on the table and remove the paper
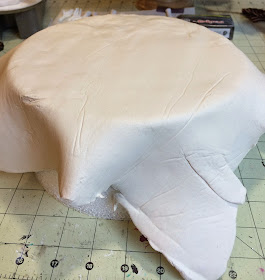
your round will look like this
strait using your fingers and water to bring the edges down onto the round.
roll the edges of the round to get an even amount of clay on the sides.
using a cake spatula dipped in water start smoothing your round
Once you have your cake to the desired smoothness it is time to mix "frosting"
In a good size cup or bowl take a bit of clay and add gesso, there is no specific measurement. Just keep adding clay and gesso mixing as you go. The more you mix the more it will get the consistency of frosting.
Once you have the clay at a frosting consistency you can add it to your decorating bag. You can use tips or cut the tip off and use it like that.
Decorate your round,
I find it easier to not allow the round to dry out to much. Your decorations will stick better to a semi wet surface.
For this project just do a top and bottom border.
If you find your having trouble with the clay coming out of the tip you may not have enough gesso to clay ratio.
Here is the basic round
Thank you for following along!
Until next time :)
LuLu


OMG what inspiration. TFS
ReplyDelete