This is my last post here on the blog for a while!! I'm taking a break from some design team commitments, and spending HUGE amounts of time at basketball games. Thank you all so much for your support, and for the love you show each of us designers here! I have enjoyed being here so much. Of course, I won't stop creating, farming and generally misbehaving, so if you'd like to keep up with me on my other interweb haunts, I would love that. (links at the end of this post) Now, ON TO BUSINESS!
WHAT YOU'LL NEED to make your own photobooth props:
- Creative Paperclay®
- Paints and Brushes I use Folk Art acrylic craft paints and Krylon Spray paints
- Foil
- Empty and clean large can
- Headbands
- Various decorations... (holly, berries, hat band ribbon, metal pipe cleaners, bells
- Sturdy small dowels
- Drill (I use a hand drill)
- Glue (I used E6000)
Gather your supplies for your creations, and get cracking smooshing and shaping your foil into shapes! I created the core for my carrot nose, rudolph's nose, and Frosty's pipe.
Wrap and twist your foil around a headband to create the core for your antlers.
Cover your pieces with Creative PaperClay®, and place them in the oven to speed up your drying time. I usually put mine in at about 190 degrees F.
To add stability to my pieces attached to headbands, I added a layer of Creative PaperClay® to the underside of the headbands. Here they are, complete with paint.
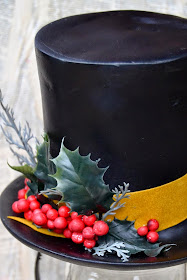
Once your pieces are dry, sand them, and paint them, and add your decorations! I put some holly, berries and a hat band around the hat:
Some orange spray paint, and shading using stain to bring out the "carrotness" of my carrot nose:
Some red paint and glitter to Rudolf's nose:
And some bells and pipe cleaners wound into coils to his antlers. I also painted the headband red, to imitate his halter.
Once everything is painted and decorated, add your dowels by drilling a hole into the pieces that will need a dowel, and glue them into place. Now you're READY FOR ACTION!!
Thanks for reading! I have loved every second of my two years here as a Designer for Creative PaperClay® and I hope to be able to return in the future!! In the mean time, if you'd like to keep up with me, and see more of what I'm up to and keep up with me, I'd also love it if you'd visit MY BLOG and Subscribe! You can also find me on FACEBOOK!


.jpg)


One of my all time favorite projects. thanks
ReplyDeleteSuch a creative project! Cute
ReplyDeleteRachel,You are too cute for words! Love this project! Hugs, LeeAnn
ReplyDelete