My dear friend Stephanie Gagos runs a fantastic online community for women called Healing Truth Sanctuary. One of the things she has been talking about this month is using the images from your memory to help deal with being triggered or times of stress. She posed a challenge for us to think about one of our positive childhood memories in which we felt free and safe and create a painting around it.
One of my favorite memories is of swinging. As a teenager , swinging was my get away. Whenever I needed to be away from my parents, think or just clear my head, I would walk to a nearby park. I would put on my headphones, pop a CD into my disc-man and swing for hours. My favorite CD to swing to was Aerosmith Big Ones. I could lose myself in the rhythm of “Cryin’” “Amazing” “ Crazy” and “Angel.” I had those songs on repeat as I was working on this painting.
You can view the full video tutorial below :)
I began the painting by briefly writing this memory and the feeling it brought up on the bottom of my canvas in the shape of my hill. Next I gessoed the entire canvas and created my background. I blended two shades of blue for the sky and two shades of green for the grass. I used glazing medium to help make the blending easier
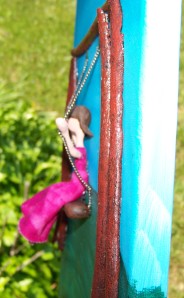
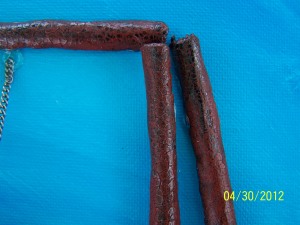
While the paint was drying I started working on my Creative Paperlcay® embellishments. I rolled my Creative Paperclay into a long strip, then cut it into several pieces to be used as the bars on the swing set. I laid the thin strips of clay on a pencil create a nice round shape that would mimic the metal swing set I had envisioned. I shaped a piece of Creative Paperclay® into a seat and set everything aside to dry.
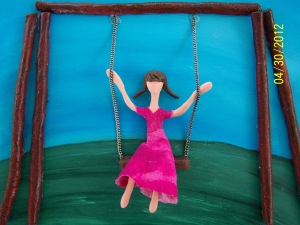
Next I started working on my girl. I created an armature in the shape of my figure using thin craft wire, then I completely covered the wire in Creative Paperclay®. Once I had created her body, I added a small ball of clay for her head and then more clay on top to form her hair. I gave her bangs and pig tails because that was how my hair was often done as a small child.
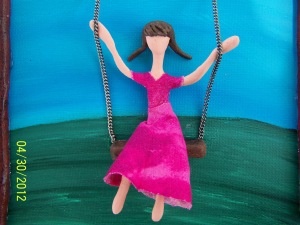
When all of my Creative Paperclay® pieces were dry I painted them with acrylic paint. I used flesh and burnt umber on my girl and a coat of black on all of the swing set pieces. After the black paint was dry I added a coat of One Step Crackle to the swing set pieces. I have found that the thicker I apply the crackle and the less I try to work it the better it does. I let the crackle dry for several hours then I applied a coat of red ocher acrylic paint to the swing set. If you really want your crackle to stand out, wipe some of the paint back of soon after applying it.
I used some old fabric scraps to make my girl’s dress. I like to cut the basic shape, then snip and fit it as I go along. I used clear tacky glue to attach her dress to her body.
Finally I arranged all of my pieces and glued them to the canvas with hot glue. I used a piece of an old necklace to create the chains for the swing and I glued the chain to the canvas using 3D Crystal Lacquer.
This piece means so much to me and I am so pleased with the way it turned out. It reminds me of the freedom and peace the simple act of swinging used to bring to me and I am grateful for the memory <3
You can view more of my work on my blog :)
Pages
▼
Monday, April 30, 2012
Saturday, April 28, 2012
We have a new Design Team
Creative Paperclay® has a new Design Team.. We are so excited!!!!! We would like to introduce each of them to you.
Terri Sproul
Team Leader
Debra Buckland
Kelly Donovan
Angie Westermann
Annie Courture
Well You have meet the whole team.. This team will be posting a project once a month and a helpful hint on working with Creative Paperclay®
Please stop by and enjoy their creations...
Terri Sproul
Kelly Donovan
Angie Westermann
Annie Courture
Well You have meet the whole team.. This team will be posting a project once a month and a helpful hint on working with Creative Paperclay®
Please stop by and enjoy their creations...
Terri Sproul
Friday, April 27, 2012
A Little Paperclay Love
It's time for my last post on the Creative Paperclay Design Team. It's been a fun six months, and I appreciate the opportunity to work with this company. For my final project, I created a shabby card. I molded an antique celluloid buckle using Amazing Mold Putty, and then cast my Paperclay in the mold. I used Terri Sproul Mixers (Violet Pearl and Gold Dust) and Sakura Crystal Lacquer to paint my "vase" and added some paper blooms. The sentiment was stamped with Hampton Art Graphic Love.
I hope I have inspired you to try adding some Creative Paperclay to your repertoire over the last few months!
Wednesday, April 25, 2012
Farewell Creative Paperclay®
Hi Everyone, it's Lori. Today is my final post for Creative Paperclay® as a design team member. I have really enjoyed being on the team and getting to use this wonderful product...honestly it's endless all the things you can do.
Today I created handmade flowers but finished them off with some Terri Sproul's mixers. Once my flowers were completely dry I mixed Sakura glue with the Smokey Quartz Pearl and got this great metallic look. I loved it. I really adore making handmade flowers and Creative Paperclay® and Terri's mixers make it extra fun.
I hope to see you all around blog land .
Hugs, Lori
Monday, April 23, 2012
Rose Fairy
Welcome to my final post for Creative Paperclay® Design Team. I have had a wonderful year and am sad to see it come to an end. I will be reapplying but I was unable to reapply this session (my little brother is getting married in August so I am really busy.) I figured I would finish with a project that is similar to my first submission piece - a fairy.
For this piece we needed to include Sakura Hobby Craft 3D Crystal Lacquer and Terri Sproul Mixers. I had so much fun creating this I hope you like it!
How to make Fairy Wings Step-by-step. Terri Sproul has made these several times and I thought it would be prefect for my fairy this time around. |
1. Roll two balls of tin foil. One large and small.
2. Attach tin foil together with a wooden skewer.
3. Cover with Creative Paperclay® Modeling Material . Add eyes.
4. Add nose, mouth and ears.
5. Add hair - try not to smash the face.
6. What happens when your thumb slips and you destroy the face.
7. Face rebuilt.
8. Added additional clay to the forehead to make her a little less fugly.
7. Add to base and paint.
Saturday, April 21, 2012
Creative Paperclay® Fascinator!
Ever since the wedding of Prince William and Kate Middleton I have been fascinated by fascinators!!! Believe it or not women have been wearing them for hundreds of years. Feathers have been worn as adornments in many cultures throughout the centuries. In the 1700’s women adorned their huge powdered wigs with stuffed birds, feathers and even birds nests! We have seen them in the late 1800’s as lace head shawl held in place with a comb, headbands during the Roaring Twenties and even the Pill Box hats... all were FASCINATORS! We just didn’t call them that!
They have just recently made a big comeback due to their popularity with the rich and famous! Fascinators are worn today more often when one might have accessorized with a hat in the past. They are attached with a comb, barrette or headband.
So here I am with my CREATIVE PAPERCLAY® Fascinator!!! It was a great project. I think these would make great party favors for a New Year's Eve party, Halloween and theme party like Alice In Wonderland. Dream on and start “fascinating!”
First, create a pattern for the size of hat you would like. Roll out your Creative Paperclay® about 1/8 of an inch thick.
Roll out a thin snake of Creative Paperclay® to seal the top of the wall of hat set aside to dry for 24 hours.
This hat is the size of paper towel roll, the roll helped keep the round form of the hat. Once the brim and the hat top dries roll a snake and attach the brim by wetting the edges of the inside of the brim and wall of the top hat. Set it aside to dry completely at least a couple of days.
Paint hat with black craft paint, then seal with Sakura Crystal Lacquer.
Pierce the brim with an awl making four small holes to attach to a headband. Gather embellishments: ribbon, feathers, lace old jewelry.
Here you have the finished Fascinator!
Grab some Creative Paperclay®
you are ready to create your own Fascinator...
Feel free to share this post on Facebook!
Thanks for visiting Creative Paperclay®
Enjoy creating ~ Lyneen
Thursday, April 19, 2012
Annya The Bottle Babe
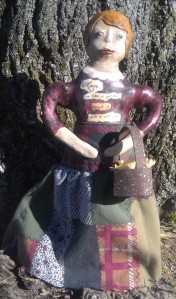
My most recent project is an art doll and that is what I want to share with you today. I love this doll so much that I have decided to create a series of these dolls for an art show I will take part in this coming May.
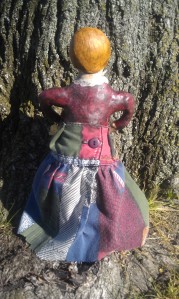
Her name is Annya and she is a Bottle Babe. I call her a Bottle Babe because the base of her body is made from a recycled jar! :D
You can watch the full video tutorial below.
I made a wire and aluminum foil armature for her torso and head and covered it with Creative Paperclay®. I then glued the torso onto a recycled jelly jar and added more Creative Paperclay to form the rest of her body.
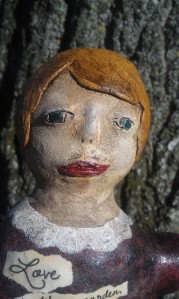
I sculpted her face and painted her with a mix of artist grade acrylic paints and acrylic craft paints. Next I cut the sleeve from an old shirt and tailored it with a few simple stitches to form her skirt. Then I gave her an aged look by painting her with a wash of fluid acrylics and water and blotting some of it away.
I printed out my text and gave it some color with Distress Inks, then added the text to her dress with matte medium. The quote says “Love is like a garden, tend it and it will grow.”
Lastly I painted a heart shaped paper mache basket with acrylic craft paint, and then splattered it with a lighter color of paint to give it some texture. I glued some silk flowers into the basket and hung it on her arm.
I think she is completely charming and I already have a row of bottles wash, dried and ready to be turned into Bottle Babes :D
You can see more of my work on my blog.
Saturday, April 7, 2012
Lock and Key Pendant
Good morning and welcome to my last post for Creative Paperclay®. I am so sad to be leaving the design team, but room needs to be made for some fresh talent. Believe me though, this is not the last you've seen of me using the paper clay. Since I have been on the team I have found a new love and this week I am also showing another new love...
First I started with a mold I had received from Articus Studios. Being on this design team has given me LOTS of fabulous opportunities to try different things.
I have a passion about keys. Especially skeleton keys and this mold had just a great variety.
I pressed my clay into the mold and let it set overnight. The next day I pulled my keys and locks out and let them air dry the rest of the way. I always leave my clay pieces in the mold overnight so as I do not distort them trying to get them out of the mold before they are at least 3/4 of the way dry.
Then I used an emery board and sanded the keys and locks. I even have used my dremel to get inside those little openings. Love this tool.
Here is my key and lock all dried and sanded. Now came the other portion of my new found passion. Our very own Terri Sproul has come out with a new product called Mixers. It's so awesome...you just "mix" it into some crystal lacquer and it creates a paint like product. As soon as Terri released them I bought some and told hubby how much I loved them. For valentine's day he surprised me with the entire product line. I was so excited and now I have so many colors to play with. It will also last a very long time because you don't need very much of the "mixer" at all. Anyway...I chose the "bronze" color and a dabble of 3d crystal lacquer and this is how my new necklace looks.
Now, again I did say this is my last post for Creative Paperclay®, but if you are so inclined to see more of my creations, hop on over to Creativity is Only a State of Mind and follow me over there. I love having new friends. I also want to send a huge shout out to Terri for having me on her DT and all the girls who I was on the team with. They are all fabulous and I know her new DT will be just as grand.
Wednesday, April 4, 2012
Making a ring and a Cameo
Hello all.
Wow, would you believe it?
This is the last post in this six month DT position I will post..... Good luck to all those that are applying.
First get some Amaizing Mold Putty and mold some Cameos with stamps.
Trim off the edges of the cameo
Optional step:
if you are not confident enough to keep the white bits white then use a masking fluid.
Paint on black ink to background (or Terri Sproul Mixers)
Take off the Masking fluid if you used it.
Use a versamark pen to go around the frame of your Cameo and apply Gold embossing powder, heat to finish it off.
or alternatively paint on Gold Terri Sproul Mixers.
See you can actually do the background in any colour. And you can use these embellishments for cards, Scrapbooking or off the page project.
Well all the best to you, our awesome readers - please leave a comment.
Maybe this is farewell...... who knows?
I do know that I am re-applying, but be best assured that there will be more Creative Paperclay® projects on my blog either I make it or not. Love this stuff to much to stop using it. Its been a pure pleasure being on this team. And I thank all my wonderful, friendly team members. So glad we could work together. Its been a pleasure.
Happy Crafting all
Debbie Buckland Signing off.... for now.
artycrafty.wordpress.com
Wow, would you believe it?
This is the last post in this six month DT position I will post..... Good luck to all those that are applying.
Ring Tutorial:
The wire is from an old wire bracelet that snapped at the join.
Here is how to make a ring using Creative Paperclay® and Terri Sproul Mixers.
And the ring is finished.
Cameo Tutorial:
I have also been playing around with Cameo's. They tend to be making a come back....
Next put your Creative Paperclay® into the molds then carefully take them apart and wait for the clay to dry.
Trim off the edges of the cameo
Optional step:
if you are not confident enough to keep the white bits white then use a masking fluid.
Paint on black ink to background (or Terri Sproul Mixers)
Take off the Masking fluid if you used it.
Use a versamark pen to go around the frame of your Cameo and apply Gold embossing powder, heat to finish it off.
or alternatively paint on Gold Terri Sproul Mixers.
See you can actually do the background in any colour. And you can use these embellishments for cards, Scrapbooking or off the page project.
Well all the best to you, our awesome readers - please leave a comment.
Maybe this is farewell...... who knows?
I do know that I am re-applying, but be best assured that there will be more Creative Paperclay® projects on my blog either I make it or not. Love this stuff to much to stop using it. Its been a pure pleasure being on this team. And I thank all my wonderful, friendly team members. So glad we could work together. Its been a pleasure.
Happy Crafting all
Debbie Buckland Signing off.... for now.
artycrafty.wordpress.com