Pages

Thursday, June 28, 2012

Quick Tip for Creative Paperclay®


Whenever you are using Paperclay in a mold, it is best to dust the mold with cornstarch before filling with Paperclay to keep it from sticking.

However, if you don’t have any cornstarch handy you can use baby powder instead. It smells good too! Hope this helps you the next time you use

Paperclay.


Barbara

Butterfly Kisses

I am a couple days behind my scheduled Creative PaperClay post, for that i apologize! Life is VERY busy right now with our 8 wk old puppy. And Yes I am completely in LOVE with her.

But as they say the show must go on....LOL

Today this tutorial is inspired by nature. A few months ago my family and I went to the Butterfly Conservatory here in Niagara Falls. (If you ever get a chance to go to a Butterfly exhibit please do so, its truly magical)

Here are a few gorgeous pictures that inspired me and perhaps inspire you.


They say Mother Nature never lies. How true, colors are perfectly matched and so pretty.

Today I am working with "Delight - AirDry Modeling Clay" Its abit different than "Creative PaperClay" ,
                                       
                                                     1. The color is snow white and it dries white.
                                                     2. Its is very lightweight.
                                                   
Its also similar!

                                                    1. It's an airdry clay. No firing, no baking is needed!
                                                    2. Takes paint, any paint, very well!


I did not take a picture of the beginning, but its rather simple, take a piece of clay and roll it into a ball. (Depends on how big you want your bowl to be will determine the size of the ball of clay)

Begin to mold it into a bowl. I took one of my old bowls to help me mold my clay around the bowl so that I could get the size right.

Once I got the size i wanted I took my favorite rubber stamp of a butterfly and stamp directly into the clay to leave an impression. I then painted it completely black.


I gathered a few fun supplies, some mica pearl ex powders , an old paintbrush. and some acrylic meadium.


I then began to layer the different pearl ex powders by mixing them with the acrylic medium.
****Sidenote - Acrylic medium can really be anything: elmers glue, golden gel medium, mod podge. Mica powders need something to make them stick to whatever you are painting them on, and if you can't afford Mica powders -  Use your old eye shadows! Create your own Mica Powders by mixing them with a little glitter!*****

When doing this kind of layering you either have to work fast or wait for each layer to dry!

And as always i love to embellish, "Delight" is really nice , I was able to put holes in it to hang the little leaves on it and it does not crack.


I initially made this for my workstation to put paperclips in it, to remind me of the beauty of nature, the grace of a butterfly and to remind me Mother Nature never lies! (grins) My mom had other ideas.....she took it home with her. LOL

Art on my friends,
ANg

Creative Paperclay Quick Tip for July

When you roll out your Creative Paperclay have you ever noticed that it tends to stick to your roller?  I've encountered this problem too.  I find it handy to keep a spray bottle of water on my work space.  When the paperclay starts to stick to the roller, simply spray your clay or roller with a little bit of water this keeps the clay from sticking.

Saturday, June 23, 2012

Creative Paperclay Fossils

I have been playing with Creative PaperClay for years. This month I had some of the mixture that I previously made into molding paste left over that I didn't want to go to waste. While thinking about how I could use it, I remembered something I made with my son years ago for a project.... FOSSILS!

After choosing which molds I wanted to use, I cut the tip off of the baggie that contained the watered down clay and squirted the mixture into molds. I let the clay dry for 2 days.

The top part of the clay dried but it was still very wet underneath so I gently pushed down the dry part and smeared (for lack of better word) the clay that came up through the cracks. Finally, by day 4 it was just where I wanted it to be. I pulled the pieces out and turned them over let the top finish drying overnight and were ready to be worked with.

When I did the project with my son, we got real sand and glued it on foamboard to make a realistic scene. I am using masking tape and some colored chalk on paper to give you idea and show what it looks like and what you can do.

The number of child projects you can use this for with are endless. You can coat these with 3D Crystal Lacquer and put them in one of those chalk balls you can make for your child to open up or you can hide them in your yard or the sand box for the little ones to find!!!!


Thursday, June 21, 2012

Tip time! - colouring it with re-inkers

Hi all....
Both products pictured here are from the same company and both are available from Zig Zag in New Zealand.

But whats so wonderful about this product is that you can add re-inkers for your stamping ink pads to the clay when it is wet!


I put on latex gloves first then took some delight clay and Creative Paperclay® added about 5-6 drops of re-inkers to each blob of clay and worked the colour into it until the clay was coloured....


Here is my end result...

I created one of those carved candle looks from clay.... 

I used the Creative Paperclay® as a base then added rolled out flat layers of the colours on top.... Green, Red and white on top.

Then carved with a knife bits out not taking the clay all away but rolling the cut parts or twisting the cut parts. Do a search in you-tube for candle carving to see how its done.


The best of all the "carved candle" will NOT melt down and leave a coloured mess but will last for a very long time all I have to do is replace the tealight candle that sits on the top.


So next time when you need some coloured clay - colour it yourself.


I finished off this piece with a coat of 3D Crystal Lacquer to make it look like wax.... So love the result! It also bought out the colours more in the clay....


Remember more re-inker the more brighter colour you will get but also the wetter the clay gets. Please use gloves or your hands will be stained for weeks!


All the best to everyone and happy crafting!


Debbie Buckland
artycrafty.wordpress.com

Tuesday, June 19, 2012

Edie's June Tip

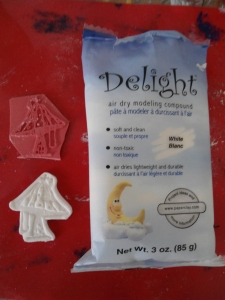
Here is quick tip to keep in mind when working with Creative Paperclay® air dry modeling material... Creative Paperclay® and Delite® are both air dry clay and will generally dry with in 24 hours, depending on thickness. If you need to speed up the drying time for either, you can put them in an oven on 250 degrees. I lay mine on wax paper to keep it from getting any groves from the racks. Something to keep in mind - Delight® will PUFF UP like a marshmallow when placed in the oven, but Creative Paperclay will not puff. I made this mushroom by rolling out Delight® clay then stamping the mushroom image into it then cut around the image with an Xacto. I placed it in the oven and let the clay puff up, dry completely, then painted it with acrylic paints.


Sunday, June 17, 2012

Creative Paperclay® Ladybug


With Summer here, I thought it would be a good time to make something cute that you see in the Summertime. I decided to make a ladybug using a gourd and Creative Paperclay® I started out with a piece of clay and fashioned a face which I put on the front of a small bottle gourd.

Creative Paperclay Ladybug 6-17-12 001 

Creative Paperclay Ladybug 6-17-12 002

I then painted my gourd to look like a ladybug:

Creative Paperclay Ladybug 6-17-12 003         Creative Paperclay Ladybug 6-17-12 004

Hmmm………Looks like it just need a few finishing touches:

Creative Paperclay Ladybug 6-17-12 010         Creative Paperclay Ladybug 6-17-12 011

Of course, some antenna and a sealer.

Creative Paperclay Ladybug 6-17-12 014         Creative Paperclay Ladybug 6-17-12 012

Now don’t you think she’s cute as a bug? lol You can use Creative Paperclay® in so many different ways and have oh so much fun doing it!

Saturday, June 16, 2012

Lyneen's Quick Tip of the Month!


So you want to play with Creative Paperclay®, but you are afraid to because you don't know how to mold a doll, a figurine or any other object.  Well neither do I and I LOVE PLAYING with Creative Paperclay®!  Here are some of the tools I use when I play with Creative Paperclay®

These are tools I had when I used to make fondant flowers in my cake decorating days.  If you have any cake decorating supplies, think how you might use them working with Creative Paperclay®.  Just remember once you use any kitchen gadget with Creative Paperclay® it should not be used in the kitchen with food again!  
  
Articus Studios has some wonderful molds you can use with Creative Paperclay®. Here is one of my favorites - Frozen Charlottes!  
Cookie cutters make great tools for special shapes.  At little cost you can find them at thrift stores.
Make your own molds using Amazing Mold Putty!!!  When I see something that I would like to have several of, I think about using Amazing Mold Putty.  Like the little cherub pictured, I only had one of him.  Since I made a mold I can have as many as I like using Creative Paperclay®!

Pictured here is a paper mold.  Used when making your own paper and pressing pulp in the mold... also, great for Creative Paperclay®!
 
Candy Molds are another great mold to use!  Just remember once used with Creative Paperclay® it should not go back in the kitchen! 

Use items to mold Creative Paperclay®.  Here I have an inexpensive mask from the dollar store that I am using as a mold for the clay.

Make templates from paper, here is a template for a crown! 

You are only limited by your imagination... what other things have you used to mold Creative Paperclay®?

Thursday, June 14, 2012

Weird and Wonky 80's Inspired Giraffe


Giraffes have a special place in the hearts of my family.  They were my late Mother in Law's favorite animal, and she collected everything giraffe related.    I used to love to find weird and wonky giraffes for her.  With Mother's Day passing recently, she has been on my mind.  So I thought that there was no better way to pay tribute to her than to make a giraffe.

The first thing I did was make a form.  I used aluminum foil, paper clips, toothpicks, and masking tape.


Then I started to cover the form with Creative Paperclay(R)


I put the giraffe aside to dry and started working on his boom box.

 Using Delight Air Dry Modeling Compound, I measured and cut a rectangle.


Next, using a lid from a glue stick I cut out circles for the speakers.

 Then I added the different pieces to make the boom box.
This is the finished boombox.  Once finished I set that aside to dry for 24 hours.


After the giraffe dried for 24 hours I added his mane and finished his arm.

Before I started the finishing touches, I set that aside for another 24 hours to dry.

After everything was dry I started the finishing touches.


Then I painted the Boombox.


Finally I painted the giraffe.


This is my final piece.

Tuesday, June 12, 2012

TUESDAY Tip with ANg

HI everyone! A very easy tip. I hear people ask...how do you keep Creative PaperClay from drying out? So lets break this down abit. What dries something out? Well if you answered AIR you are completely right! So keeping it stored properly is pivotal in keeping the clay soft and pliable. What i do.... I use..... Are you ready..... THIS IS MY SECRET WEAPON! Its a small terra cotta brown sugar disc. IT WORKS~! Soak the disc in water for 15 minutes,take it out of the water and place it in a ziplock bag with your clay (I usually leave the orginial package on the clay) and seal it up. The disc keeps a small amount of moisture in the bag and prevents the clay from drying out! Everytime i take my clay out to work with it, i rehydrate my disc by soaking it in water for 10 minutes. Awesome eh? Art on everyone! L. ANg

Saturday, June 9, 2012

TIP with Creative Paper Clay

I love using products for different things than what they are intended. I love doing mixed media so my tip for this month is use the Creative Paper Clay Light and roll it out. Stamp or even draw in design with back of paintbrush. When dry, glue (in one piece or break into pieces) as part of the background! Then you can paint or stamp like normal! It is light weight and makes an awesome background!!!!

Thursday, June 7, 2012

Shhh!! Don't wake the Dragon!


Shhh!!! Don't Wake the Dragon!
He is a dragon - his name shall be Hercules.

Hercules is a baby dragon.... This little fellow doesn't sleep with his eyes open yet as the experience of having his treasures stolen hasn't come into question. The key is for some other treasure chest I have no idea where and he has kept his favorites near him.

Here are some close ups....


If you play CastleVille on facebook this little fellow maybe a little similar.... CastleVille has baby Dragons!!! And that is what I modeled him off. ;)


I think he may have a bit of a cheeky look to him.... Maybe he is not sleeping at all and is just tricking us!


I actually use him as a pen holder.....

So you want to know how to make this cute little creature?
Ok I'll show you.....


Here is a two part video Part one is how to mold him out of Creative Paperclay® and the 2nd is how to paint him up with Terri Sproul Mixers.


The final tips I didn't put on the video...
(just so our fave readers here at the blog can have some special info)

After the video was made I painted an additional layer of watery Acrylic paint (olive green)
Then put over top a layer of Terri Sproul Mixer - Bronze only. 
Drying in-between all layers.
This added depth in the finish of the final product.

Thanks so much for watching
May your dragon forever sleep (and look cute!)

Debbie Buckland
artycrafty.wordpress.com