Pages

Monday, October 31, 2016

Happy Halloween!

Happy Halloween! I've made 2 more accessories to complete my costume. I used the lighter "Delight" clay. It was very easy to work with and dried in a fraction of the time. The basic instructions for creating the shells is the same as the belt I created on my October 10th post.   These instructions are also posted below. My apologies for the shadow, I couldn't get a true color shot without one.
*SEE the entire costume at the end of this post.


SUPPLIES:
"Delight" Modeling Clay by PaperClay
Mold N Pour, Color Mist: Stream - Ranger Ink
Glimmer Mist: Suede - Tattered Angels
Colorful Glossy Cardstock: Deep Sea - Murdock Country Creations
Blue Metallic braided thread-Kreinik
Other: Velcro, Clear Acrylic Spray Sealant, faux pearl beads, sea shells, beading wire, plastic tiara, mini brads or eyelets, needle.

INSTRUCTIONS:
1. Create various molds of real shells with Mold N Pour.
2. Cast multiple "Delight" molds of each shape, 2 starfish are needed, one for the head piece and one for the necklace. You will need 4 clam shells and 2 other shells.  Let air dry completely.


3. Using a wet brush and a bit of water, brush the shells with Stream Color Mist then spritz with Glimmer Mist.


 4. The starfish was colored by first spraying with the Glimmer Mist, then brushing Stream Color mist on the peaks only. Let dry or use a heating tool.

5.  Glue a starfish to the center of the tiara and flank with 2 clam shells.
6.  Glue a few plastic pearl beads in the empty spaces.
7. Use a needle and beading wire to string the remaining shells and starfish. Place 3 or more beads between each piece.
8. Poke the needle through the clay shells, add one bead and exit front to back.  You can add jewelry closures or just tie off the beading thread.

The finished costume!  A paper doll mermaid :o)


Happy Monday!
Make art every day :o)
Becky

Tuesday, October 25, 2016

Here Today, Gone Tomorrow

Sometimes we change our mind. Maybe it is the concept behind the piece of art, we couldn't execute the vision we saw in our mind or ???? With Creative Paperclay®, it is easy to remove the clay if our project doesn't work out. In this case, I had added a fennec (Saharan) fox on my art piece but changed my concept for the piece. I needed to remove it so I could continue on with my painting.

SUPPLIES

Dried Creative Paperclay®
Water
Paper Towels
Metal Palette Knife/Scraper


I covered the clay with very wet paper towels and leave on until the clay softened.


Then I scrapped it off. If some of the clay is still hard just reapply the wet paper towels again.


When all the clay is removed, I can continue to work on the piece. The playing never stops.

Dream in Color.

Darlene Olivia McElroy

Wednesday, October 19, 2016

Making Animals with Creative Paperclay (part 1 of 2)


If you are new to sculpting or just starting out with paper clay, one of the biggest challenges to creating something lifelike is getting the proportions right.  When I was starting out, I constantly struggled with symmetry, proportion and where to place details like eyes and ears. 


Of course, if you are making abstract sculptures, you're already good to go!


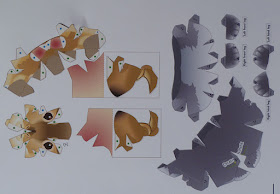
Because Creative Paperclay (CP) bonds so well with paper and fabric, and because we need some kind of armature to build on with our clay, a whole world of possibilities is open to us.  I'm talking about paper craft.  There are literally thousands of free paper craft models available to download, print, cut out and glue together. 


While I personally like making animals, you can use any kind of paper craft as the armature for your sculptures, from vehicles to houses to almost any object you can think of, but you don't have to stop there, you can also combine multiple paper craft into something wholly unique, like a beast that is half animal and half machine.


Two of the best websites I have found for downloading free paper craft are:

Papermau


and

Canon Creative Park


crafting armatures from papercraft animals
Parts of paper craft models I used

Paper crafters are a devoted group.  Paper models can range from something simple, made from a single sheet of paper (these are usually not very detailed) to extremely complex pieces that can use hundreds of pieces cut from dozens of sheets of paper.  After choosing a model or two, be sure to print them on card stock which will make for a firmer model.


I don't have a lot of patience when it comes to assembling paper models, so I look for ones that use as few pieces as possible, but still show lots of detail.  Also, you usually don't have to use all of the pieces of a model.  We really just want to establish the proper shape and proportion for an armature with guides to show us where to add the details. 


I am even impatient enough that I don't like to glue all of the pieces, so I often just piece them together with little bits of masking tape.  The model ends up looking horrid at this point, but it doesn't matter, because we are going to cover it with paper clay.
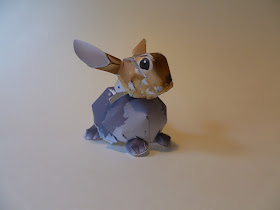


crafting armatures from papercraft animals
Head and body assembled
For this tutorial, I chose two of the rabbit models from the Canon site.  I liked the body of one and the head and ears of a different one.  If you decide to combine two or more models, you will probably find that the parts don't match up.  That's okay.  I use a piece or two of masking tape to fill in any voids.


Another great part of using paper models for your armature is that once you have assembled the body, head and any other interesting parts, you can then decide where to position them in whatever pose you want to make.  In other words, you are not tied to just mimicking the original paper craft.


This is a useful method for trying out different sculpture ideas without investing a lot of time or money.
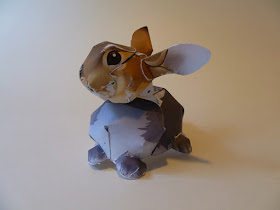
crafting armatures from papercraft animals for use with air dry clay
Armature shows where to place details


Once you have your paper armature put together and in a pose that you like, coat the entire surface (inside and out, if possible) with Paverpol, wood glue, or PVA (white, craft) glue and let it dry.  This will firm up the card stock so you can use a little pressure when you are adding on the paper clay.


The next step is to add a thin layer of paper clay to your armature.  One of the problems with paper craft models is that in cutting and folding flat pieces of paper, you end up with angles and pointy bits where they don't belong.  When adding this first layer of paper clay, you can smooth out those angles.
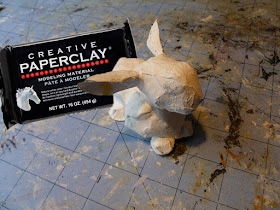


crafting armatures from papercraft animals
Use CP to cover armature and smooth out curves
For detailed areas, like around the eyes, I either leave the paper clay layer so thin that I can still see where to place the eyes when I add the top layer, or if it is a larger sculpture, I go ahead and place the eyes in position, but make them thicker than the rest of the layer so they stand out. 


Even though I might make some details stick out from the first layer of CP, when I add the final layer, I can adjust the proportions.  The goal at this point is to keep clear the position where everything belongs.


We will be adding a second layer to put in the details and textures in the second part of this tutorial.
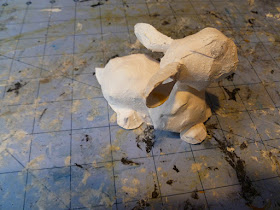
setting detail location on paper clay sculpture
Keep position of details clear for next layer


You can find part two here.


link to kevin whitham saatchi art online


You can visit me on Facebook.


Tuesday, October 18, 2016

Tori's Tip - DIY Glow-in the-Dark Clay


We've mentioned several times here on the Design Team that paint can be added to either Delight™ air dry modeling compound or Creative Paperclay® modeling material, but when considering your options don't forget about specialty paints.


You can make your own light weight, glow-in-the-dark clay just by putting some paint with Delight™ air dry modeling compound.  I mix mine by putting the clay in a baggie and squirting some of the paint in, then squishing it around until it's all mixed in.  Kids would love doing this in the semi-dark to watch how the paint mixes with clay and makes it all glow.

Roll out and cut letters, shape into ghosts, etc.


Thanks for joining me here again!  As always, play, experiment, and have fun!

Tori
Find me on Facebook, or peruse & ponder pics with me on Pinterest


Monday, October 17, 2016

Shari's October tip of the month- Filling the Gaps

Hi!

My tip of the month is short, sweet, and saved the day. I happened across it when I was creating a project last weekend.

Late Friday night I was just about done with a mixed media piece. I have been struggling on this piece and so I was down to the wire.

The last piece, a dowel rod, need to have the dowel cap on it. No problem! I had the dowel cap.... or did I? The cap I had purchased was too large for the dowel. The project was due in the morning before any of the craft stores opened.  Panic!

I started looking around my studio and when I opened my paperclay drawer an idea popped into my head. I took a small piece of  Delight® (white) air dry modeling compound and kneaded in a small amount of Tacky glue. I filled the cap with the compound, inserted the dowel,(the compound will ooze out over the edges),and wiped away the excess.


When dry, paint the compound the color of your cap.

 Voila! A perfect fit.   

Happy creating!
Shari

Thursday, October 13, 2016

Altered Playing Card APC with Creative Paperclay Heart


APC w CPC Heart

First, cover the playing card with deli paper, map pages, book pages, artist paper like watercolor paper or scrapbook paper.  Add a small amount of Gesso to the playing cards. I prefer to create multiple APCs because sometimes I am not happy with the results. I have used two different sizes of playing cards for this project--a standard poker playing card and a dollar tree children's animal knowledge card.


I rolled out the clay and used a cookie cutter to get the size I wanted.  A PVC pipe is a great tool to for this but you can also use a rolling pin. 


Add acrylic paint to the playing cards. I normally use my fingers for this step. It is much easier so I don't have to get up to clean a paint brush in the middle of my process.


To add another layer by placing the cards under a 12 x 12 stencil and using a make up sponge to apply image to the cards. I have only done this a couple of times and learned this trick after watching one of Seth Apter short tutorials on his website. Very effective and I will be doing this often especially when I participate in a 52 deck swap.


I decided to use the animal knowledge card which is approximately 4 x 6 size.  I went around the edges with black paint to add another layer. Then I punch out a heart from a sheet of mono printed paper one of my students created for me. And then I painted the small wooden heart with red paint.  I added letters "faded" from my stash.


I finished it off by added some of the words from a Tim Holtz' product. However, you can use a word processing program to make your own words or cut them from book pages or magazine clippings. I really love the results. Thank you for checking out my project. Now, it's your turn.


Tuesday, October 11, 2016

Texture, Texture, Everywhere

It doesn't matter where I am. I am always looking for things I can cast or use for stamps. I make marks of all kinds on squares or tiles of Creative Paperclay®. When they dry, I will try different surface techniques on them.  I found this textured roller at a local flea market. Yes, I drawers full of stamps and texture plates but this is more of an adventure for me.

SUPPLIES

Found Objects
Creative Paperclay®


On a hike I found a volcanic rock with great texture. I love the natural texture it gives to the clay.


I had a bag of gold crumbles that I decided to play with. I tried mixing it in the clay and it disappeared. So the best way is to roll out your clay and sprinkled it on the clay. The final step was to brayer it into the clay. There is so much more to explore with this but that is for a later date.


I have drawers full of lace. I thought this would turn out differently but I do love the contemporary stamp it made. This is why we are the "mad scientist artist". I push a product to its limits and I make new discoveries all the time.


Mark making is important to me as an artist. These are rough marks made in the clay with an African porcupine quill. I can change the look just by wetting my fingers and smoothing out the marks.


I decided to use my alphabet stamps in no particular order to make a pattern. I was not trying to make words just a design. This is something that I can see using quite a bit.


I decided to raid my coin jar for a circle design in the clay. Fun.

Experiment. Be crazy. Dream in color.

Darlene Olivia McElroy


Monday, October 10, 2016

Halloween Costume Accessories: Mermaid

Hello Crafty People!  I've started creating my Halloween Costume. I will be a mermaid (with a little twist of course).  The first piece of the costume is a decorative belt.

Supplies:


Creative Paper Clay
Mold N Pour, Color Mist: Stream - Ranger Ink
Glimmer Mist: Suede - Tattered Angels
Colorful Glossy Cardstock: Deep Sea - Murdock Country Creations
Other: Velcro, Clear Acrylic Spray Sealant, faux pearl beads, sea shells

Instructions: 
1. Create various molds of real shells with Mold N Pour.
2. Cast multiple Creative Paper Clay molds of each shape, except only 1 starfish is needed for the belt. Let air dry completely.


3. Using a wet brush and a bit of water, brush the shells with Stream Color Mist then spritz with Glimmer Mist.


 4. The starfish was colored by first spraying with the Glimmer Mist, then brushing Stream Color mist on the peaks only. Let dry or use a heating tool.

5. Cut a 12x12 piece of decorative glossy cardstock into 3" x 12" strips. Glue them together to make one long waist band.
6. Trim to size for the waist and add Velcro for the closure.
7. Find the front center of the belt and lay flat.  Hot glue the Starfish into the center and work outward on both sides, gluing shells into place.
8. Glue pearl beads as a filler between the shells and a small swirl off to each side.
9. Spray the entire project with clear sealant. Let dry.


Happy Monday!
Make art every day :o)
Becky

Friday, October 7, 2016

October First Friday Fan Day


Need some inspiration for your next Creative Paperclay® project? Check out what folks are making with Creative Paperclay™.


Haunted Book of Spells
Halloween Pumpkin Treasure Box
Snowman Head Decoration
Halloween Pumpkins
Paperclay Doll's Eyes Tutorial

Embossing with Paper Clay

HELP US FIND YOU!!
  1. Use the hashtag #CreativePaperclay on all your social networks.
  2. When using Facebook, be sure the your posts and images using the #Creative Paperclay hashtag are set to public, otherwise we won't be able to find you.
  3. Share your projects on the Creative PaperClay® Facebook page.
I'm always trolling the web, looking for great Creative Paperclay® projects. If you find something, post it on our Facebook page.

GOT QUESTIONS???

Find the answers to your paperclay questions. See what other folks are creating. Stop by our Facebook group and say, "Hi!" Creative Paperclay Q&A
Carole

Tuesday, October 4, 2016

Creative Paperclay Still Life (part 2 of 2)


Creative Paperclay Still Life part 1 is available here.


Creative Paperclay's best friends are paper and pva glue (white craft glue).  Paper is such a versatile medium, it can be cut and folded into almost any shape.  Once you define the outline and shape of the object you want to create using paper, you can then cover it with paper clay and refine its shape and texture.


STARFISH


To create  a starfish or any other object you would like for your still life, draw an outline on a piece of cardstock.


When you are happy with the shape, cut it out. 


You can fold it where necessary to give it some dimension. 

Add Creative Paperclay (CP) to the bottom and let it dry overnight.  This will firm up the piece.


Make any adjustments you like to the shape and add a layer of CP on the top and let it dry / harden.


You have now made a two-dimensional paper cutout into a three-dimensional sculpture.


You can add a second thin layer of CP if you want to create a texture or add more details.


Once you have all of the pieces of your still life rendered with paper clay, you can decide how you want to assemble them.


This is the most fun for me, as I can spend a lot of time trying different arrangements.


FINISHING TOUCHES


When you are happy with an arrangement, take a photo or draw a quick sketch of it for reference.


Then you can paint or finish each piece individually before gluing them in place.


I added color by using chalk pastels and watercolors.  Then I sealed it with a thin layer of Mod Podge.


Or you may decide not to glue them and just re-arrange them from time to time.


link to kevin whitham saatchi art online


You can visit me on Facebook.