Showing posts with label Debbie Buckland. Show all posts

Thursday, October 18, 2012

Debbie B's Tip - my last post

Hi all
Yes its my last post on the blog... I have decided not to re-apply to be back on this design team. Its been an awesome year and I have worked with wonderful ladies! But one must move on.... I hope to start up my own nail art business soon so time will be needed there to build it up.

I also just love this product so no stopping me from using it. ;)

My tip is....
Keep reading the blog for great tutorials and tips. ;)
Very many talented people work very hard to put things on this blog.... please comment and encourage them.

Also....
Creative Paperclay® is great and light weight for making unique one-off embellishments for scrapbook pages....
The above layout was printed in Australian Scrapbook ideas magazine issue 15!
It has a Tuatara (New Zealand native lizard) on the page made with Creative Paperclay® molded by me by hand.


Hand painted with Stampin Up! reinkers and a brush with water. Made the perfect accent for this page.

Thank you all so much for receiving my creativity so well. I am honored.
If you want to continue to follow me online my blog is....
artycrafty.wordpress.com

May all your crafty days be fabulous!
Debbie Buckland
New Zealand

Wednesday, October 3, 2012

Cracked Bead making

Hi all
Here is a tutorial on how I made my beads for my bracelet....

You will need:
  • Creative Paperclay®
  • Acrylic Paint
  • One step Crackle
  • several bamboo skewers
  • nail file or sandpaper
  • Dark brown or black reinker or watery acrylic paint
  • Pearlex varnish
  • dry old rag
  • Thin elastic
  • Small beads
  • brush
  • water to clean brush
Step 1
form your beads out of Creative Paperclay®


Step 2
poke the bamboo skewers into the center of each bead to make the whole


Step 3
Once all bead are dry sand them with a nail file or similar to sand off any unwanted bumps...


Step 4
paint your beads your desired colour... (since turquoise is so "in" at the moment here in NZ I went with that...) - I used Jacquard Lumiere paints Turquoise and pearl white mixed to make a light Turquoise colour.


Step 5
Once the paint is dry paint the beads again with One Step Crackle and wait for that to dry...


Step 6
the cracks appear when the One step crackle is dry... now to enhance the cracks you will need a watery dark colour... I used Stampin Up! reinker - early espresso with a little water.

Paint on and before the ink is dry dab it off with a dry cloth/rag. It will stay in the cracks and leave your colour too.


Step 7
to finish your bead off and set it nicely paint with Pearlex varnish - let it dry.


string it up with the smaller beads in the middle of each paperclay bead and you are done!


Hope you too can all make a bracelet or necklace with awesome paperclay cracked beads.

thank you all for dropping by!
Debbie Buckland
artycrafty.wordpress.com

Thursday, September 20, 2012

Debbie B's quick tip

Hi all sorry no pictures but a quick tip from me would be.....
When you are working on a large piece you can add pieces to it as you go, dry on wet works well too. Just spray the dry spot you are adding to with water, blend the wet clay to the dry clay. (best to do when the clay is not too dry though -surface dry is fine).

Amaizing stuff aye!

All the best - see you next month!

Thursday, September 6, 2012

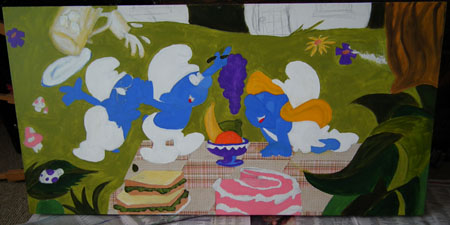
A Smurfy Canvas

Disclaimer: I have NOT been paid to do this. This canvas is for my own private use. It will NOT be sold or reproduced to giveaway in any form. This is just a post in the sole purpose of showing an example of what you can do with creative paper clay® I have no intention to breach copyright if it does I am more than too happy to take it down.
 
Hi all
This month I will show you how I put together this Smurfy Canvas for my daughter.... measuring 20" x 40" - yes its huge!

To do this you will need:

Creative Paperclay®
Canvas the size you want
Picture to copy
Acrylic paints
Patterned paper
Black marker pen
Pencil


.

Step 1
Draw up your picture in pencil


 Step 2
Paint your painting
Step 3
Add your patterned paper on the mat


Step 4
Make your clay pieces that you want to stand out


Step 5
once your clay pieces are dry Paint them


Step 6
Draw your black lines onto your painting with the black marker pen if your painting is a cartoon painting like this.

Step 7
Stick your clay pieces in the desired places on the canvas.

You are done!


Here is the painting again and close ups....


Thanks so much for dropping by... Happy Smurfing!

Debbie Buckland signing off for now...
http://artycrafty.wordpress.com


Disclaimer: I have NOT been paid to do this. This canvas is for my own private use. It will NOT be sold or reproduced to giveaway in any form. This is just a post in the sole purpose of showing an example of what you can do with creative paper clay® I have no intention to breach copyright if it does I am more than too happy to take it down.

Thursday, August 16, 2012

Debbies Tip.... drilling

Hi all!
Did you know that you can drill Creative Paperclay® when its dry without cracking?


I drilled the fern pieces to make them into pieces for a necklace.


So get onto it and start drilling your pieces today!
Thanks so much everyone for dropping by!
-Debbie Buckland
artycrafty.wordpress.com

Thursday, August 2, 2012

Making your own scrapbook embellishments with stamps

Hi all Debbie back here with you...

I have been experimenting some more with my own stamps. And making my own Paperclay embellishments!

The bird house below is made from molding a stamp and putting paperclay inside the mold to get an embellishment....


This tutorial you will need:
  • Amaizing mold putty
  • Creative Paperclay®
  • Your own stamps
  • Some release agent like light powder or gel


 Here is how I did it....


Thanks for dropping by!
Debbie Buckland
artycrafty.wordpress.com

Thursday, July 19, 2012

Tip - making lettering

Hi all
So sorry you had to wait so long.... really its only been 13 days. ;)

here is how to make Creative Paperclay (R) lettering....


Enjoy. ;)
Debbie Buckland
artycrafty.wordpress.com

Thursday, June 21, 2012

Tip time! - colouring it with re-inkers

Hi all....
Both products pictured here are from the same company and both are available from Zig Zag in New Zealand.

But whats so wonderful about this product is that you can add re-inkers for your stamping ink pads to the clay when it is wet!


I put on latex gloves first then took some delight clay and Creative Paperclay® added about 5-6 drops of re-inkers to each blob of clay and worked the colour into it until the clay was coloured....


Here is my end result...

I created one of those carved candle looks from clay.... 

I used the Creative Paperclay® as a base then added rolled out flat layers of the colours on top.... Green, Red and white on top.

Then carved with a knife bits out not taking the clay all away but rolling the cut parts or twisting the cut parts. Do a search in you-tube for candle carving to see how its done.


The best of all the "carved candle" will NOT melt down and leave a coloured mess but will last for a very long time all I have to do is replace the tealight candle that sits on the top.


So next time when you need some coloured clay - colour it yourself.


I finished off this piece with a coat of 3D Crystal Lacquer to make it look like wax.... So love the result! It also bought out the colours more in the clay....


Remember more re-inker the more brighter colour you will get but also the wetter the clay gets. Please use gloves or your hands will be stained for weeks!


All the best to everyone and happy crafting!


Debbie Buckland
artycrafty.wordpress.com

Thursday, June 7, 2012

Shhh!! Don't wake the Dragon!


Shhh!!! Don't Wake the Dragon!
He is a dragon - his name shall be Hercules.

Hercules is a baby dragon.... This little fellow doesn't sleep with his eyes open yet as the experience of having his treasures stolen hasn't come into question. The key is for some other treasure chest I have no idea where and he has kept his favorites near him.

Here are some close ups....


If you play CastleVille on facebook this little fellow maybe a little similar.... CastleVille has baby Dragons!!! And that is what I modeled him off. ;)


I think he may have a bit of a cheeky look to him.... Maybe he is not sleeping at all and is just tricking us!


I actually use him as a pen holder.....

So you want to know how to make this cute little creature?
Ok I'll show you.....


Here is a two part video Part one is how to mold him out of Creative Paperclay® and the 2nd is how to paint him up with Terri Sproul Mixers.


The final tips I didn't put on the video...
(just so our fave readers here at the blog can have some special info)

After the video was made I painted an additional layer of watery Acrylic paint (olive green)
Then put over top a layer of Terri Sproul Mixer - Bronze only. 
Drying in-between all layers.
This added depth in the finish of the final product.

Thanks so much for watching
May your dragon forever sleep (and look cute!)

Debbie Buckland
artycrafty.wordpress.com

Thursday, May 17, 2012

Quick Tip - dried up clay?

Hi all here is a quick tip....
If your clay is all dried up in a very hard block.... (I mean completely hard for several months)
PLEASE DON'T throw it away!!!!!

draw a shape on it...


carve it carefully with a craft knife or similar
Then sand it with sand paper


decorate it as desired
This is a Pencil topper or in this case it protects a blade from digging into my hand when I want to find something on my desk.

I used Terri Sproul Mixers (steam punk set)
Stampin Up! Early Esspresso ink pad and sponge
Watch parts and 3D crystal Laquer.
and Fiskars craft drill to drill the hole in the bottom. (yes you can drill the stuff when it is dry! cool aye!)


Thanks for dropping by!
Debbie Buckland
http://artycrafty.wordpress.com

Thursday, May 3, 2012

Creating Bracelets with Paperclay


How to make a Creative Paperclay® bracelet

Hi all I’m baaaaack!!! I am so excited to be back for a second term!!!! Did you miss me? ;)
You may see something new in my posts in this six month term. I am working closely with Creative Paperclay® and Petra from Zigzag.co.nz to help promote sales here in New Zealand (NZ). Why not keep this great product international? It also helps our NZ customers knowing where to find it closer to home.  I love finding my favourite products here in my own country and my own town. (Also saves a bit on postage too, therefore helps me afford to buy more. ****shhhh*** don’t tell the hubby!)

I am going to start this term by showing you how to make your own bracelets by stamping, painting, crackling and drawing on them. So let’s go!

You will need:
·         A block of Creative Paperclay® - available in NZ from Zigzag.co.nz
·         Terri Sproul Mixers (TS Mixers) Purple, pink, blue set– available from VLVstamps
·         3D crystal Lacquer - available in NZ from Zigzag.co.nz
·         Artline  210 medium 0.6 black pen
·         Archival Ink Jet Black stamp pad
·         Inkadinado 97615 Clear stamps
·         One Step Crackle by Decoart
·         Atelier – burnt umber acrylic paint


Take some paperclay out of its packet and roll a long snake with it on your work space the length it would take to wrap around your wrist.

Take a round container that would fit your current bracelets and put the paperclay snake around it and flatten it. Let it dry.

When it was half dry I removed the paperclay bracelet and then let it dry completely.

I stamped one bracelet with a clear stamp and the other bracelet I drew lines on it with a marker pen.

With TS Mixers I mixed them with 3D crystal Lacquer and painted the bracelets

After the TS Mixers where dry I applied One step crackle to the face of the bracelets.
When that was dry I applied burnt umber acrylic paint (dark brown) over the bracelet and then wiped it off leaving it in the cracks only.
Thicker the application of One step crackle the bigger the cracks.

With the stamped bracelet I sanded the edge of the bracelet applied burnt umber acrylic paint to the spot that was sanded and then applied the One step crackle as above thinly to get finer cracks.

And I have some groovy new bracelets

These bracelets I made are a little flexible. I also made them with a small gap instead of a complete round. Thickness of my bracelets are about ¼ inch or 2-3millimeters.


Thanks so much for dropping by

I will be back later on in the month with a tip...

Monday, March 5, 2012

Greek Inspiration with Creative Paperclay®

Hello all...
I have always been inspired by Ancient Greek art and design. Its fabulous and I could research it for hours!
Well thanks to the internet and Google images search I have looked and looked up Ancient Greek art and design.... Sculpture... Symbolism and colourings.

This is what I ended up with....


Here is how I made it
I used:
  1. Creative Paperclay®
  2. square plastic packaging from a cuttlebug die
  3. old barbie/fashion doll (the hair I cut off as it was matted - i am planning to re-hair her oneday)
  4. Amaizing mold putty - parts 1 and 2
  5. Inks/paints/brushes/ribbons etc to decorate
  6. Glue Gun
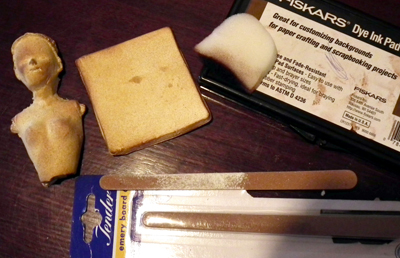
I molded the old barbie/fashion doll
Made one of full torso and then a head and a nose. I will only use the full torso for this project today...
When the clay was partly dry I popped it carefully out of the mold then shaped the face a bit by pinching the cheeks in to make the shape of the face I wanted. I also tore off the shoulder parts and the waist part to make it look like broken stone..... then let the clay dry for 3 days till totally hard.


Next I put some clay into the cuttlebug die packaging and molded a flat-ish square:

let dry for 3 days with the doll torso.


This is when I started really researching my design..... what did Ancient Greek wall sculpture look like?What colour was it? What colours did they use back then? What symbols did they use? What did the Greek alphabet look like?


Well after all that I came up with a loose design.


I also took the symbols of the Greek Alphabet in the form of my Initials DMB and got "Delta Mew Bay-tah".... so cool.  I think I'll start up a Crafting Sorority called that... what you think? LOL
As you see I was playing around with the logo design too.... The stamp is from Viva Las Vagas stamps

Decorative Frieze


 Spray with Pale Ale memories mists from Stewart Superior

 Tidy the edges and then ink with brown.


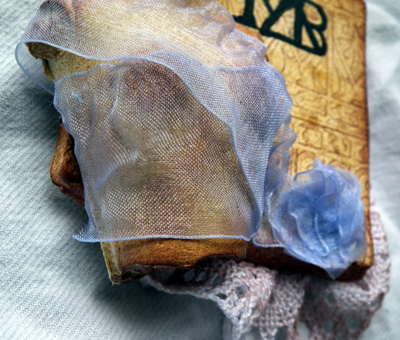
 Stamp your image on the panel piece then glue your ribbon around the torso and glue the torso to the panel


Next with a pencil draw your Greek Logo and then paint it.


Now find some old looking lace, ink it up and glue it to the back of your art....
I like naming and signing the back or bottom of my work....
 
You are finished!
 
 Delta Mew Beta...... lets go and create ya! LOL

 And here it is in my space.
Thanks for dropping by.