Showing posts with label Alice in Wonderland. Show all posts

Monday, April 20, 2015

Alice Inspired Pin Cushion for Mom

 Good Morning!

If you have a Mom who likes to sew then this cute teacup pin cushion gift will be a real winner!


It doesn't matter how old you are, mom will always cherish something handmade by you. She still has a shoebox full of magnificent drawings you created in elementary school .... am I right?


Here is what you will need

Creative Paperclay®
Sandpaper
Sandits®
Styrofoam ball
Poly fiberfill
Fabric
Plastic flowerpot
Baking spray
Sewing pins
Needle and thread
Americana Muti-surface paint®
Mod Podge®
 E6000 glue

Let's get started

Making the cup
1. Lightly spray a plastic flower pot with baking spray so that your paperclay will not stick.
2. Roll out a sheet of paperclay and drape over the flower pot.
3. Trim off excess.
4. Smooth out paperclay using water on your fingertips
5. Cut a strip of paperclay and roll it to form a solid tube. (This will be for your handle)
6. When dry smooth out the cup more (if needed) using a fine grit sandpaper. The handle had a lot of  curves. I found it was easier to finish using Sandits®.
7. Paint your pieces and decorate to your liking.
8. Attach the handle to the cup using E6000 glue.
9. Mod Podge the entire piece to seal.


Making the pin cushion 
1.Cut a square piece of fabric large enough to wrap around your ball.
2.Wrap some fiberfill around the styrofoam ball.
3.Wrap your fabric around the ball to hold the fiberfill on pinning in place.
4. Take a needle and thread and stitch together at the bottom of the ball gathering excess as you go.
5. Remove the pins.
6. Glue the finished fabric covered ball into the cup using E6000 glue.


Top view of the finished pin cushion
Thanks for following along with the creation of my quirky Alice in Wonderland inspired pin cushion.

Happy creating!
Shari


I have been creating art for as long as I can remember. I studied graphic design in Portland, Oregon before moving to Denton, Texas and putting all my focus on creating mixed media art. In addition to being on the Creative Paperclay design team, I am a contributor for the Robin's Nest Design Team, an article writer for Mixed Media Art, and a blogger for DecoArt.
I strongly believe in giving back. I volunteer at Scrap Denton Creative Reuse Center where I teach workshops, art camps, and perform art demos. I am very passionate about mixed media art and enjoy helping and watching others discover their creativity.
Follow more of my creative journey on My Altered Life's blog and My Altered Life on FB

Friday, February 21, 2014

The Making of the Caterpillar's Hookah with Rachel Whetzel

My love affair with Creative Paperclay® continues!! I'm working some more on my Caterpillar piece, and today's project is his Hookah!

WHAT YOU'LL NEED to make your own Caterpillar's Hookah:
  • Something to form the bones of your piece. I used a large bolt for the main piece, and a second, smaller screw for the mouth piece attachment.
  • Creative Paperclay®
  • Paints. I used Krylon spray for the metal, and acrylic craft paints for the bowl.
  • Sandpaper
  • Sandits
  • Embroidery Floss (black and white) 
To get started, I used a large bolt and put a light layer of Creative Paperclay® over the top of it to start my base. 
 Next, I sculpted the base of my piece, and left part of the bolt threads exposed, because I will use that to secure the piece to my mushroom later.
 I used the thread area of the piece to spin it and used my fingers in a stationary position to imitate a lathe like motion, and make my sculpts uniform.
Once all my pieces were dry, I sanded and assembled the pieces. To create the tubing on my mouth piece, I used the same technique as you would use to make a hair wrap. GO HERE to see a tutorial video on how to do this. I used Sandits tools to create a nice, round tobacco bowl, and to make some of my smaller swoopy bits look nice and clean. I will officially be adding these to my creating arsenal.
 Then I wrapped the cord with some masking tape to protect it from paint, and spray painted the piece with metallic spray paint.
Last, I painted the handle of the mouth piece, and the bowl of the hookah, and put the piece onto my mushroom! 
Thanks for reading today!! I would love for you to visit me at my "house" too!! Hop over and subscribe!  ~rachel

Friday, December 20, 2013

Caterpillar's Mushroom by Rachel Whetzel

Hello! It's Rachel Whetzel. Today, I'm sharing the process of creating a base for a future Art Doll I have plans to make. I have made a lot of Alice in Wonderland themed dolls. I've made Alice, in various ways, I've made the Queen of Hearts, and the Cheshire Cat. I've made the White Rabbit, and the Mad Hatter, and I've always wanted to make the Caterpillar. The thing is, the mushroom has always gotten the better of me. Until now.
In my tip earlier this month, I shared a bit about creating the bones of a structure, and how to help make it strong. I also utilized items I had on hand, and some I had thrifted.
I also went on line, and did some research on the Amanita muscaria mushroom, and used pictures like the one below for reference and inspiration.
PHOTO SOURCE: http://www.kew.org/plants-fungi/Amanita-muscaria.htm
WHAT YOU'LL NEED to make your own Caterpillar's Mushroom:

  • Something to form the bones of your piece. I used a large wooden candle holder, and an old plant tray
  • Newspaper
  • Tape
  • Creative Paperclay®
  • Paints. I used Krylon spray for the red, and acrylic craft paints for the rest
  • Knife or something straight to press into wet clay
  • Sandpaper

To get started, I further filled out my base using news paper and tape as I have shown you HERE and HERE. Then I got to work covering the whole piece in clay.
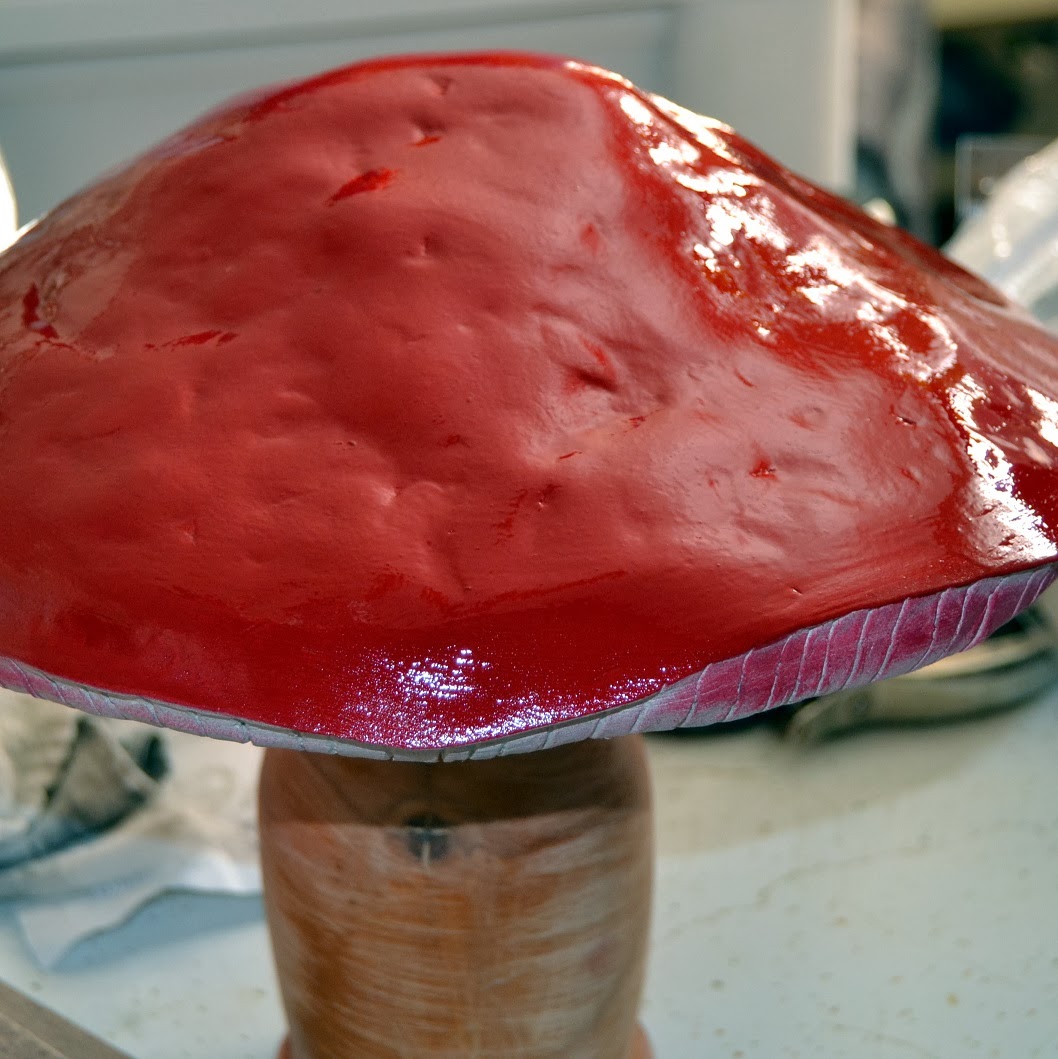
Once the whole piece was dry, I filled in any cracks, and then added another layer of clay to the underside of the mushroom. Once I had that layer of clay added, I used a Dough scraper to put lines in the clay to form the gills of the mushroom.
I used water to smooth out the edges of the gills. When I was finished, they looked like this:
Then I added the edge to the mushroom, and when the edge was finished, I pulled the gills to the VERY underside of the top.
Once I had the general shape and feel I wanted, I let my piece dry overnight, and sanded it. When I had sanded the piece into well, I wiped it down with a wet washcloth, and spray painted the top of the piece with red spray paint.
As you can see, I also sanded the wooden candle base that has become the mushroom stem in order to prepare it for paint. Then I cleaned up the overspray of my red paint, and put stripes on the stem to add a whimsical touch to the piece. While the stripes dried, I added spots to the top of the mushroom.
Once all my paints had dried, I used some Valspar antiquing paint to add depth to the gills of the mushroom, and onto the stem as well!
I may end up muting the antiquing paint with a bit of white paint later, but for now, I like the way it turned out!! I can't wait to create the Caterpillar and his Hookah and place them on this cutie.
Leave me a comment and let me know! I would love for you to visit me at my "house" too!! Thank you so much for reading!! ~rachel

Wednesday, May 15, 2013

May Tip by Rachel Whetzel

Hello!! Rachel Whetzel here. I have a tip for you! That guy above is my newest art doll I created using Creative Paperclay® modeling material. My tip today is about painting. When you paint things with a lot of texture, like Mad Hatter's hair, you can achieve the best dimension by painting in more than one color to add shading and highlight areas. 
For the Mad Hatter here, I used a light blue paint as my base coat, and then added a darker blue. Before the darker blue was dry, I wiped it off to expose the lighter shades underneath, and left the darker blue in the crevices of the hair. For the last layer, I used antiquing stain and then rubbed it off as well, leaving it in the deepest parts of the hair. Using the technique allows you to let your sculpting to the work for you! 

Thursday, January 5, 2012

Alice in Wonderland Canvas

Hi everyone, Debbie here.
First a warning: this post is LONG!
But it brings you not one but 5 tutorials!
These 5 tutorials brings you a one big finished project!

This project is for my Son's preschool. They have looked after both my children while I worked part time and now my last is off to school! I can't believe my little man is 5yrs old this month! New Zealand school year starts Feb - Dec with 4 four terms broken up in 8-10 week lots. Holidays in between. I know its all complicated aye. lol

So are you ready?

This is the finished project: Canvas measures 15" high and 30" long


You will need:
  • Large Canvas (I found a free canvas. Already painted on So I had to prep it with gesso)
  • Gesso
  • Paint brushes different sizes
  • Creative Paperclay®
  • Shaping tools
  • Glue
  • Paints
  • old story book pages

1. gesso canvas if second hand
2. Sand between dryed layers of gesso I did 2 layers
3. Sequence your story book pages
4. Plan and sketch your layout
5. place your story book pages
6. stick them down
7. paint black around edges and over titles


Now for the Creative Paperclay® Pieces:

How to make the bottle                                                 
   
How to make the Rose

How to make the Hat
 how to make the Toad tool
 
 How to make the Watch:


Good time to plan where to stick the embellishments.....
  

Once pieces are dry Paint up your pieces to the colour you desire.... (click on following images for larger views.)


Stick pieces with liquid glue to the canvas.... I find PVA, Aleene's Glue or Elmars Glue good.
Congrats you have finished the canvas!!!
Well done for reading the whole post and I thank you for sticking with me through it.
Here are the close ups of the canvas...


Have a crafty day!
Check out my blog: artycrafty.wordpress.com