Wednesday, May 28, 2014

Mischievous Woodland Pixie Tutorial By Gloriann Irizarry


Hola my dear followers, collectors and  friends Gloriann Irizarry here bringing you a new tutorial.
Now this time I do have to apologized for the delay. We got to love the technology..lol

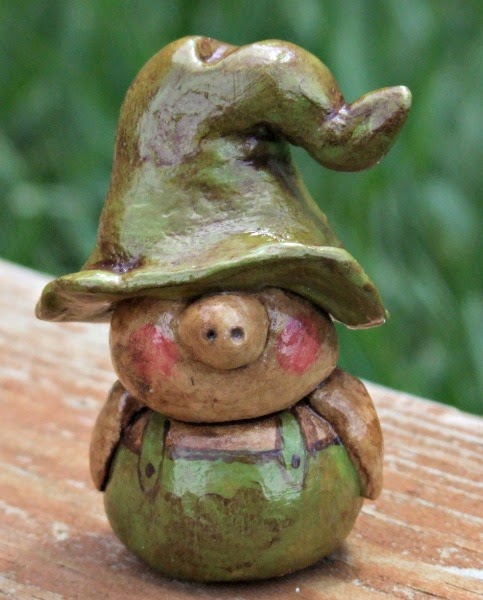
Well today i wanted to introduce you to Pixie the little mischievous woodland fairy.

She was specially made for a friend.
We had a challenge called Dark Fairies and this is how this Pixie was born.

I find challenges to be very helpful.  They are so much fun and we get to spend so much fun with fellow artist. We help each other share experiences and teach new techniques.

If you up for a challenge I will recommend for you to look for a participating groups.
One of my favorite group is at Facebook EVeRy WiTcH WaY LaNe 
The group leader is my friend and artist  Patrick Gill

Let me show you how this little Mischievous Woodland Pixie took shape


Materials

1 bag of 16 oz of  Creative Paperclay® modeling material
Aleene's Quick Dry Tacky Glue 8oz
Mini Gourds
Acrylic paints (Purple, Green, Yellow and White)
3 Purple swarovski crystals
Thin Ribbon
Roll of tulle
 Steel wires
Mini wood plaque
Aleene's Spray Acrylic Sealer Matte Finish 6oz


.


I grabbed 2 mini gourds and glued them together with the Aleene's Quick Dry Tacky Glue


Drill some hole to the gourds place wires to create the hands and feet.
Cover the wires with some Creative Paperclay® modeling material  to start shaping the little fairy. 


Let it dry and make sure is attached to the gourds. If they peel off use the Aleene's Quick Dry Tacky Glue to reinforce the clay armature for the piece.


Little by little add more clay to the little wires to create the shape of the legs and arm.


 Add more clay to the face and begin creating the mischievous smile.


Layer by layers add more clay to the back and wait to dry


 Once the clay on the face dry add more to the cheeks to give some personality to the pixie.


Layer by layer the fairy start taking shape and growing stronger and stronger


Add some clay to the wires on the head to create some crafty ears.


I added more clay to the back to give her a more fuller look.


To give her ans expression i added more clay on her cheeks and lightly sculpted her eyes.


Check on the piece to see if you wan to add more clay or your already happy with her lines.
If happy let her dry completely overnight.


 The first base layer I used is a water down purple and cover the whole piece.


I wanted to give the Pixie some natural feel to the skin so I used the tooth brush technique.
It is easy. Just choose your favorite color of acrylic paint and watered down.
Place the tooth brush on the paint and brush your thumb to sprinkle the paint in to the figure.
I did this to her in two layers. Once Yellow and another one green.


Once it dry you can add the eyes, lips and ears details.
Seal with Aleene's Spray Acrylic Sealer Matte Finish
After seal dry go ahead and glue the 3 Swarovski Crystals to the forehead with the 3D Sakura Crystal Lacquer

For the Tutu is pretty easy Cut a 8 inches piece of black thin ribbon.
Now cut a lot of little strips from the roll of tulle and start attaching them to the 8 inches strip of ribbon by knotting them to the thin black ribbon.
Little by little it will get fuller and fuller until your achieve the skirt look.


Let make some Fairy Wings now

Wings Materials
Acetate or paper print wings
Super Strong magnets
Instructions

Making these wings are easy.

Print this graphic in acetate or card stock

Mix your favorite colors of the Terri's Sprouls Mixers with 3D Sakura Crystal Lacquer

Use the mix to decorate and accent your wings with your favorite 3D Sakura Crystal Lacquer

Wait for them to completely dry.

Cut the wings out.

Use some tulle and ribbons to create a center piece and glue it.

Place a magnet on the wings with Glue with the 3D Sakura Crystal Lacquer and wait for them to dry.
After they dry they are ready to be wear.


#bygloricom


#bygloritutos


#creativepaperclay


@bygloricom


Now have in mind the Creative Papeclay possibilities are endless, so feel free to let you imagination fly and remember to always have fun in the process . 
I hope you enjoy this full tutorial fell free to place any comments or email me with any question :)

Have a bless day and remember to always have fun while crafting!


Friday, May 23, 2014

Kids Project: Votive Screen

Working with Creative Paperclay® is a perfect activity to involve the kids—of all ages. My four year old granddaughter and I worked together to create this votive screen. We started with a ball of Creative Paperclay®, pressed it with our fingers to flatten it, then completed the flattening process using a rolling pin. The paperclay is so pliable to work with that it was easy for Chloe to roll the clay flat and thin. I finished the last couple rolling pin passes to get the clay to a 1/16" thickness.

We placed a USArtQuest PrintMaker rubber plate (PrintMaker) on the clay with the design side of the PrintMaker touching the clay. Then, one fairly firm pass with the rolling pin to impress the clay. Just one pass with the rolling pin rather than repeatedly rolling back and forth helps to ensure a crisp impression.


I aligned a metal ruler and Chloe used a bone folder to trim away the excess clay beyond the impression left from the PrintMaker. [Note: The pink striations in the clay are a happy accident that occurred when we rolled the clay out on a teflon mat that we'd used earlier with stamp pad inks. We ended up painting over them for this project, but it's a coloring technique that I'm sure to revisit.]


Next step was to pierce the stems of the ginko leaves to allow for light from the votive to show through. I did this step for this project because it was too fiddly for a four year old, but an older child could handle this well. With the clay laying flat on my worktable, I used the tip of the bone folder to slice through the clay, then gently enlarged the area enough to allow light to pass through.

We positioned the trimmed and pierced clay onto a jar to dry.


Painting was all Chloe's job. This was our color palette: leaf green, black green, and gold metallic.


First, she completely coated the piece—front and back—with the black green. After that coat dried, we added the leaf green accents with a barely wet stipple brush. She barely dripped the brush into the paint, then tapped off excess by stippling onto scrap paper until the brush held just the slightest amount of paint. I did help her judge the amount of paint on the stippling brush. We let the leaf green paint dry before adding the gold highlights. These were added with a sponge brush that had even less paint on it than the stipple brush did.

Here's our finished votive screen. [I recommend using a battery operated candle rather than a live flame.]

Watch for more projects with kids in mind the last Friday of each month. I'll also be sharing general tips and ideas for introducing children to art projects and Creative Paperclay®.

Carole

Sunday, May 18, 2014

Creative Paperclay® Gnome Home with a Little Gnome Piggy

Welcome I am glad you have come to join me.

My name is Donna AKA/Memes Art Place and I am new to the Design Team. 

I have made the sweetest Gnome Home with a Gnome piggy as my first assignment. 

Supply List
*Creative Paperclay®
*Eileen Hull Designs/Sizzix 3D Block Die/or box of size you would like-You can see them HERE
*Embossing Paste by Wendy Vecchi-You can see that HERE
*Paint/I used Golden...but you can use what you like
*Time to play 

So how did this start? I will show you how I began my Gnome home!

I started with Eileen Hull Designs 3D Blocks die, I moved them around until I figured out how I
wanted my Gnome Home to look.
Once I found the shape I wanted and glued it all together I used
Embossing Paste to cover the outside of the house. I wanted this to
resemble stucco. I had to wait for this to dry a bit.
So while waiting, I rolled out my Creative Paperclay® and cut it into squares, not really worrying
about it being exact. As you can see some are smaller and some are bigger.
But it is okay, these will be roof tiles.
I started to apply the tiles, no glue necessary. Just remember, water is your friend!
I created a stem for the top and added little bricks and rocks to the front and sides.
I let this dry for a few days. Really only needed overnight, nothing was to thick, except maybe the stem.
I was off to paint and add the character to this New Gnome Home!
 I did not take pictures of the process for the Pig, he really was super easy! 
I think the paint process was the longest part of this whole process!
You can make anything out of the Creative Paperclay®!
The rocks look realistic along with the bricks.
Here is the back of the Gnome House with vines climbing up the stucco.
Another view, you can see the side.

And Finally meet the little piggy that lives in this home........Winston!
 
Here is Winston's backside!

I want to Thank You for stopping by and please let me know how I did with my first post as official member of the Creative Paperclay® DT!

If you would like to find out more about me or about other art projects, please visit my

Friday, May 16, 2014

Dyed Creative Paperclay® with Rachel Whetzel

Hello, Creatives!! Rachel Whetzel here! I played this month, with some of my Alumilite Dye, and used it with my Creative Paperclay®! Then, I gave my dyed piece to my art student, and she created this!
WHAT YOU'LL NEED to make your own Dyed Creative Paperclay®:
ADDITIONAL SUPPLIES FOR MIXED MEDIA CANVAS:

  • Paper Doily
  • Paints. I use Folk Art acrylic craft paints.
  • Paint brushes 
  • Scissors
  • Butterfly image
  • Glitter 
  • Tattered Angels pearl sprays
  • Punchinella
  • Patterned paper
  • Glue. I use Crafter's Pick : The Ultimate and Elmer's
  • Typewriter or computer connected to a printer
  • Krylon's Matte Finishing spray
I wanted to experiment with using my Alumilite Dyes and Creative Paperclay. I also have a new frame I've been wanting to mold, so I started by creating a mold for a frame that Emmie could use on an art piece she and I started last month.
 I put some drops of  purple Alumilite Dye onto the clay and kneaded it into the clay. It was light to begin with, so I kept adding dye and kneading until it was as dark as I wanted it. THAT'S IT!! Using the dye was so simple, I couldn't believe it! The clay still dried and shaped as usual, and the dye didn't stain my fingers! I was really surprised.
Keep in mind, that your clay color when wet is a lot like paint. It's always a little different (usually a little darker) than it will be dry. Once it was mixed, I pressed the clay into my mold, and put it on low heat in the oven to speed up the dry time.
 Emmie wanted some butterflies on her piece, and the one she chose was one that I only had one image of, so I took a picture of the butterfly, and then printed out more in a word document, so that I could print them out in varying sizes for her piece.
 OTHER DETAILS:

  • A glued a paper doily to the base canvas, painted over it, with the paint away to reveal the texture of the doily. 
  • Crafter's Pick was used to glue a mirror down under the frame, and we sprayed matte sealant over the whole piece to seal it all, but also to frost the mirror. 
  • Punchinella used as a stencil with yellow and white paints
  • Elmer's glue drizzled down the page and then glitter sprinkled over the top
  • More glitter in dots around the page
  • Flower embelishments that Emmie brought with her
  • The lyrics to You are My Sunshine printed on patterned paper and adhered to the piece