Wednesday, November 23, 2016

Figure Sculpting with Creative Paperclay (part 1 of 3)

1/9 scale female figure cardstock armature
1:9 scale female armature
1/9 scale male figure cardstock armature
1:9 scale male armature


In our last article we looked at sculpting animals using a paper craft armature.  In this series, we are going to take it one step further by sculpting human figures based on a simplified paper craft armature.


I have drawn out a male and a female model that you can download, print on card stock, cut out and assemble to make a very basic 3D armature.


The figures are about eight inches tall, making them approximately 1:9 scale.  Feel free to print them larger or smaller to fit the scale in which you want to work.

8 inch figurine sculpting armature
female armature cut out and taped

You can use glue to assemble them, but to save time, I just use bits of masking tape.


As you can see, the figures are not complete and have gaps between different parts, but they will suit our purpose, which is to show proper scale and location of details.


We will fill in the gaps later with paper clay once we decide on a pose.


8 inch figurine sculpting armature
male armature cut and asembled


In traditional sculpting, it is more common to use a wire armature, but I find that by using a card stock armature, I can draw on any details I want to include.


If you would prefer to use a wire sculpture, David Neat, a British artist, has an excellent article with downloadable drawings here. 


strengthen armatures with Paverpol
love is everywhere...
the figure on right has
been coated with glue


The next step is to reinforce the armature so it is solid enough to add clay.  The easiest way I have found is to coat all sides with Paverpol or wood glue, which when it dries, becomes quite firm.


Once the glue is dry, you can add a thin layer of clay.  This first layer is just to give the armature more strength and depth.


Don't worry about how you will position your figure yet.  After the first layer of clay is dry, it will be much firmer.


When dry, you can decide how you want to position your figure.  This is a fun part, because you can try all sorts of ideas.


Even after you settle on one, remember it is easy to change your mind, even after the clay is dry.
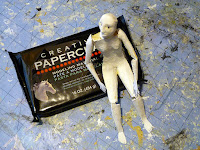

female figure after first layer of paper clay
female figure after first
layer of paper clay
In the next part, we will add the second layer of paper clay, which will bring together all of the elements of our figure and make it look more human and less cartoonish.


This first part was making the armature and preparing it for sculpting.  The next step gives you total freedom on how you want to express your view of the human condition through your art.


Click here to go to part 2.


link to kevin whitham saatchi art online


You can visit me on Facebook.

Tuesday, November 22, 2016

Change Your Mind Tips

Sometimes we change our mind. Maybe it is the concept behind the piece of art, we couldn't execute the vision we saw in our mind or ???? With Creative Paperclay®, it is easy to remove the clay if our project doesn't work out. In this case, I had added a fennec (Saharan) fox on my art piece but changed my concept for the piece. I needed to remove it so I could continue on with my painting.

SUPPLIES

Dried Creative Paperclay®
Water
Paper Towels
Metal Palette Knife/Scraper


I covered the clay with very wet paper towels and leave on until the clay softened.


Then I scrapped it off. If some of the clay is still hard just reapply the wet paper towels again.


When all the clay is removed, I can continue to work on the piece. The playing never stops.

Dream in Color.

Monday, November 21, 2016

Shari's tip of the month for November- Unexpected Paperclay Molds

Good Morning!

I was recently shopping for some new mixed media elements. I was ready to recycle the plastic form trays that they come in when I realized they were an  exact mold of the original. 


I found another to make keys. I started thinking even more outside the box and found a plastic mold off of my cupcake papers that will work too!


 I would suggest that you lightly spray the mold with cooking spray before adding your paperclay. Let the clay dry partially before removing it from the mold. 


I was really excited to share this tip with you. I am now looking at everything I purchase to see if I can use it as a mold. I love the fact that I not only have great molds but I reused something that would have normally been tossed or recycled.

I would love to hear what interesting items you have used to make a mold.

Happy creating,
Shari

Sunday, November 20, 2016

Photo Magnets - Creative Paperclay Style


I don't spend a lot of time with family - we don't live in the same state they do, and we just simply don't get along really!  So when we do get a chance to spend time with them - the memories we make are priceless, and deserve to be showcased!!!  My mom and sister (who live in a different state than I do) came to see those of us who live here, which is 5 of her grandchildren and me!  I wanted to make something for her this Christmas that would be unexpected - and bring back those memories of that special week spent here with all of us!  I love making magnets too, smaller one's made out of Creative Paperclay, stamps, paper flowers, molded flowers, and paint - this is the first one (not the last) made with photos, I hope you enjoy!  
 
Supplies needed:
Creative Paperclay - flattened
White and yellow paint
Ribbon, rick rack, bakers twine
Bling
Paper flowers
Molded flowers
Magnet strip's
Chipboard saying 
Scissors 
Hot glue gun

**TIP - this is where I have said it really saves time to make up things ahead of time, for use later on!  When you have the inspiration, you can easily create something in relatively little time, compared to larger projects!**


Directions: 
Step one:  Taking your flattened Creative Paperclay - make the bases for the magnets the size you want for the photos you are using.  
Step two:  After pieces have been fully dried - sand and paint them.  I used a white paint for the bases - paint 2-3 coats.  
Step three:  After the paint has completely dried - you can start to create the frames.  Cut down the photos to size, adding if you do not have any ribbon, etc to add.  
Step four:  Add the ribbon, rick rack, or bakers twine you are using to wrap around the frame if you are using them.  After you are done with this - make sure to add the photo if you haven't in the last step.
Step five:  Add the bling - the flowers - the extra's to the rest of the piece finishing it off!


I can't wait to get more magnet strip's to make more magnets for my own use this time!  Sometimes it is harder for me to create something for me, rather than making it to sell or as a gift!  This project, was one from the heart for sure, I hope my mom feels the same way!  Thanks for stopping by, 
Lynda Jeffs
Memories in Tyme and
Creative Paperclay Design Team
    

Wednesday, November 16, 2016

A Little Birdie Told Me

I'm working on holiday ornaments. I love backyard birds! This was my first attempt, I love the way it turned out :o) I used the "Delight" clay so the ornament wouldn't weigh down the tree. I haven't attached the hanger yet, I'm using a eye hook at the base of the neck (hot glued in the hole) and ribbon to hang him.


Supplies:
Delight air dry clay by Creative Paper Clay 
Acrylic Paint: lt blue, copper and white
Medium wire
Black Sharpie
Eye hook, ribbon, clear glaze and hot glue

Instructions:
1. Form the bird body, wings and legs with Delight air dry clay.
2. Form bird feet from medium wire.
3. Let pieces dry overnight.
4. Paint with acrylic paints, let dry.
5. Use hot glue to attach wings and legs to the body.
6. Use a black sharpie for the dot for the eye.
7. Seal with clear glaze sealant.
8. Put an eye hook on the top at the base of the neck (secure with hot glue), add ribbon to hang.

Have a wonderful day!
Becky

Tuesday, November 15, 2016

Blue Flower Grass - An Experiment in Art

A few months ago I was lucky enough to receive a copy of the book Artful Paper Clay - Techniques for Adding Dimension to Your Art by Rogene Mañas for review.  I really loved this book, and was excited to try the techniques, but at the time, was living in a hotel room while we looked for a new house.  The day finally arrived that we had our new home and I had my art supplies back (Hurray!) so I decided to try the technique with a three-dimensional project of my own design.

Sisyrinchium demissum - stiff blue-eyed grass

For this project I used:

Creative Paperclay® modeling material
a 5 x 7 shadow box
gesso
acrylic gloss medium
acrylic paints
rubbing alcohol
sculpting tools
wood scrap
sandpaper


 I started with a simple sketch of how I wanted the flower placed.


I prepared the two background pieces - one of illustration board and one of wood, by cutting them to size and coating them with gesso (I had more gray gesso on hand than white, so I saved the white for the clay coating)


The upper piece is cut at an angle so only the edge of the wood will be visible, helping to create the illusion that the piece is floating against the background


I taped the larger background piece to a work board, masking off the edge that was needed to fit the board into the frame.

Clay was rolled out to approx. 1/8" thickness and applied to the board, then I pressed in random lines to indicated grass.


I wanted to have more texture in the background, so rolled and crinkled up some Kraft paper and pressed that into the design at various intervals.


Here is the first background piece, set aside to dry.


I sculpted the second background piece, flower, and stem separately.

When the large background piece was dry I cut a frame into it, per my design.

When the other pieces were dry, the edges were cleaned up, and some of the sections were sanded.


All of the pieces were given a coat of white gesso, then glued together and given another coat of gesso, then two coats of clear medium, as per the instructions in the book.


Next the scary part - painting the entire thing with Mars Black and allowing it to dry.


After the paint was dry, the top layer was removed with rubbing alcohol and then I started adding color to the piece.


I colored all the layers, then decided the background was more of a distraction than an enhancement, so added a dark wash of green over it.


This is the final piece, with the darker background and with highlights added to the grass stem, some of the grass, and the flowers.

I enjoyed creating this piece and trying the new techniques.  This was one of those cases where the work didn't match my vision of it before starting, but that's okay, I learned new ways of working with clay and acrylic paint, and I will definitely be trying these techniques again.

Thanks for joining me here again!  As always, play, experiment, and have fun!

Tori
Find me on Facebook, or peruse & ponder pics with me on Pinterest


Wednesday, November 9, 2016

Making an Aged Frame with Delight®

I love the marshmellowy feel of Delight®. It is perfect for the series of frames for some old tintypes to give as gifts. Delight is light when dry and takes texture well.

SUPPLIES

Delight®
Textures
Micaceous Oxide paint
Salt


Cut off strips of Delight® and push down on them to roughly form the shape of a frame.


I used rubber stamps, a latex mold and embossed wall paper to add textures to the Delight®.


After it was trimmed into a rough square shape I added some of the cut off pieces to the fron plus some cast flowers. Then I stamped it with alphabet stamps.


I finished the frame shape by painting a wash of micaceous oxide acrylic paint. While the paint was still wet, I salted it to give it a aged look. Now to find the right tintype for the window. At this point, I can still make the window larger if needed to fit the image.

Play with art and dream in color!

Darlene Olivia McElroy

Monday, November 7, 2016

Easily Recreate a Sage Burning Bowl

Good Morning!

I love this small bowl that I purchased to burn sage. When I went to buy another one for a gift, they no longer sold them. I was so sad!


Instead of trying to search everywhere for one that I loved as much, I decided to recreate a handmade one using Creative Paperclay®.

Today I am going to show you how I made this. I will also show you how I changed it up a bit and gave it my own personal touch.

One of a kind handmade gift....score!

Supplies 
Creative Paperclay®
Clay roller
Pasta machine for clay(optional)
Clay knife
Paint brushes
Water
Spray vegetable oil
Paper towels
E 6000 glue
Mod podge® ultra gloss
DecoArt® Metallic Lustre
      Black shimmer
      Iced espresso
      Majestic purple
      Elegant Emerald
Dazzling Metallics
     Worn penny
Multi surface acrylic paint
      Black
      White
      Teal
      Purple
      Gold


Lets make this!  

Helpful hint...You can lay your clay on the inside of the bowl or the outside, depending on the size you want.


The Bowl
1. Lightly spray oil on the side of your bowl you are going to mold, including the edges. Wipe off any excess.


2. Roll out a piece of clay very thin, enough to cover your piece.

3. Smooth the clay out with your wet hands and/or a brush.

4. Trim the edges with a clay knife. Smooth the edges with a damp brush.

5. Let Dry

6. When dry, remove the piece.

7. Clean up the edges.

Faux Raku
1.. Turn bowl upside down and apply small amounts of various colors of the Metallic Lustre® on the bowl.


9. First with your fingers, and then a wet paintbrush, spread the color around the bowl.


 2. When dry, I painted the inside with Metallics®worn penny paint.

3. Seal all over with the  Mod Podge ultra gloss.


The Dragonfly

1. Roll out a small piece of clay large enough for your stamp.

2. Push the stamp into the clay to make an impression.


 3. Trim around the dragonfly. Smooth the edges with a wet paintbrush.

4. When dry paint the dragon fly. 

5. Attach the dragonfly to the edge of the bowl with E6000 glue.


I hope this tutorial helped inspire you today. 

Happy Creating,
Shari


Sunday, November 6, 2016

Lyndas Tips For Using The Products

Being a paper crafter for the most part - I use both products - both for different reasons!  Other people on the team - will create elaborate sculptures and items...but for me - I am all for the embellishments I can make with the Delight and Creative Paperclay products!  Some things I have learned when creating with the products - 
  • Delight is more airy to work with - and dries quickly!
  • Delight doesn't have to be painted - the white is a great color to start with if you like!   
  • Creative Paperclay can be smoothed using your fingers and water!  
  • Creative Paperclay can be painted - making them customized for each item made. 
Save things like tuna cans - coffee cans - boxes....and create your own customized items!  I am re-purposing a tuna can now - adding Delight and a candle...I can't wait to show you what I end up creating!!!  I am also going to create another one using the Creative Paperclay product, to show you the differences between the two products!  
Depending on what you want your items to look like -will depend on the product you start with!  Light and airy for the Delight - the Creative Paperclay a bit harder, and you can customize this product with paint a bit easier!  Either product is fun to use!!! 
Thanks for stopping by,
Lynda Jeffs
Creative Paperclay Design Team 2016
    

Friday, November 4, 2016

November First Friday Fan Day


Need some inspiration for your next Creative Paperclay® project? Check out what folks are making with Creative Paperclay™.


Snowman and Button Ornament
Embossed Star Ornament
Snowman Ornament
Rose Made with Delight!

5 Christmas Ornaments
Paperclay Cupcake

HELP US FIND YOU!!
  1. Use the hashtag #CreativePaperclay on all your social networks.
  2. When using Facebook, be sure the your posts and images using the #Creative Paperclay hashtag are set to public, otherwise we won't be able to find you.
  3. Share your projects on the Creative PaperClay® Facebook page.
I'm always trolling the web, looking for great Creative Paperclay® projects. If you find something, post it on our Facebook page.

GOT QUESTIONS???

Find the answers to your paperclay questions. See what other folks are creating. Stop by our Facebook group and say, "Hi!" Creative Paperclay Q&A
Carole