Showing posts with label Amazing Mold Putty. Show all posts
Friday, November 24, 2017
Bejeweled Creative Paperclay® Painting
I have been working on a series of 48" x 48" paintings using Creative Paperclay® as part of my narrative. This piece is in its early stages and is just blocked in at this point. I loved combining the old with new in my work so I started with a traditional pose from the 1500's combined with highly decorated clay hearts.
SUPPLIES
Creative Paperclay®
Silicone mold
Found objects
Acrylic paint
Amazing Molding Putty
E6000 glue
Soft gel gloss
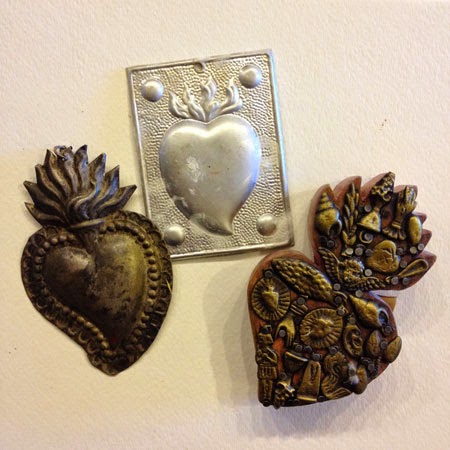
I started by casting a series of hearts. The mold was made from my collection of milagros and exvotos using Amazing Molding Putty.
While this was drying I gathered beads, found objects and E6000 glue.
The dried hearts were attached to my painting with soft gel gloss. BTW I work on wood panels.
People leave me bags of broken jewelry and other goodies at my door step. Last week I received three bags from three different people. It is like Christmas when I get these.
At a thrift door the last week, I found large bags of broken jewelry and odds and ends for a cheap price and I didn't pick them up. When I went back they were gone. Still kicking myself.
This piece has faux pearls from the 30's, old bracelet and small charm.
I definitely have a baroque heart in this body that keeps trying to come out. Decorated with faux pearl, salt water pears, micro beads and vintage broach.
Old beaded necklace, broach and some mica flakes finished off this heart.
The finished piece will be posted on my facebook page when done - https://www.facebook.com/darleneoliviamcelroy
Dream in Color and throw nothing out.
Darlene Olivia McElroy
Monday, September 28, 2015
Molding and Creative PaperClay®
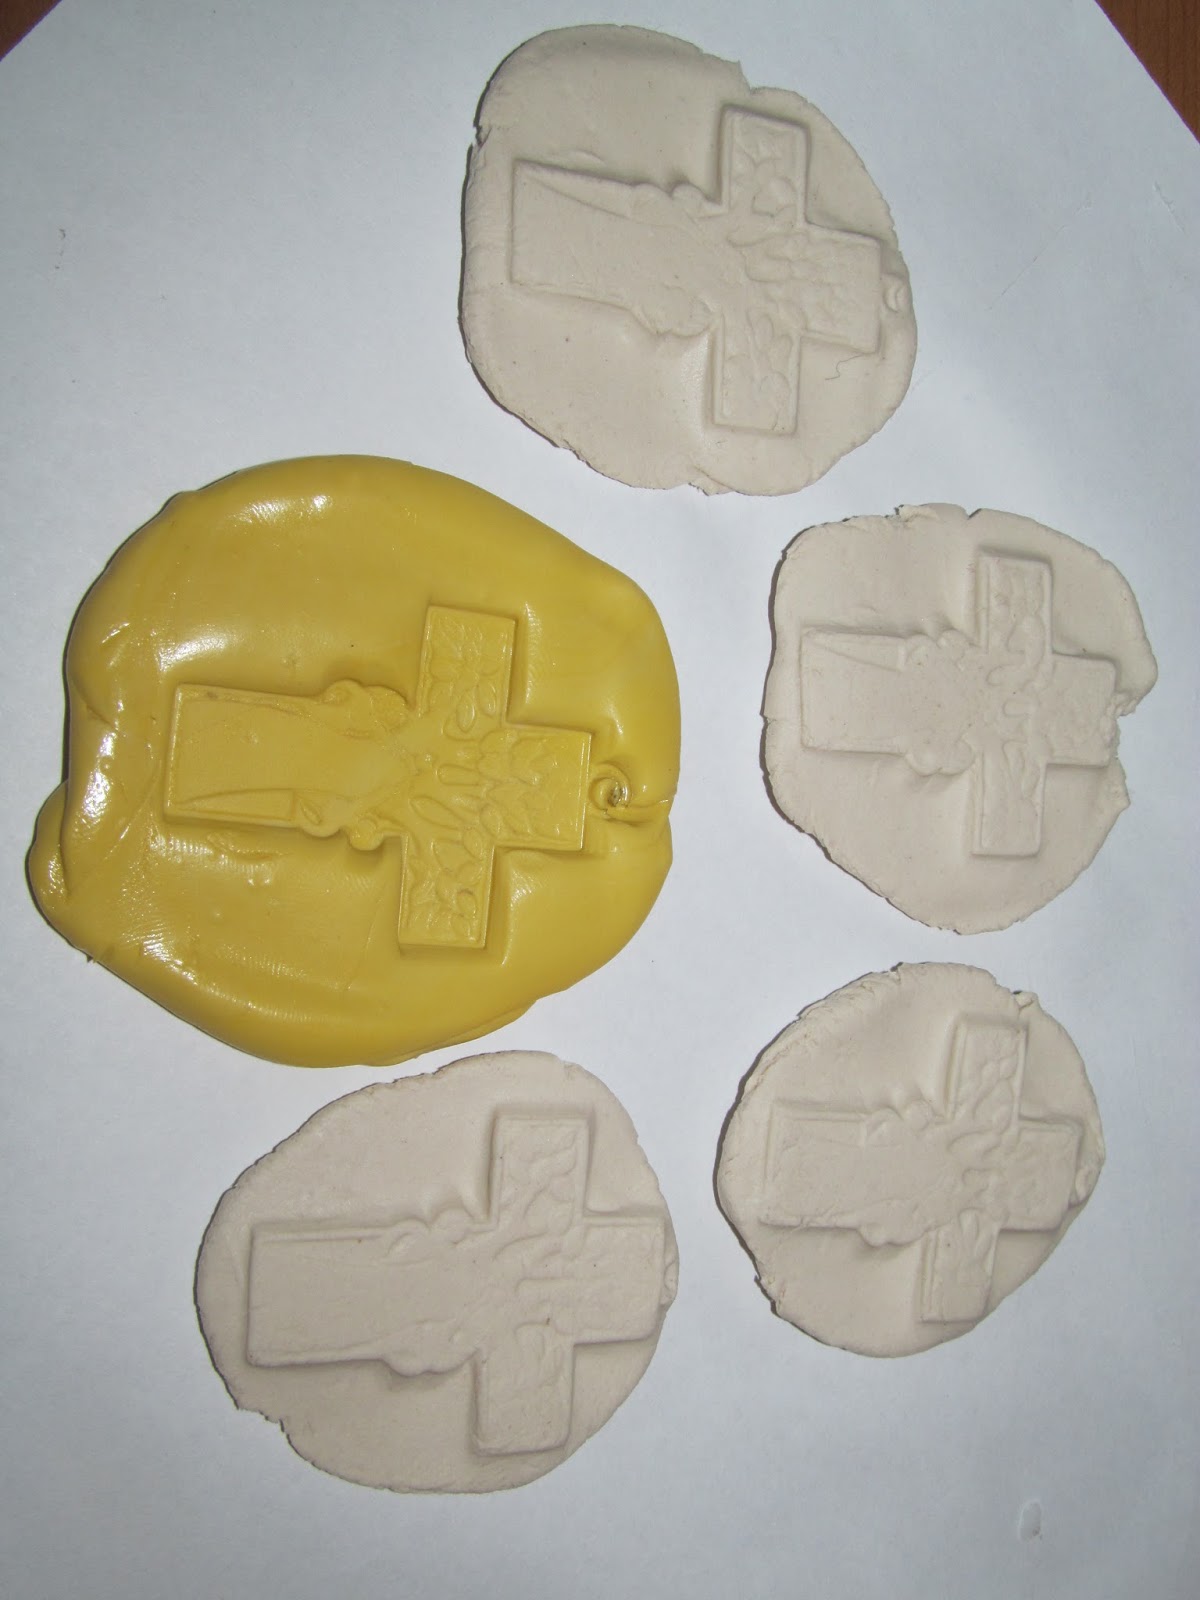
Hi all! A quick tutorial on molds and Creative PaperClay®. Do you have a piece in your stash that you wish you could "clone". Well I certainly do. It is a cross that I found in Mexico a number of years ago.
I have searched all over the internet in hopes that I could find more or discover the artist who created it with absolutely no luck. After exhausting all possibilities, I decided to create a mold of the piece to use.
(NOTE: Never EVER make a mold of a copyrighted product or an original piece that can be attributed to a specific artist. To do that would be like stealing.)
Amazing Mold Putty (www.moldputty.com) is my go-to mold making product. There are times I wish I had some in my pocket as I travel around and discover something with a cool texture! This molding material is available at most craft stores. In the box are 2 containers.
To create a mold, mix together equal sized balls (one from each container) between your fingers until the colors are completely blended. Place the blended material on your work surface and flatten slightly with your fingers or a roller. Press the item to be molded into the material (as shown)
and let it set for 20 minutes. Once set, the original piece can be removed and you have a flexible mold to use and reuse.
It is amazing (just like the name suggests) the amount of detail that this product picks up!
Now to create a few reproductions from my mold. I teach art at a Catholic school, so you can imagine the amount of excitement that surrounded Pope Francis' visit to the DC area. I thought how lovely it would be to create a simple pin or bookmark for my fellow teachers. I think this will be the perfect highlight for those creations. Pull a small amount of Creative PaperClay® off the block and roll it into a smooth ball.
Press the ball into the mold making sure it fills all of the crevices.
Then flex the mold to remove your clay piece.
Place it on your work surface and repeat until you have multiple pieces to use.
Now to detail. If you are an impatient sort (like me) you may not want to wait until your pieces are dry to ink or paint or color them. Let me present my "experiment" which shows why you need to wait. For this piece I pulled out a leaf green Ancient Page ink and laid the cross on top of it. I lightly pressed on the back until (I thought) it had picked up the ink. When I turned it over I discovered way too much ink had transferred to the piece and I needed to remove some. Since the clay was not dry, I couldn't wipe it (this would have smooshed the design). Instead I placed a piece of paper over the top and lightly blotted. This removed some ink from the top, but not the the background,,,still, an interesting look.
I cut away the excess clay and plan to detail the trunk with markers or colored pencils after it dries completely.
I tried one more time (because that is what I do) with another color of ink. This time I used a lighter touch and the background remained light colored while the raised portions picked up the ink and "POPPED".
Again I cut away the excess clay and set it aside to dry.
NOTE: If desired, the molded components can be placed into the oven at 275 degrees to quick set. it will not completely dry the components, but will make them a bit more easy to detail without the danger of smooshing and having to start again.
Pieces cut away can be reused. However, be careful of them starting to airdry (after all, this is AirDry clay). As you can see from this photo, the molded piece has a very distinct crack across the top.
To get around this possible problem, keep a damp paper towel handy and wrap any cut away or excess clay up immediately. The paper towel will keep the clay moist and help you avoid nasty cracks & crevices.
I plan to use the crosses for pins or bookmarks, but they would also be beautiful on card fronts or as bag ties. I hope you have enjoyed this intro to molds and Creative PaperClay® Have fun and experiment.
I have searched all over the internet in hopes that I could find more or discover the artist who created it with absolutely no luck. After exhausting all possibilities, I decided to create a mold of the piece to use.
(NOTE: Never EVER make a mold of a copyrighted product or an original piece that can be attributed to a specific artist. To do that would be like stealing.)
Amazing Mold Putty (www.moldputty.com) is my go-to mold making product. There are times I wish I had some in my pocket as I travel around and discover something with a cool texture! This molding material is available at most craft stores. In the box are 2 containers.
To create a mold, mix together equal sized balls (one from each container) between your fingers until the colors are completely blended. Place the blended material on your work surface and flatten slightly with your fingers or a roller. Press the item to be molded into the material (as shown)
and let it set for 20 minutes. Once set, the original piece can be removed and you have a flexible mold to use and reuse.
It is amazing (just like the name suggests) the amount of detail that this product picks up!
Now to create a few reproductions from my mold. I teach art at a Catholic school, so you can imagine the amount of excitement that surrounded Pope Francis' visit to the DC area. I thought how lovely it would be to create a simple pin or bookmark for my fellow teachers. I think this will be the perfect highlight for those creations. Pull a small amount of Creative PaperClay® off the block and roll it into a smooth ball.
Press the ball into the mold making sure it fills all of the crevices.
Then flex the mold to remove your clay piece.
Place it on your work surface and repeat until you have multiple pieces to use.
Now to detail. If you are an impatient sort (like me) you may not want to wait until your pieces are dry to ink or paint or color them. Let me present my "experiment" which shows why you need to wait. For this piece I pulled out a leaf green Ancient Page ink and laid the cross on top of it. I lightly pressed on the back until (I thought) it had picked up the ink. When I turned it over I discovered way too much ink had transferred to the piece and I needed to remove some. Since the clay was not dry, I couldn't wipe it (this would have smooshed the design). Instead I placed a piece of paper over the top and lightly blotted. This removed some ink from the top, but not the the background,,,still, an interesting look.
I cut away the excess clay and plan to detail the trunk with markers or colored pencils after it dries completely.
I tried one more time (because that is what I do) with another color of ink. This time I used a lighter touch and the background remained light colored while the raised portions picked up the ink and "POPPED".
Again I cut away the excess clay and set it aside to dry.
NOTE: If desired, the molded components can be placed into the oven at 275 degrees to quick set. it will not completely dry the components, but will make them a bit more easy to detail without the danger of smooshing and having to start again.
Pieces cut away can be reused. However, be careful of them starting to airdry (after all, this is AirDry clay). As you can see from this photo, the molded piece has a very distinct crack across the top.
To get around this possible problem, keep a damp paper towel handy and wrap any cut away or excess clay up immediately. The paper towel will keep the clay moist and help you avoid nasty cracks & crevices.
I plan to use the crosses for pins or bookmarks, but they would also be beautiful on card fronts or as bag ties. I hope you have enjoyed this intro to molds and Creative PaperClay® Have fun and experiment.
Tuesday, March 17, 2015
Building up a Mold Collection - Tori's tip for March
This month's tip - Start building a collection of molds to use for creating embellishments, parts, and whatever fabulous projects you come up with. Costume jewelry, various caps and containers, beads, natural objects, doll parts, keys, etc. can all be used as a basis for your molds. My favorite product for small objects and quick molds is Amazing Mold Putty. As you can see though, I use many different materials depending on how I'm going to use the mold. For large objects, I find plain old paper mâché works best for me. Experiment, have fun, and find what works best for you! Test out your molds with Creative Paperclay® modeling material, and Delight™ Air Dry Modeling Compound and keep the molded pieces on hand for when you need that extra "something" for your project.
Links -
Flex Wax
Amazing Mold Putty
Friendly Plastic
Sculptamold
PenScore (now called Magic Stamp)
Mold Builder
Thanks for joining me here!
I'd love for you to join me for more projects & art adventures on my personal blog
Thursday, February 12, 2015
Give a Little of Your HeART
Since
Valentine's Day is almost here, I decided to make a batch of hearts to
hand out to my friends so they have a memento of how much I care. I made
an assortment because all of my friends are different plus I enjoy the
variety of textures and looks.
Supplies
Creative Paperclay®
Amazing Molding Putty
Assortment of hearts to cast
Acrylic paint
Gold & silver rub

I went through my collection of metal and wood hearts to find the ones that I wanted to work with.
I made molds with amazing molding putty with some of them. One of the metal hearts I just had to turn over to cast the clay in.
Then it was my usual painting and metallic rubs.
I finished by putting them in fabric gift bags to hand deliver them in.
Happy Valentine's Day!
Darlene Olivia McElroy
Supplies
Creative Paperclay®
Amazing Molding Putty
Assortment of hearts to cast
Acrylic paint
Gold & silver rub

I went through my collection of metal and wood hearts to find the ones that I wanted to work with.
I made molds with amazing molding putty with some of them. One of the metal hearts I just had to turn over to cast the clay in.
Then it was my usual painting and metallic rubs.
I finished by putting them in fabric gift bags to hand deliver them in.
Happy Valentine's Day!
Darlene Olivia McElroy
Friday, May 16, 2014
Dyed Creative Paperclay® with Rachel Whetzel
Hello, Creatives!! Rachel Whetzel here! I played this month, with some of my Alumilite Dye, and used it with my Creative Paperclay®! Then, I gave my dyed piece to my art student, and she created this!
WHAT YOU'LL NEED to make your own Dyed Creative Paperclay®:
I wanted to experiment with using my Alumilite Dyes and Creative Paperclay. I also have a new frame I've been wanting to mold, so I started by creating a mold for a frame that Emmie could use on an art piece she and I started last month.
I put some drops of purple Alumilite Dye onto the clay and kneaded it into the clay. It was light to begin with, so I kept adding dye and kneading until it was as dark as I wanted it. THAT'S IT!! Using the dye was so simple, I couldn't believe it! The clay still dried and shaped as usual, and the dye didn't stain my fingers! I was really surprised.
Keep in mind, that your clay color when wet is a lot like paint. It's always a little different (usually a little darker) than it will be dry. Once it was mixed, I pressed the clay into my mold, and put it on low heat in the oven to speed up the dry time.
Emmie wanted some butterflies on her piece, and the one she chose was one that I only had one image of, so I took a picture of the butterfly, and then printed out more in a word document, so that I could print them out in varying sizes for her piece.
OTHER DETAILS:
WHAT YOU'LL NEED to make your own Dyed Creative Paperclay®:
- Creative Paperclay®
- Dye. I use Alumilite
ADDITIONAL SUPPLIES FOR MIXED MEDIA CANVAS:
- Paper Doily
- Paints. I use Folk Art acrylic craft paints.
- Paint brushes
- Scissors
- Butterfly image
- Glitter
- Tattered Angels pearl sprays
- Punchinella
- Patterned paper
- Glue. I use Crafter's Pick : The Ultimate and Elmer's
- Typewriter or computer connected to a printer
- Krylon's Matte Finishing spray
I put some drops of purple Alumilite Dye onto the clay and kneaded it into the clay. It was light to begin with, so I kept adding dye and kneading until it was as dark as I wanted it. THAT'S IT!! Using the dye was so simple, I couldn't believe it! The clay still dried and shaped as usual, and the dye didn't stain my fingers! I was really surprised.
Keep in mind, that your clay color when wet is a lot like paint. It's always a little different (usually a little darker) than it will be dry. Once it was mixed, I pressed the clay into my mold, and put it on low heat in the oven to speed up the dry time.
Emmie wanted some butterflies on her piece, and the one she chose was one that I only had one image of, so I took a picture of the butterfly, and then printed out more in a word document, so that I could print them out in varying sizes for her piece.
OTHER DETAILS:
- A glued a paper doily to the base canvas, painted over it, with the paint away to reveal the texture of the doily.
- Crafter's Pick was used to glue a mirror down under the frame, and we sprayed matte sealant over the whole piece to seal it all, but also to frost the mirror.
- Punchinella used as a stencil with yellow and white paints
- Elmer's glue drizzled down the page and then glitter sprinkled over the top
- More glitter in dots around the page
- Flower embelishments that Emmie brought with her
- The lyrics to You are My Sunshine printed on patterned paper and adhered to the piece
Friday, January 17, 2014
Sculpting Creative Paperclay® to Mold with Rachel Whetzel
Earlier this month, I shared a tip that stamping on Creative Paperclay® was easy, and simple to do! This week, I'm sharing a little twist on that same idea. Molding and stamping Creative Paperclay® to use in making a mold! I had the idea that I could make some Valentine's Day decorations using and resin, so I got to work trying it out.
WHAT YOU'LL NEED:
What custom pieces can you imagine making over and over?
WHAT YOU'LL NEED:
- Creative Paperclay®
- Stamps
- Molding Material (I used Amazing Mold Putty)
- Resin (I used Amazing Casting Resin with Alumilite Red Dye)
- Acrylic Paints (I use Folk Art)
- Hole Punch
- String and Needle
Start your project by shaping your Creative Paperclay® into the shape you'd like. Make your surface as even as possible, and don't make your clay so thin that stamping would cut through the clay to your counter top. I used some sculpting tools to write LOVE on my heart, and a Tim Holtz clock stamp. I had 'love endures forever' running through my mind while I was working. Set your clay out to dry.
Once the clay is dry, sand your edges, and fine tune any bits that you need to. I used a carving pick, and evened out the word LOVE. I also used a bit of water to smooth out that area.
Once your surfaces are smooth, and ready, mold your piece, and then pour your resin!!
When I pulled out my cured resin, some edges needed trimming. I did that while the resin was still a bit soft, and then used my hole punch to create holes where I planned to put stitches later.
Before I put my stitches in, I used craft paint to fill in all the indents that my stamps made, and wiped off the excess. Then I put the stitching in! Such a simple, easy thing to do, and now that I have created the mold, I can replicate my original Creative Paperclay® piece with ease!! I can also pour my resin a bit thinner than the clay, making it easy to use the pieces on cards or a scrapbook page!
What custom pieces can you imagine making over and over?
Leave me a comment and let me know what you think! CLICK HERE to visit me at my "house" too!! Thank you so much for reading!! ~rachel
Don't MISS IT!! We're hosting a Valentine Link Party on Feb 8th!!
Friday, October 18, 2013
October Tip from Rachel Whetzel
One of the things I love about Creative Paperclay®, is how quickly it dries on low heat in the oven.
Once in a while, though, I like to create molds for my Creative Paperclay®. Lots of us here on the Creative Paperclay® team like to use the clay in molds. Thing is, the clay doesn't dry as well when it's smooooshed up against a non porous surface. My solution is to use Amazing Mold Putty when I make my molds, which can be heated up to 400 degrees Fahrenheit. That way, I can heat my paper like I do when I DON'T mold pieces... and my mold won't melt. Being able to heat your mold helps your clay dry in a timely manner, and makes for speedier projects so that this:
Can become THIS,
with very little wait time.
Friday, July 5, 2013
Making Custom Stamps for Cheese and Butter by Rachel Whetzel
Hello! It's Rachel Whetzel today, with something a little different than most of the "crafty" things we share here on the Creative Paperclay® modeling material blog!
Some of you may follow me on my own personal blog, or on facebook. If not, allow me to tell you that I in addition to being an artist, I am a farmer. I raise Nigeria Dwarf Dairy goats, and I milk them. Once in a while, I make cheese with that milk. When I was a little girl, my mom used to make butter, and she bought a butter stamp for her butter. That memory gave me the idea to use Creative Paperclay® to make a custom stamp of sorts for my cheese, using the logo for my herd name and logo.
I thought it would be cool to mimic the way that soap makers use their logos in their soap molds, and apply that idea to the food I make with my goat's milk. My farm name is MigMog Acres. MigMogs are a fictional creature that my husband and his brother made up when they were kids. They pretended that MigMogs make lots of mischief, smell like stinky farts, and have messy fur. We used to tease our boys that they were behaving like a MigMog when they were naughty, and my middle son drew a picture of what he imagined a MigMog looked like when he was about five or six. I used that picture in the creating of my logo.
To create your own butter or cheese stamp,
YOU WILL NEED:
Next, I rolled out some Creative Paperclay® and cut it into a round shape, since my cheese and butter would usually be made in ball shape.
Then I wet my paper, and wrote over the top of the paper with a ball point pen, onto the clay to transfer the image to the clay.
Next, I carved into the clay with a toothpick, and used a wet paint brush to smooth rough edges that the tooth pick made in the clay.
The ear on the right is how the edges look once the clay is smoothed with the wet brush.
Once the piece was finished, I set it aside to dry.
Once the piece was dry, I used Amazing Mold Putty to create a food safe mold to become the stamp for my cheese and butter. To be sure that the putty got into all the nooks and crannies in my small carving, I spread small amounts of putty thinly over the Creative Paperclay® piece.
Then I spread the rest of the putty over the top and shaped it.
Once the putty set, I removed the new stamp. When you remove the stamp, your text and image will be backwards. That's OK!!
Last, I washed my new stamp, and tested it out on some butter!
I can't wait to try it on some cheese next time I make it! I made some for this post, but I used basil in it, and the basil obscured the stamp print a little too much for it to show well in the pictures.
I would love for you to let me know if you create something of your own inspired by this post! Leave me a comment, and let me know if you do!! I would love for you to visit me at my "house" too!! Thank you so much for reading!! ~rachel
Some of you may follow me on my own personal blog, or on facebook. If not, allow me to tell you that I in addition to being an artist, I am a farmer. I raise Nigeria Dwarf Dairy goats, and I milk them. Once in a while, I make cheese with that milk. When I was a little girl, my mom used to make butter, and she bought a butter stamp for her butter. That memory gave me the idea to use Creative Paperclay® to make a custom stamp of sorts for my cheese, using the logo for my herd name and logo.
I thought it would be cool to mimic the way that soap makers use their logos in their soap molds, and apply that idea to the food I make with my goat's milk. My farm name is MigMog Acres. MigMogs are a fictional creature that my husband and his brother made up when they were kids. They pretended that MigMogs make lots of mischief, smell like stinky farts, and have messy fur. We used to tease our boys that they were behaving like a MigMog when they were naughty, and my middle son drew a picture of what he imagined a MigMog looked like when he was about five or six. I used that picture in the creating of my logo.
YOU WILL NEED:
- Creative Paperclay® modeling material
- Water
- Amazing Mold Putty or other FOOD SAFE molding material
- Paint Brush
- Toothpic or other carving tool
- Printed image
- Ball Point Pen
Next, I rolled out some Creative Paperclay® and cut it into a round shape, since my cheese and butter would usually be made in ball shape.
Then I wet my paper, and wrote over the top of the paper with a ball point pen, onto the clay to transfer the image to the clay.
Next, I carved into the clay with a toothpick, and used a wet paint brush to smooth rough edges that the tooth pick made in the clay.
The ear on the right is how the edges look once the clay is smoothed with the wet brush.
Once the piece was finished, I set it aside to dry.
Once the piece was dry, I used Amazing Mold Putty to create a food safe mold to become the stamp for my cheese and butter. To be sure that the putty got into all the nooks and crannies in my small carving, I spread small amounts of putty thinly over the Creative Paperclay® piece.
Then I spread the rest of the putty over the top and shaped it.
Once the putty set, I removed the new stamp. When you remove the stamp, your text and image will be backwards. That's OK!!
Last, I washed my new stamp, and tested it out on some butter!
I can't wait to try it on some cheese next time I make it! I made some for this post, but I used basil in it, and the basil obscured the stamp print a little too much for it to show well in the pictures.
I would love for you to let me know if you create something of your own inspired by this post! Leave me a comment, and let me know if you do!! I would love for you to visit me at my "house" too!! Thank you so much for reading!! ~rachel
Friday, February 15, 2013
February Tip from Rachel Whetzel
My tip this month has to do with water. Use water with your clay to accomplish a few things. When adding layers, it is helpful to use water on your dried surface, and to wet your clay a bit. Doing so imitates the same principle that earthen clay 'slip' does. When the surface you are adding your clay to is more dry and porous than the clay you are adding, it can actually repel your clay. Adding water to dry paperclay or dry wood makes the surface more receptive to the clay. When you're stamping, or making repairs, you may find that your stamps "pull" the clay off of the surface you're stamping, or that they stick to your stamps and molds. If this happens, make sure the UNDERSIDE of your clay and the surface it is on is more wet than the surface you're stamping. Then, allow the surface you are stamping to DRY a little before you stamp! A slightly dry clay surface makes it easier for the mold or stamp to release. The quick and simple formula? Water=Sticky Dry=Easy release. There you go!
Friday, January 4, 2013
Vintage Frame Repair
Hello!! Rachel Whetzel here!! Today, I'm going to show you how I repaired a vintage picture frame using Creative Paperclay® modeling material.
As you can see, the molding on the corner of the frame was broken out. As I was getting this together, I almost felt like this might be TOO simple for a post here, but I'm so happy with how it came out! Plus, I want to show you how it truly IS so easy anyone can do it!!
SUPPLIES YOU WILL NEED:
Second, I created a mold from one of the un damaged corners of my frame using Amazing Mold Putty.
Once your mold is set, press your clay into the corner needing repair.
Then VERY firmly, press your mold into the clay. I found that clay with no water added to it was easy to press and pull the mold off of to check. I pressed several times until I had the mold impression deep enough to blend with the surrounding area.
I used my fingers to blend the edges further, and then let the clay dry. Once the clay is dry, I painted the corner in brown.
When the brown was dry, I painted white VERY lightly over that.
All of the corners of the frame are slightly cracked up the center, so to imitate that cracked look, I used some black paint painted into the crack, and then used a damp paper towel to wipe that off. The water on the towel also removed some of the white paint, exposing the brown beneath, and imitating the worn look of the rest of the frame.
There you have it!! If you create something inspired by my project, please leave a comment with a link here, so I can come and visit to see! I would love for you to visit me at my "house" too!! Thank you so much for reading!!
As you can see, the molding on the corner of the frame was broken out. As I was getting this together, I almost felt like this might be TOO simple for a post here, but I'm so happy with how it came out! Plus, I want to show you how it truly IS so easy anyone can do it!!
SUPPLIES YOU WILL NEED:
- A picture frame or other object in need of repair.
- Creative Paperclay® modeling material
- Amazing Mold Putty
- Craft Paints in brown, black and white. (I used Folk Art)
- Paper towels and a dash of water.
Second, I created a mold from one of the un damaged corners of my frame using Amazing Mold Putty.
Once your mold is set, press your clay into the corner needing repair.
Then VERY firmly, press your mold into the clay. I found that clay with no water added to it was easy to press and pull the mold off of to check. I pressed several times until I had the mold impression deep enough to blend with the surrounding area.
I used my fingers to blend the edges further, and then let the clay dry. Once the clay is dry, I painted the corner in brown.
When the brown was dry, I painted white VERY lightly over that.
All of the corners of the frame are slightly cracked up the center, so to imitate that cracked look, I used some black paint painted into the crack, and then used a damp paper towel to wipe that off. The water on the towel also removed some of the white paint, exposing the brown beneath, and imitating the worn look of the rest of the frame.
There you have it!! If you create something inspired by my project, please leave a comment with a link here, so I can come and visit to see! I would love for you to visit me at my "house" too!! Thank you so much for reading!!
~rachel
Subscribe to:
Posts (Atom)