Wednesday, September 30, 2015

Fall/Halloween Tree by Linda Hess

I have been teaching an after-school polymer clay group for years.  This year I have a group of middle school students (yippee), so we can work on some more involved projects.  Yesterday I showed them how to make an armature from foil and then wrap it with polymer clay.  HMMMM, wouldn't it be great to use my air dry Creative PaperClay® instead?!  I set right to work...

The materials are easy:  Creative PaperClay®. foil, a damp paper towel, and your hands (Optional: cutting tool)
1) Pull off a long piece of foil (mine is about 2ft long).  Crumple it together at the bottom only (keep the top loose).
 Be careful how tightly you scrunch it together...foil can always be made smaller as the design progresses, but it is very difficult to make it larger without ripping.
2) Flatten the bottom of the trunk by pressing against the work surface.  Do not worry about it standing at this point...adjustments can be made as the tree progresses and the branches help to balance it.
3) Now to work on the branches.  Beginning at one end of the foil (about 3"-4" from the end), carefully rip it down towards the trunk.
Do not rip it off as this will form a branch.  Scrunch the foil together (as shown),
folding onto itself to shorten the branch (if desired).  Continue to rip and scrunch branches until the top is completely done.  
As you can see from the photo, no 2 tree armatures ever turn out the same (OOAK creations).
4) Now it is time to apply the Creative PaperClay®.  Cut off a piece of clay from the block (NOTE: A tree of this size shouldn't take any more than 1/4 block of PaperClay).  Place it onto the damp paper towel.  Fold the towel over the clay to keep it moist as you work.
5) I like to work with small pieces and then smooth as I go.  Pull a blob of clay off the cut piece.   Flatten/thin the blob between your fingers
before applying to the tree armature.  Begin work at the bottom and work your way up to the branches.  
Since this is a tree, I don't want it to be super smooth...the seams are smoothed together, but texture is left behind.  If the clay doesn't want to go together at the seams, dip one finger into water and smooth over the clay.
Continue until the tree is completely covered.


6) Step back and take a look...do the branches look "full" or does it need a few touch ups?  My tree looked a bit bare, so I added small bits of clay onto the large branches by pressing small bits on and then smoothing along the seams.

Perfect.
7)  Final touch, fattening the bottom and adding roots.  Add blobs to the base of the trunk, smooth into place, and then pull out some of excess clay to form a triangle.
Twist the triangle gently to create roots.  
Once you are happy with the look, set the tree aside to dry.

Tomorrow: Finishing the tree and embellishing


Monday, September 28, 2015

Molding and Creative PaperClay®

Hi all!  A quick tutorial on molds and Creative PaperClay®.  Do you have a piece in your stash that you wish you could "clone".  Well I certainly do.  It is a cross that I found in Mexico a number of years ago.
I have searched all over the internet in hopes that I could find more or discover the artist who created it with absolutely no luck.  After exhausting all possibilities, I decided to create a mold of the piece to use.
(NOTE:  Never EVER make a mold of a copyrighted product or an original piece that can be attributed to a specific artist.  To do that would be like stealing.)

Amazing Mold Putty (www.moldputty.com) is my go-to mold making product.  There are times I wish I had some in my pocket as I travel around and discover something with a cool texture!  This molding material is available at most craft stores.  In the box are 2 containers.
To create a mold, mix together equal sized balls (one from each container) between your fingers until the colors are completely blended.  Place the blended material on your work surface and flatten slightly with your fingers or a roller.  Press the item to be molded into the material (as shown)
and let it set for 20 minutes.  Once set, the original piece can be removed and you have a flexible mold to use and reuse.

It is amazing (just like the name suggests) the amount of detail that this product picks up!

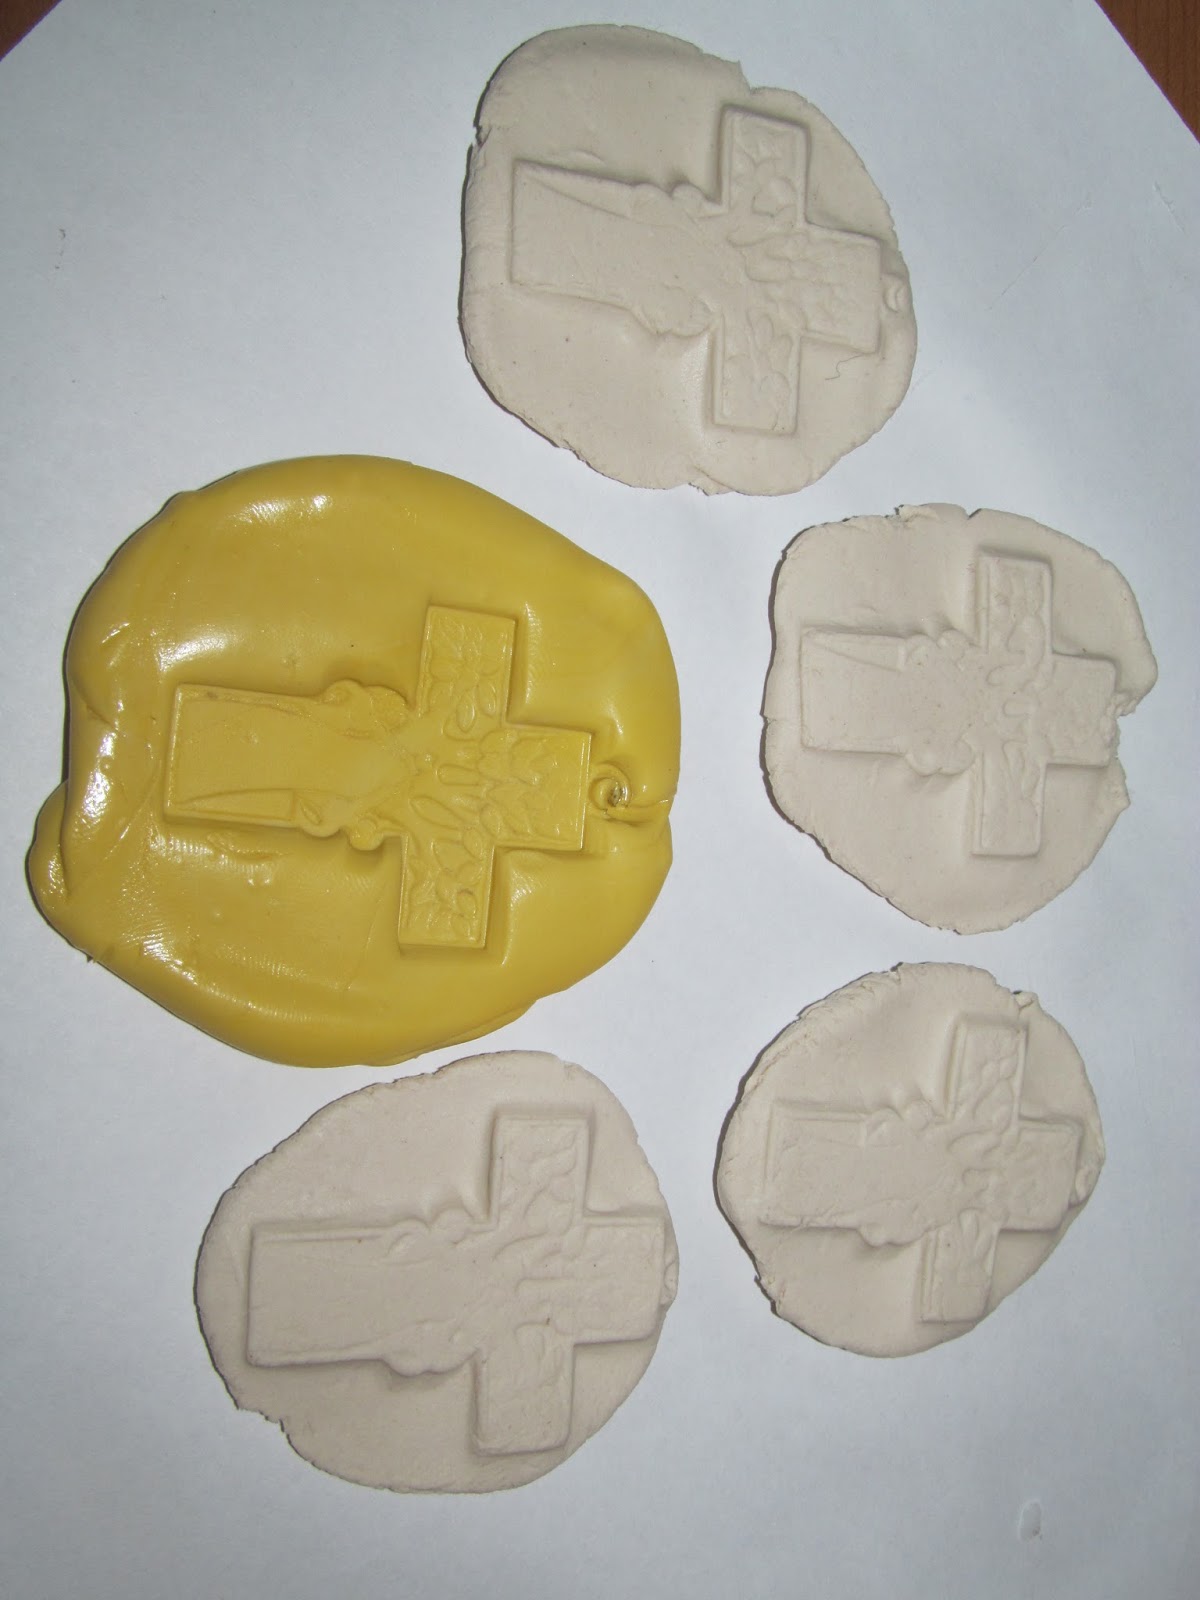
Now to create a few reproductions from my mold.  I teach art at a Catholic school, so you can imagine the amount of excitement that surrounded Pope Francis' visit to the DC area.  I thought how lovely it would be to create a simple pin or bookmark for my fellow teachers.  I think this will be the perfect highlight for those creations.  Pull a small amount of Creative PaperClay® off the block and roll it into a smooth ball.
Press the ball into the mold making sure it fills all of the crevices.
Then flex the mold to remove your clay piece.
Place it on your work surface and repeat until you have multiple pieces to use.

Now to detail.  If you are an impatient sort (like me) you may not want to wait until your pieces are dry to ink or paint or color them.  Let me present my "experiment" which shows why you need to wait.  For this piece I pulled out a leaf green Ancient Page ink and laid the cross on top of it.  I lightly pressed on the back until (I thought) it had picked up the ink.  When I turned it over I discovered way too much ink had transferred to the piece and I needed to remove some.  Since the clay was not dry, I couldn't wipe it (this would have smooshed the design).  Instead I placed a piece of paper over the top and lightly blotted.  This removed some ink from the top, but not the the background,,,still, an interesting look.
I cut away the excess clay and plan to detail the trunk with markers or colored pencils after it dries completely.
I tried one more time (because that is what I do) with another color of ink.  This time I used a lighter touch and the background remained light colored while the raised portions picked up the ink and "POPPED".  
Again I cut away the excess clay and set it aside to dry.

NOTE:  If desired, the molded components can be placed into the oven at 275 degrees to quick set.  it will not completely dry the components, but will make them a bit more easy to detail without the danger of smooshing and having to start again.

Pieces cut away can be reused.  However, be careful of them starting to airdry (after all, this is AirDry clay).  As you can see from this photo, the molded piece has a very distinct crack across the top.
To get around this possible problem, keep a damp paper towel handy and wrap any cut away or excess clay up immediately.  The paper towel will keep the clay moist and help you avoid nasty cracks & crevices.

I plan to use the crosses for pins or bookmarks, but they would also be beautiful on card fronts or as bag ties.  I hope you have enjoyed this intro to molds and Creative PaperClay®  Have fun and experiment.

Saturday, September 26, 2015

Fun Layout - With embellishments Made Out Of CreativePaperclay


I absolutely apologize for this late post, I broke 2 of my fingers off my right hand and am in a cute little pink cast right now, so my project this month is just a bit late due to just being able to actually use my hand and type!!!   
One of my tips I share a lot - especially if you paper craft, is to make the embellishments ahead of time, in order to save you time down the line!  Use molds or stamps to create the item, such as a flower, using either Creative Paperclay or Delight product as your base.  Let the piece/pieces dry like normal, and place them aside for use later on!  Then, if you need to paint it, you can customize it to the piece you are working on!  That is how today's project happened!!!
Supplies used

Colorbok papers - Sweet Bloom
Punches - circle, flower
Die cut - flower
Flower mold 
Delight product
Basket stamp
Creative Paperclay
Xacto knife
Hot glue gun
Paper trimmer
Adhesive

The directions will start with how to create the layout...if you need any help in basic molding and stamping, scroll down!!!  

Directions
Step one:
Decide what papers and photos you are going to use, you need 3 sheets total, 1 for the background, and 2 for matting and embellishments.  Using the other two papers, matt the 2 photos you are using.
Step two:
Using the blue side - punch 8 circles for the middle of the flowers, as well as 4 flowers.  Start to add the circles to the flowers - and to the small flowers, add the blue  flowers.  If they go off the edge of the paper, trim the excess.  
Step three:  
Add your molded flowers to the circles.  1 of the flowers will be cut in half for the top flowers (if you are using the same papers I used).  
Step four:
Die cut 3 white flowers, add a blue circle and a flower to each of the 3 flowers. Add it to the basket embellishment in an attractive way...  

Molding
Step one:
Find the mold you want to work with - take a small portion of the product you want to use (Delight or Creative Paperclay) - roll into a ball, then flatten the product to put in the mold.  
Step two: 
Add the flattened product in the mold to create the shape.  Carefully take the shape out of the mold, set aside to dry.

Stamping:
Step one:
Flatten out the product you want to use (I normally will use Creative Paperclay) using a rolling pin type of thing!  
Step two:  
Take your stamp, stamp the image in the product.  Take your Xacto knife, and carefully cut the shape out of the product, set aside and allow to dry!  

This is going in a frame to hang on my wall!  This is my mom, sister, daughter, son and his girlfriend!  Pages are meant to be on walls too, not JUST in books!  I will have a whole wall of photos and pages like this, working on the special photos now!  Great present for just about any reason, or just because!!!  I can't wait to get this on my family wall!!!  For more ideas for scrapbooking, join me at Memories in Tyme blog!!!  
Lynda Jeffs
Creative Paperclay Design Team
and Memories in Tyme      


Halloween Cat Ornament By ImagiMeri's Creations

Halloween Cat Ornament
By Meri Wiley


Hi Meri here.  Sorry this is late, but I had issues loading it.  Today I'm showing you how to make a Halloween cat ornament.  I'll take you through the process of creation, but I'm leaving the painting up to you.  Happy Hallo-crafting!

Supply and Tool List for Halloween Cat Ornament

Creative PaperClay®
3” of 20 gauge wire
Wire cutters
Garlic press
Xacto knife with brand new blade
Misting water
2” Styrofoam ball
Sandpaper (I use 100 grit)
Rolling pin
1-Pair of plastic animal eyes
Whatever tools you normally use when crafting with Creative PaperClay®


These are the eyes I used, which I found at Hobby Lobby


Friday, September 25, 2015

How To Save Some Time

Hello, it is Ann here today with a quick tip.  I like to have "play" sessions where I pull out some Creative PaperClay® and my box of moulds and just make a whole batch of embellishments.  It is fun, therapeutic, and gives me some extra time.  It is kind of like Batch Cooking!  Except I call it Batch Claying!


Working this way gives me some extra time to focus on other aspects of my projects , and also means I have some ready made embellishments to just add to my creations.


By working in Batches I make a mess once, and clean up only once too.


I let my clay embellishments dry over night.  The following day I just gather up my pretties and store them in a container, to be used at a later date.

Just a quick tip to save you some time.  I hope that you find this useful and enjoy making more projects.  For more tips and How To's, please come over to my blog at:  http://annmakes.blogspot.com.

Thank you for stopping by.

Thursday, September 24, 2015

Dressing Up an Assemblage


I was working on this assemblage for a show and I was stuck until I started using Creative Paperclay® on another project and I realized it was just what I needed for this piece.

SUPPLIES
Creative Paperclay®
Acrylic Paint
Embossed paper
Cinnamon


I started with balls of clay, making them all about the same size.


I laid embossed paper over the clay balls and brayered them flat. The pattern looked great on them. These became the pedals of the skirt.


I applied the embossed disks to the assemblage to make a skirt and shaped some clay to look like flames. I let the clay dry thoroughly. The skirt was painted with a burnt umber paint and cinnamon was sprinkled on the paint while it was still wet. It gave it a faux rust look. I then painted the little flames with orange and yellow paint.

Play, Experiment and Dream in Color.

Darlene Olivia McElroy

Friday, September 18, 2015

Never Too Early for Christmas Ornaments

I my book, it's never too early to think about Christmas and holiday decorations. And right now there are fewer than 100 days until the big event!! So, Chloe and I started making ornaments for our tree.

We began with a ball of Creative Paperclay® that we rolled out to a thickness of about 3/8".

We placed this slab of clay in a snowflake embossing folder. 


When the clay was between the leaves of the folder, we gentle pressed on the top to emboss the design onto the clay.

After transferring the embossed clay slab to our work surface, we outlined the simple shape of a Christmas tree, and cut it out.


Next, was making the ornaments for our tree. We traced and cut out a star, and rolled small balls of clay for ornaments.

To make the ornaments easier to paint, I inserted a pin into each one. Now, all the pieces were set aside to dry.

Before painting with acrylic paints, we sanded the rough edges of the tree with Sandits. These are the handiest sanding implements!!

After painting, the last step was to glue a bezel on the back for hanging. 

Here's out finished ornament, all ready for our tree.


Carole

Chloe

Table Cell Table Cell