Showing posts with label #PlaidCrafts. Show all posts

Wednesday, October 14, 2020

Circular Texture Pin by Linda Hess


 Inspiration is all around us.  I mention that because this tutorial was inspired by my love of texture and ways to bring multiples together in an artistic way.  I hope you enjoy this.  As always, it is easy peasy lemon squeezy to do. 😄

Materials:

Creative PaperClay

a non-porous work surface

a roller (I used an acrylic roller, but a dedicated rolling pin would also work)

a circle cutter (mine is 2" round, but any size will work)

a knife or blade

texture sheets, stamps, mesh...the sky is the limit!

lightbulbs (the good, old fashioned kind) 

foil

Procedure: Part1

1)  Open the package of Creative PaperClay, pull off a bit, and place it on the work surface.  Rewrap the remainder of the package tightly in plastic wrap OR in a Ziploc baggie, squeezing the air out before sealing.  Using the acrylic roller, flatten the clay on your work surface to an even thickness

HINT: If you roll the clay between 2 popsicle sticks, then the final sheet of clay will have a uniform thickness.

2)  Use a circle cutter (mine is 2" round) to cut a few circles from the clay sheet.


3) Press texture into the clay circle.  The texture sheet will distort the circle slightly, depending upon texture used, so be sure to recut the circle to maintain uniformity in size.  Repeat with a variety of textures on the remainder of circles.


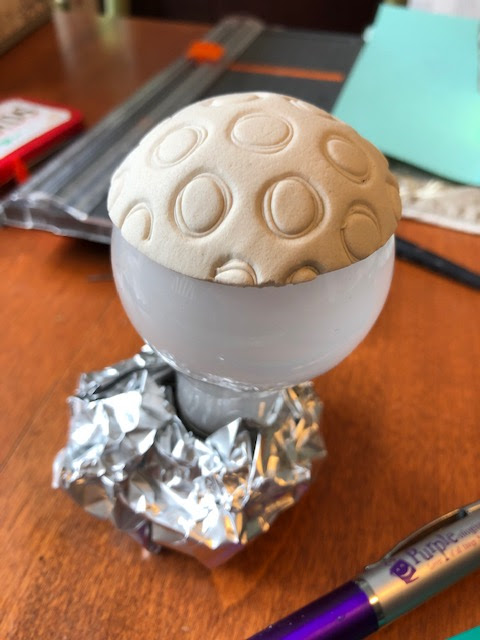
4) Gently lift each circle off your work surface.  Place onto the curved surface of a light bulb and press into place using the palm of your hand.  Repeat with each circle.  Let dry in place overnight OR (if you are an impatient sort) bake for 10-15 minutes @ 275 degrees.  

NOTE: You may have noticed in one of the pictures that I created a base for my lightbulb with a piece of foil.  This can be easily created by lightly crumpling a piece of foil, wrapping it around the lightbulb base, and flattening the bottom on your work surface.  It allows the clay circle to remain upright to dry rather than the possibility of a flat spot should it roll on the table.


That's it!  The first part is done.  After the textured circles have dried completely, pop them off the lightbulbs and continue on...


Procedure: Part 2

Materials:

Creative PaperClay

knife, blade, or Exacto knife

plastic paint palette 

assorted wires (aluminum 10g and Funwire 20g shown)

knitting or darning needle

scissors or wire cutters

Step 1) Use the knife, straight blade, or Exacto knife to cut each circle into 2 or 3 pieces.  If cutting is difficult, rock the tool back and forth to "saw" through the dried clay.  Rough edges can be carefully shaved away.  NOTE: Keep any shavings in the paint palette until later.  Arrange pieces, mixing textures, as shown above.

Step 2) There are 2 different ways to put the pieces together.  The first way is to roll a ball of Creative PaperClay (from the part set aside in plastic wrap or Ziploc), flatten the bottom slightly, and then arrange components on top of the ball.  Once you are happy with the arrangement, remove each piece, rub tacky glue on the inside, and place it back on top of the ball to dry.


The second way to put the components together is to (once again) roll a ball of Creative PaperClay, but instead of leaving it rounded, flatten the clay into a disc about 1/8-1/4" thick.  The disc can then be flattened inside of the cut, textured pieces.


Bet you thought we were done!  No way!  Now it is time to add some embellishments. 
 
Step 3) Again, there are options.  The first is to use a thick, aluminum wire (super easy to bend) to fill any channels or create another visual component.  Cut a piece of the wire longer than the length you will need.  Bend each end in and curve the wire, as shown below.

Curve the wire component and place it as desired.  Don't get frustrated if you need to rework the curve a few times.  Press everything together and set aside to dry as you work on the others.
NOTE: For this wire option, I used the first way to put together components (a solid ball behind the pieces).  The solid ball will give a better grip to the larger wire.

The second way to add wire is to use Funwire (or telephone wire).  Again, Funwire is easy to manipulate.  For this option, wrap the wire around a knitting needle, creating a tight coil.  Continue wrapping until the wire coil is longer than the space in which you would like to place it.  Leave the ends loose (see left photo).  These ends can be embedded into the back of the component.  


For this example, I used the hollowed back construction.  With that construction, I placed the piece on top of a lightbulb (smaller diameter than the initial one used) to dry.  Placing it on the lightbulb will also help to hold the wire in place (see below).


Step 4) Remember the shavings that were set aside in the paint palette?  Add water (a few drops at a time) to the shavings.  Allow the clay to soak up the water before pressing the mixture together to form a paste (add more water if needed).  You want the paste to be the consistency of tacky glue.

Use this paste to backfill any areas where there may be large cracks between the clay and wire components.  I am a big fan of using my finger for this process.  I usually press the mixture in with one finger and then wipe away excess with another.  If the paste smooths out any texture, use a fingernail or a toothpick or a turkey lacer to remove the paste and reveal the texture again.  Once you are happy with the piece's connections and look, set it aside to dry one final time.
NOTE:  It should not take as long to dry this time since you have applied such a thin layer.

Step 5) Almost done!!  Roll one final piece of Creative PaperClay into a thin sheet.  Cut 1 circle (same size as before) for each pin.  Press the domed component on top of the circle. NOTE:  I do this on top of a piece of paper or waxed paper so it will not stick to my work surface.
Cut or smooth away any clay that squishes out past the edges.  Allow the piece to dry flat overnight OR quick dry by popping the piece into the oven (250-275 degrees) for about 15 minutes.

Procedure: Part 3

Materials:
Plaid paints in choice of colors (I used Folk Art Multi-Surface Metallics in #2966 Bright Gold, #6310 Malachite, #6313 Tanzanite, and #6308 Garnet)
Small paintbrush
Bar Pinbacks
Superglue

1) Use the paintbrush to paint each section of the domed pin with one layer of your chosen colors, making sure to get down into the embedded textures.  Once the first layer dries, a second layer in an alternate color can be rubbed gently over the surface.  I used Tanzanite, Garnet, and Malachite to paint the first layer, then rubbed bright gold over the top.   Be sure to wipe away any paint that may cover the wires. 
2) Use super glue to attach a bar pin to the back of each pin.  
ENJOY 😁


Monday, November 5, 2018

Creative Paperclay® Christmas Trees

Hello!
Welcome to another tutorial using Creative Paperclay®. I decided to make these cute Christmas trees and decorate them using stencils and Plaid Acrylic Paint. They are super simple to make so the little ones can join in too.


Here's what you need:

  • Creative Paperclay®
  • A cardboard template of a Christmas tree
  • A rolling pin
  • A craft knife
  • A sharp tool to make a hole (or a skewer)
  • Gesso
  • Plaid Acrylic Paints -see below
  • Stencils
  • Water
  • A makeup sponge
  • Paint brushes
  • White Glitter
  • Sandpaper  
  • Toothbrush
The Plaid Acrylic Paints I used are:

Please follow along in the video below.
</>


I do hope you enjoyed this tutorial. You can share your creations with us on our Facebook page. We would love to see them! For more inspiration have a look around the blog. There are tutorials for many levels using Creative Paperclay®. You can also visit my blog www.papermachepatch.com.


You can find Creative Paperclay® online at Creative Paperclay Co and also at Michaels, Hobby Lobby, Dickblick and Amazon. 

Thanks for stopping by!

Suzette


Wednesday, August 8, 2018

Easy Peasy Home Decor with Delight!™


Those of you who follow my work and blog know that I have been experimenting with acrylic pours this week (https://polymercreations4u.wordpress.com/ ).  Experiment is the key word here.  Researching the process ahead of time yielded a wealth of information, many "formulas" for the pour ratio, and (yes) many thoughts on what to use for a flow medium (all purpose glue, Mod Podge®, Floetrol®).

Plaid® Crafts sent a box of goodies a couple of weeks ago filled with a variety of paints, glitter, and Mod Podge®!  Yippee...I had everything that I needed!  Mod Podge®, paint, and water plus a stash of canvases.  I tend to jump into things with both feet...this was no different.  I started with a 50/50 mix of Mod Podge®/paint.  Most people would mix a couple of colors and then test.  Yea, not me.
I mixed up 6 colors of paint adding enough water to make it flow (or so I thought). Plaid® sent me Mega Glitter Mod Podge® along with the regular gloss I mixed up a cup of that too (50/50 with silver paint).  I mean, who doesn't like glitter??  Excited to get started I took all of my supplies outside to paint. (NOTE: Flow painting can make a HUGE mess.  I worked on a plastic covered table and then was able to roll up the mess and throw it away at the end).
I am not going to bore you with the details of my first painting experiment since you can check out my blog post for the results of that one and the subsequent experiments...let's just say that my first mix was a bit....ummmm, thick.  Instead of getting gorgeous the gorgeous flow painting I expected, I got what I have referred to as rocky terrain.  Bummer.  You would think that seeing one rocky terrain I would think "Perhaps I should thin the mix a bit more...get a better flow."  Yea, No 😖  Instead I carried on and created 3 more rocky terrain canvases using up all of the paint mix in the process.
While not the effect that I thought I would get, I set them aside to dry in hopes they would speak to me in some way.  Fast forward a few days and they began to scream "CLAY!!" I grabbed one of my favorite products Delight!™ Air Dry Modeling Compound as a vision took hold.  I saw 2 versions in my head, so decided to do both (of course). (NOTE:  Each flower used about 1/4 of the Delight!™ package)

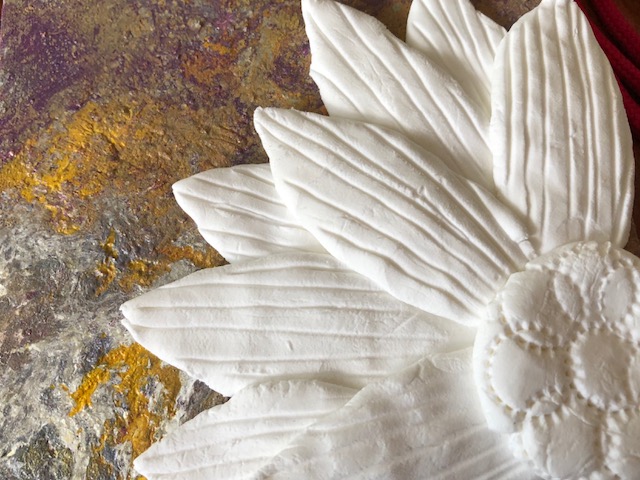
I decided to start with a sunflower, growing from the side of my canvas.  I separated the clay into 8 pieces to start.  
One of the pieces was rolled into a ball, flattened (about 1/4" thick), and pinched on one side to form a teardrop.  This was the start of my sunflower center.
The petals were created using the following steps: 
1) Roll a ball.  
2) Roll the ball into a log with a slightly tapered end.
3) Flatten the log into a petal shape (about 1/4" thick).
4) Pinch the edges to thin and make it more "petal like".
5) I used a turkey lacer (or you can use a toothpick) to make texture lines on the petal.  The shape can be adjusted at this point (if desired).  Repeat process with 2 more pieces.
The petals were positioned with the center before starting on the next batch of petals.  
2 more were created following the above directions.  I wanted these to fit behind the others without the design sticking out too much, so I flattened the bottom edges to fit each snuggly behind the first petals.
 
I divided the remaining 2 clay balls in half, rolled each into a ball, and then continued with the directions to create 4 more petals.  These were added to make the snuflower come to life.  once i had all of the petals in place I wasn't as happy with the center, so I removed it to rework the shape.
A little texture gave the center just the look I wanted (NOTE: The texture was created with the tip of a fruit corer!)
The entire piece was set aside to dry overnight before adding paint.  I quickly moved on to my second floral thought: An artsy flower, not as realistic in nature as the first.

For the second flower I thought of 7 petals and a simple center.  I separated the clay into 8 pieces and rolled each into a ball.
7 of the balls were rolled into teardrops and flattened to about 1/4" thick.
A few of the petals got cracks in the surface as I flattened them.  A fingertip dipped into water and then rubbed over the surface and edges helped to smooth any problem areas.


The petals were put together, manipulated as needed to fit together without too many gaps.

I wanted the center to be simple, so a ball of clay pressed on top of the petals worked perfectly.  (NOTE: The center was pressed on loosely to allow for additional details to be added)
The design needed some "POP".  I grabbed some texture sheets and stamps from my stash (I do love texture) and went to work.  
The first thought was all petals the same, but that seemed a bit...plain.  I decided to use multiple textures, some bold and some simple to give the flower a wonky balance.
The center was replaced.  With the texture on the petals I thought the center needed a little something too.  The fruit corer came in handy once again.
Happy with the design, I placed the flower onto the canvas and set it aside to dry overnight.

DAY 2: Painting 
I am a member of the NAEA (National Art Educators Association).  I recently participated in an online conference.  We received a goodie box filled with materials to use during the conference.  One of my absolute favorite products in the box was from OOLY, the Chroma Blends Pearlescent Watercolor set.  I wondered if they would work on my flowers...so of course I jumped in (no turning back once I start!)

For my sunflower I wanted to use colors that made it come alive on the canvas rather than blending in.  For that reason, I began with the orange and then highlighted with the golden yellow.  The center was painted first with brown and then highlighted with purple (I pulled the color choice from the canvas background).
 

Once dry, The sunflower was glued to the canvas.  It looked a little bare, so again I went to my stash of materials (I have been crafting for so many years I have a little of everything!).  I found metal scrapbooking words that were the perfect finishing touch.
 For the second flower I wanted the color to be a bit more bold, so I chose the vibrant red.   
Purple helped tie the flower to the canvas color.
 
Once dry, the flower was glued in place.  
I hope you have enjoyed this super easy way to create new pieces for your home decor.  I post for this blog the 2nd Wednesday of every month.  Hope to see you again next time!
You can also visit  https://polymercreations4u.wordpress.com/ for experiments in creating Acrylic Flow canvases.