Showing posts with label #creativepaperclay. Show all posts

Saturday, January 27, 2024

It's All About the Story

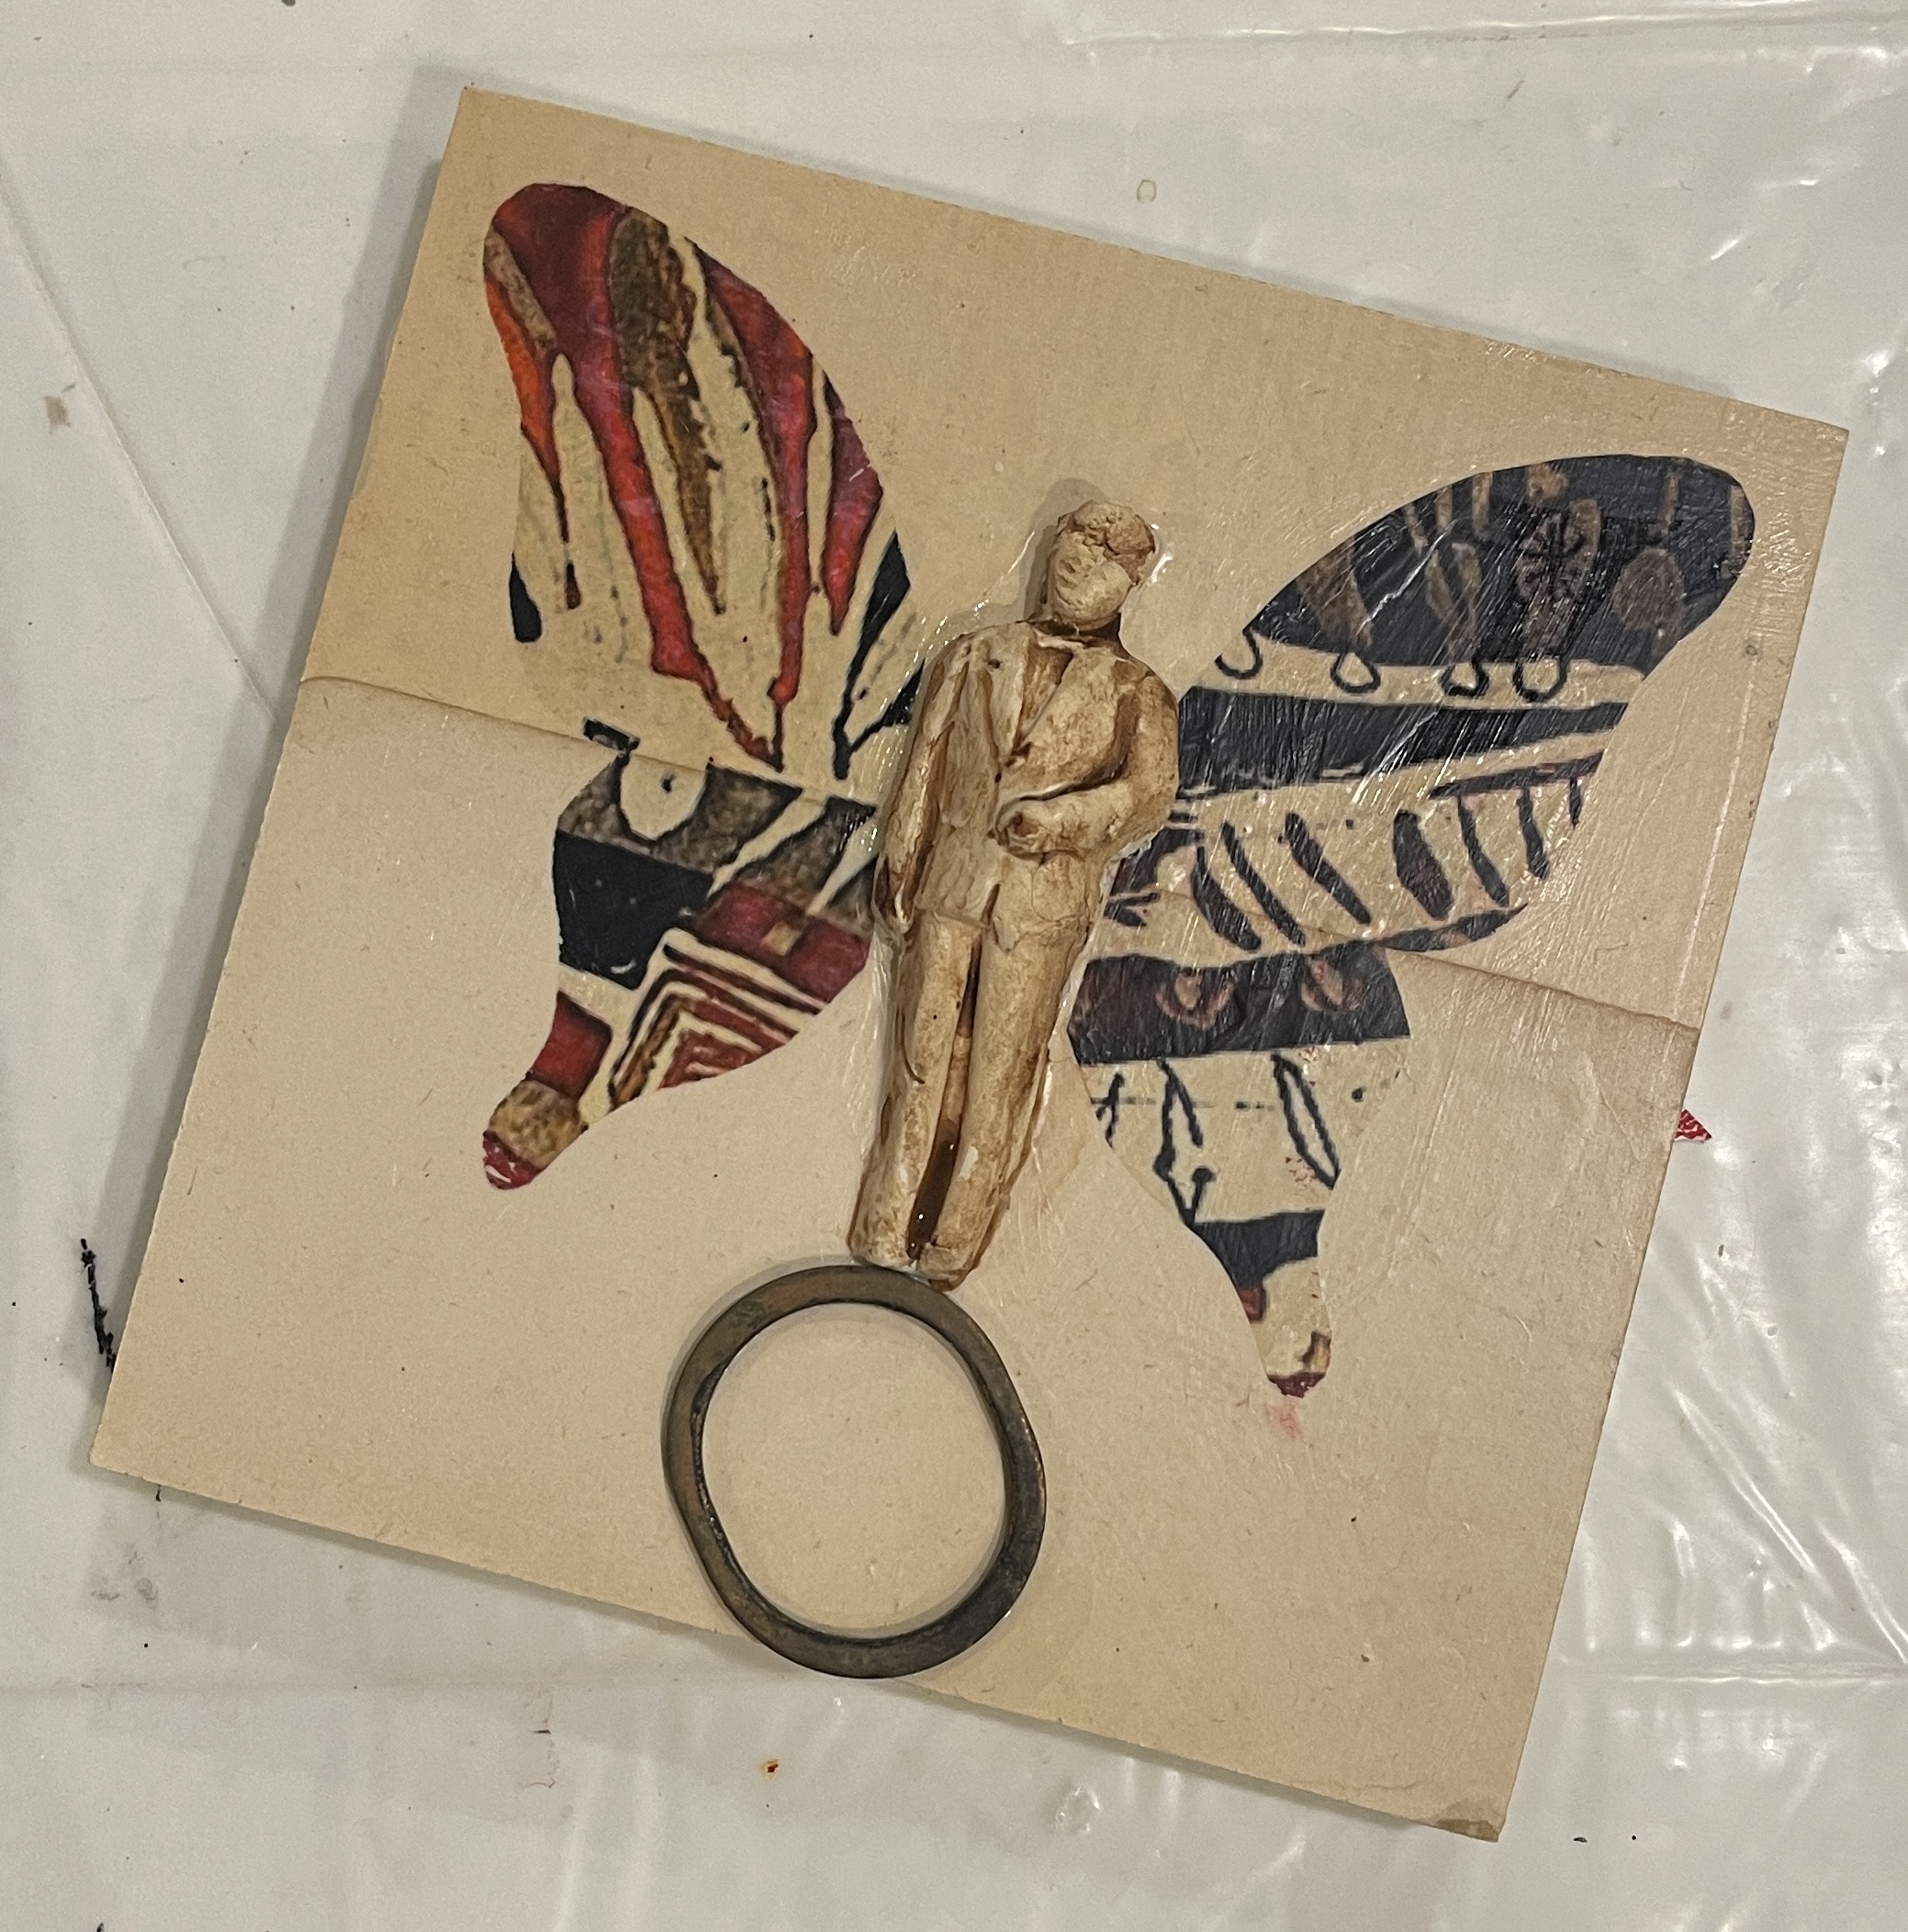
 Sometime simple is the best way to tell a story and, let's face it, all art tells a story. I just finished a big painting and had just enough time to do a small piece before I took off on vacation.

SUPPLIES

Creative Paperclay®
Waterslide Decal
Rust Metal Object
Wings
Fake Flower
Hand cut paper


I started by collaging old book pages with aged edges on my panel. Then I cast a man with Creative Paperclay®, letting it dry on the panel. Next, I gather collage elements and added the waterslide decal wings to the piece.


I wanted this piece to be about balance so the rusty metal ring was added.


After adding more collage details, I finished off the sides with a diamond pattern. This way it doesn't need to be framed.  I love doing these small simple pieces as it keeps me flexible and I never where it will lead me on my large pieces of art.

Dream in Color!

Darlene Olivia McElroy

darleneoliviamcelroy.com


Saturday, December 23, 2023

Their Love Blossomed


Time to celebrate with a gift for friends in love. For some reason I kept changing my mind about color, theme, etc. But I want you to know that it is just fine to do that and the art may come out better. Working on this art project has given me ideas for future projects. So, I have a lot to look forward to.

SUPPLIES
Creative Paperclay® 
Stamps
Acrylic Paints
Hand cut gold paper
Ring
Wood panel


I started by rolling the clay out flat on a wood panel. I then used a ruler to make tile shapes. I am not a perfection kind of girl so my tiles aren't perfect but I like it. I always look for that happy accident.


Next, I stamped and made marks in the clay. Originally, I was going to put a star burst in the middle but that changed as my "story" changed. It was originally for a family member that just had a baby but then I found out about an upcoming wedding.


The background was painted multiple times as the colors never seemed righ. My color changes ranged from warm to cool and then I added a touch of gold leaf and a dark wash. I was open to color changes until the very end.


The next step was to roll out a sheet of clay, stamp it with my heart stamps then trim the heart shapes from the clay. After it was dry, the edges were sanded.


The hearts were painted with red acrylic paint then a deep red acrylic wash was applied after the first color dried. This color sank into the low points of the clay and showed off the detail of the stamps. One of the hearts is raised from the surface with a small block of wood, giving it depth.


It was missing some "pop" so I added some metallic gold paper that was hand cut and glued down a faux diamond ring I found in my box of old jewelry parts. These really completed the story and made it special.

Remember, changes are always OK to make.

Dream in Color!

Darlene Olivia McElroy

Saturday, October 28, 2023

Making Molds and Milagros

I love to add dimensional details to my art with Creative Paperclay®. These little items are the sweet part of my paintings that add POP to the piece like the heart in this piece of art.

This lesson shows how to make a mold with Creative Paperclay® and then use the clay to make multiples. You get two tricks for the price of one

SUPPLIES

Milagros or dimensional objects
Creative Paperclay®
PAM no-stick cooking spray or talcum powder
Polymer Medium
Black acrylic paint
Krylon's foil metallic spray (in silver)

After rolling out the clay, I impress a vintage milagro into the clay before letting it dry. When dry, I seal it with polymer medium to seal the surface.

To use this as a mold, I either spray PAM on it as a mold release or apply talcum powder to it. Then I apply my clay to the mold and pull it out immediately.

The cast object is cleaned up with an exacto knife and edges are smoothed with water.

I am a happy accident kind of person so when this heart came out of the mold with a crack through the center, I was thrilled. This will go into a piece about a broken heart.

I use sandpaper or Sand-Its to clean up the edges. Sometimes, I like a raw, aged look.


Now it's time to paint. For my milagros, I spray Krylon's silver foil metallic spray paint. When that has dried, I apply a black acrylic paint that I wipe off while wet. This sticks in the crevices and gives it an aged look.

Of, course, Creative Paperclay® can be painted any color, gold leafed and more.

Dream in Color!

DarleneOliviaMcElroy.com


Saturday, June 24, 2023

Stranger Things with Delight® and Creative Paperclay®

Stranger Things artI have created a Stranger Things series (https://www.darleneoliviamcelroy.com/stranger-things) where I reach into my inner child and come up with strange creatures and happy little monsters. There is a simplicity to them but things don't have to be complex to have beauty to them. The art piece will use both Delight® and Creative Paperclay® but in a simple manner that is fun and creative. Plus I will also show you how to fix a ornate vintage frame.

SUPPLY LIST
Creative Paperclay® & Delight®
Mark Making Tools
Modern Masters 2 part Rusting Kit
Glue
Found Objects
Scissors
Brayer
Amazing Molding Putty
Acrylic Paint

Delight®
I love the fact that you can roll out Delight® into a thick paper and then cut it with scissors or an exacto knife. I already have ideas for some future projects using the Delight® paper (as I call it). 


Found objects and cut/textured Delight®


When working on my Stranger Things series, I start blocking in my design with objects I would like to use. I cut out my Delight® paper with both regular scissors and pinking shears prior to giving it texture with my tracing wheel. The left shape at the bottom is a paint skin that I made. 

The Delight® shape I made in the last step is now painted with a base color that will eventually be rusted. I made a circle of Creative Paperclay® that I added an eye to and which I will glue down when the clay dries. Texture was added with a rubber shaper. The found metal object will be rusted and embellished. This is the first in my Stranger Things series where I have added these two air drying clays and I am really enjoying it.
All Dressed Up
I finished my cute little monster with painting, rusting, adding found elements and hair made with Delight®. The rusting was done using the Modern Masters 2 part Rusting Kit. 


An ornate frame plays off the contemporary minimalist art but it is hard to find one that is in mint condition however they are fixable with Creative Paperclay®.
two part Amazing Molding Putty
I used two part Amazing Molding Putty to make a mold of part of the frame that was in good condition. Once both parts of the putty are blended together, I laid it on the frame. It sets up in approximately 15 minutes.


Creative Paperclay® was applied to the frame in the areas that needed to be fixed then I laid the silicone mold matching it up to the good areas of the frame. When I am happy with how it looks and it is thoroughly dry, I coat it with polymer gloss medium to seal it and then decide whether to spray gold or black.

Dream in Color!

Darlene Olivia McElroy
NARRATIVE MIXED MEDIA ARTIST
www.darleneoliviamcelroy.com


Saturday, April 29, 2023

 Hi there, I'm Susie and I'm happy to bring something different than my usual sculpt. I hope you enjoy and find some inspiration to create one of your own. I do keep my videos short, because if you're like me, I like to get to the main idea and get busy creating on my own. So here's a few pictures of my progress and then there is a video link to You Tube.


Paint your background.  I painted directly on the wooden frame.


Adding clay to the outer frame and glass

Painting everything a dark base color gives depth and shadows 

Lighten up all the dark painted areas with the color or your choice.

Add moss for more interest and texture


Little details like mushrooms, rock and birds nests give a fun touch 


Some supplies you'll need to gather:

Thrifted picture frame Masking tape aluminum foil air dry clay (I use Creative Paperclay®) water clay tools sand paper (fine grit)

glue

dry flowers, moss etc

acrylic paints paint brushes

twinkle lights


You can find more tutorials from other design team members on the Creative Paperclay® blog. 
http://creativepaperclay.blogspot.com/ You can find my work at: www. ArtbysusieK.com @Artbysusiek on IG, FB and TikTok @WillowHollowWoods on IG and FB

email ArtbySusieK@gmail.com

Friday, April 23, 2021

How to Create a Cameo Framed Art Piece


Hello and happy Friday everyone, Cinnamon here and I am going to show you how I created this cameo framed art piece.  Follow the steps below to see how this was done.


Supplies:
  • Creative Paperclay®
  • Small hand roller or something to flatten out clay
  • Decorative frame
  • Exacto knife 
  • Sand paper
  • e6000 glue
  • Acrylic Black and gold paint
  • Sealer, Varnish
  • Sheet of black felt


 I have a few of these pretty frames that I brought from my local 5 Below discount store. It has a very vintage and distinguished look so I wanted to create a cameo piece and place it in the middle. I have always admired vintage cameo portraits and wanted to try to recreate one of my own.


***This is not a necessary step****, but I chose to create my own silhouette from an image I found online in Adobe Illustrator. You can just grab a silhouette from a quick Google search online or draw one by hand. 


I took the silhouette and made it to the size of the opening of the frame and cut it out. Again, you can just do this by hand and not get on the computer to do this step.


Once I cut out the silhouette, I used it as a guide to make sure that I create my piece to size.
I have a flat tool that I use to shape clay which allows me to cut pieces of the clay as needed to create fine details. You can use a pin or anything that allows you to shape those little details while the clay is still pliable. It's important to get you basic shape down at this point so that you don't have to do as much sanding and cutting into the clay later.


Keep building up the piece and focus on getting the profile just right. 


I wanted to add a braid to the hair of the piece. My clay was a bit dried out so it broke in a few places when I tried to rolled out thin pieces of it. If you use fresh paperclay, you won't run into this problem. If you do, it can easily be corrected by brushing a bit of water onto the pieces and blend them together.


I took the braid and pressed it into the piece with a wet brush to help it stick in place. I brushed the pieces on the braid with the damp brush to join some of the pieces that were splitting from each other. Set the piece aside and allow it to dry.


Once the piece dried, I did a light sanding to clean up the details and smooth it out.


Be sure to try the piece out in the opening of the frame to see if you are happy with the size. Adjust as necessary.


After I was done with sanding, I moved on to painting the piece with a black undercoat of acrylic paint.


After applying the undercoat, I painted gold acrylic paint onto the piece using the dry brush technique. The braid was fully painted in gold so that it could be the focal point. Set aside to dry and then seal it with varnish.


Take your felt sheet and cut it down to the size of the opening of the frame. After you cut it down to size, glue it onto the back of the frame with the the e6000 glue.


If your piece is dry, glue it onto the frame with the e6000 glue as well.


And this is how it turned out!


Thank you all once again for stopping by, and I hope that you enjoyed 
today's tutorial! You can find Creative Paperclay® at the following 

See more of my work at Melandolly.com, catch updates on 
my Instagram page and here is a link to my shop!


.