
In my role as an Art Teacher (K-8th grade) I introduce my students to a variety of materials during the school year. Nothing gets more excitement than when I pull out clay! I am blessed to have a kiln in my classroom, but to be perfectly honest I prefer Air Dry clays and polymer clays for the ease of use. My go-to airdry mediums are (of course) Creative PaperClay and Delight Air Dry ❤
Here are the many ways I have used Creative PaperClay and Delight Air Dry in my classroom this year:
4th grade used magazines to create recycled woven baskets. Once complete we needed to create something to go into the baskets...eggs were the perfect choice! Out came the Delight Air Dry clay. The students loved that color can easily be mixed into the clay rather than colored on top...just dap the washable marker onto the clay and then mix in! Easy peasy. You can see from the photos no 2 eggs turned out exactly the same.


Next up: Jim Dine hearts
I created these with my 3rd graders. We looked at many Jim Dine art pieces and talked about the colors, shapes, and designs. They each created a background with tongue depressors focusing on color and pattern. Next class we pulled out the clay. I shared my example (bottom) and demoed how to mix color into the Delight Air Dry clay. I encouraged them to make a variety of colors....a couple of students only processed "multiple colors" and added all the colors to the entire ball of clay. Thankfully even "mud" can be gorgeous in the hands of a child (see far left photo).
NOTE: This was a parent favorite ❤


Next up: Easter Crosses
I teach art in a Catholic school so I am able to create religious pieces with students throughout the year. For Easter, my 2nd graders used Creative PaperClay to create a cross or crucifix. We talked about the thickness and how to best attach components to each other (a dab of water rubbed onto one piece and then the other attached was the favorite method). I had a variety of texture sheets and texture tools for them to use. ALL loved how easily the clay accepts texture.
For the background students could choose a wooden picture frame or a canvas. Both were painted for the "perfect" backdrop. For the frames, students chose a piece of wallpaper to cover the cardboard center. Crosses were then glued into place.


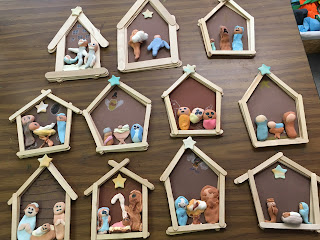
Time for a Christmas project with my 1st graders. We used Delight Air Dry for this project. Again I demoed how to mix color into the clay rather than color on top. I was WOWWED by what they accomplished! Pieces dried in place, then were glued down with Elmer's school glue. Heirloom project sure to be showcased year after year ❤





4th grade used magazines to create recycled woven baskets. Once complete we needed to create something to go into the baskets...eggs were the perfect choice! Out came the Delight Air Dry clay. The students loved that color can easily be mixed into the clay rather than colored on top...just dap the washable marker onto the clay and then mix in! Easy peasy. You can see from the photos no 2 eggs turned out exactly the same.


Next up: Jim Dine hearts
I created these with my 3rd graders. We looked at many Jim Dine art pieces and talked about the colors, shapes, and designs. They each created a background with tongue depressors focusing on color and pattern. Next class we pulled out the clay. I shared my example (bottom) and demoed how to mix color into the Delight Air Dry clay. I encouraged them to make a variety of colors....a couple of students only processed "multiple colors" and added all the colors to the entire ball of clay. Thankfully even "mud" can be gorgeous in the hands of a child (see far left photo).
NOTE: This was a parent favorite ❤


Next up: Easter Crosses
I teach art in a Catholic school so I am able to create religious pieces with students throughout the year. For Easter, my 2nd graders used Creative PaperClay to create a cross or crucifix. We talked about the thickness and how to best attach components to each other (a dab of water rubbed onto one piece and then the other attached was the favorite method). I had a variety of texture sheets and texture tools for them to use. ALL loved how easily the clay accepts texture.
For the background students could choose a wooden picture frame or a canvas. Both were painted for the "perfect" backdrop. For the frames, students chose a piece of wallpaper to cover the cardboard center. Crosses were then glued into place.


Time for a Christmas project with my 1st graders. We used Delight Air Dry for this project. Again I demoed how to mix color into the clay rather than color on top. I was WOWWED by what they accomplished! Pieces dried in place, then were glued down with Elmer's school glue. Heirloom project sure to be showcased year after year ❤


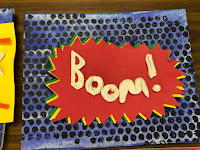
The final project of the year for my 6th graders featured Pop Art. What better way to get POP than with clay?? The students used foam core, paint, and cardstock for bases. Some created Benday dots using bubble wrap to print. The final step was to create lettering. Some used cutters, but most free-formed letters to create a motion word. Words dried in place and then were glued down (again with Elmer's school glue). I think everyone can agree they all did an amazing job!


I hope you have enjoyed this little walk through my year. I look forward to introducing my students to more projects in the coming year using these fabulous products!


