Showing posts with label Shari Welch. Show all posts

Monday, September 5, 2016

Create a Cute Halloween Goulie Wand


Hi!

I don't know about you but I am so ready for fall to begin!

Today I am really excited to show you how I created my first fall craft of the season. Let's get ready to make this easy, adorable, Halloween Goulie wand.


What you will need:
Creative Paperclay®
Styrofoam balls
Americana® multi-surface acrylic paint
Wooden round dowels
Dowel caps
Matte Mod podge 
Feather trim
Ribbon
Black Hemp string
Painters tape
Clay roller/tools
Raffia
Pencil 
Hot glue gun/glue
Paint brushes/water/paper towels

Lets get started:
1. Take a Styrofoam ball and a stick. Push the stick half way into your Styrofoam ball. Set stick aside.
2. Roll out your paperclay to about 1/4 inch thin.
3. Lay your Styrofoam ball on the clay and trim around the ball. Leave a little extra for wrapping around the ball.
4. Form the clay around the ball, removing any excess clay and making sure not to cover the hole.
5. Smooth the clay out with damp hands.
6.Let dry completely.
7. Paint 2 coats of white paint.
8. With a pencil , lightly hand draw out the face.
9. Paint in the face with black paint and a fine detail brush.
10. Seal it with a Matte mod podge.


Finishing Mr. Skeleton

The wand
Paint the stick white.
Use painters tape to create a striped effect.
Paint the space between the tape with black.
Paint the cap black and hot glue it on the stick.
Seal all with matte mod podge.
Glue the head on the other end of the stick with hot glue.

Creating the mini bat head.
Roll out a small ball of clay.
Flatten the ball with your finger.
Using a cutting tool, cut a triangle on the top of the circle.
Trim the other edges to create a bat head shape.
With damp fingers, smooth out the bat head.
When dry paint the face black and the eyes yellow.

The bow
Cut 3.5"of black ribbon and lay on the table.
Cut 8 strands of orange raffia various lengths and lay on top of the ribbon.
Cut a 5" piece of hemp string.
Pinch the ribbon and raffia together.
Wrap  the hemp string around them and tie it in a knot.
Tie the collar with the hemp string around the stick.
Hot glue in place and trim the ends.

Assemble 
Hot glue the bat head on the middle of the knot.
Cut 2"of feather trim.
Attach it around the back of the skeleton head, attaching to both sides of the back of the ribbon with hot glue.

My 4 yr. old grandson loved Mr. Skeleton! Because I had so much fun making him, I ended up creating a few more. Meet my monster and pumpkin Goulie wand.

I hope you enjoyed my first fall craft post. Come back later this month for a helpful tip that I use when creating with paperclay.

Happy Creating,
Shari
My Altered Life blog


Monday, June 22, 2015

Shari's Tip of the Month

Hi!,

Today I am going to share with you a tip on fixing a broken ceramic piece with Creative Paperclay®.


I found this ceramic garden art piece at my creative reuse center Scrap Denton. As you can see it is in horrible shape. The film covering it was peeling off and it had a pretty good crack that someone had tried to glue together.

Just like Charlie Brown's little Christmas tree I felt the need to bring it home and give it some tender loving care.


I don't mean to burst your bubble, but probably like myself, I was under the asumption these kind of pieces were hand painted. Apparently I was wrong. It is some kind of shrink wrap.I peeled off the film as much as I could and took a utility knife to scrap off the rest. I then sanded it down and wiped it with a damp lint free cloth.


I dampened the cracked area slightly. I added paperclay being sure to work it deep into the crack. When all the cracks are filled I will then smoothed it out with my damp fingers. Let this sit for several days before you attempt to sand the area. Once it's ready I can truly give it the hand painted finish it was meant to always have.


I hope you enjoyed my tip of the month. Sadly, this will be my last post for Creative Paperclay®. I have been asked to be a blogger and outside artist for DecoArt ®.

I have so enjoyed being on this design team with such lovely creative artists. Creative paperclay is a product that I will continue to create with. Thank you for believing in me and allowing me to join the team. I will miss you all!

I would love you all to continue to follow my creative journey at My Altered Life's blog and My Altered life on facebook.

Shari

Monday, June 8, 2015

The Imperfect Heart

 
 Hi,

Today I am showing a few mixed media techniques to make your creative paperclay piece pop.

I have heard that black wings symbolize imperfections. Showing that everyone makes mistakes and its okay to make mistakes.This was my inspiration for my mixed media piece "The Imperfect Heart"


The Supplies

Creative Paperclay®
5x7 canvas
Heart and wing mold
Sandits®
Cheese cloth
E-6000 glue
Water mister
Golden® matte medium
Tim holtz distress stain (wild honey, vintage photo, chipped sapphire, broken china)
Americana multi-surface satin paint (black tie, red barn)
Americana crystal gloss glitter paint (black)
Dylusions ink spray (post box red)
Pearlescent liquid acrylic (galactic blue)
Various sizes of paint brushes
Hair dryer 


Let's get started

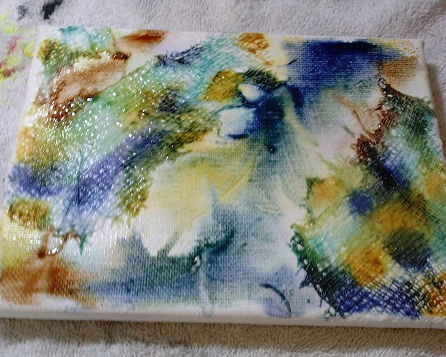
Cut off a few small pieces of cheese clot.Spread a small amount of matte medium on the canvas, then lay the cheese cloth on top of it. Next add matte medium on top of the cheese cloth to secure it into place.


Dot  several colors of the distress stain on the canvas. 


Use a water mister and spray on the canvas. Pick up with canvas and tilt it in different directions to create a unique flowing look. 


While still wet you can spray on Dylusions and  Pearlescent liquid acrylic.  
Time saving tip:Use a hair dryer to dry your paints, stains and mediums in between steps.


I create the heart and wing piece from a candy mold.
Note: When using these kind of molds with your paperclay be sure that the clay does not spill out over the edges of the mold. Let it dry some before you try and remove it from the mold.


Clean up the dried paperclay mold using Sandits®.
These are the best products that I have found to clean up small detailed areas of your paper clay.


Finally paint your piece using the Americana multi surface and crystal gloss glitter paint. Attach it to the canvas using E-6000 glue.


I am so glad you decided to stop by and take a peek at my tutorial.  

Shari

I have been creating art for as long as I can remember. I studied graphic design in Portland, Oregon before moving to Denton, Texas and putting all my focus on creating mixed media art. In addition to being on the Creative Paperclay design team, I am a contributor for the Robin's Nest Design Team, an article writer for Mixed Media Art, and a blogger and outside artist for DecoArt.
I strongly believe in giving back. I volunteer at Scrap Denton Creative Reuse Center where I teach workshops, art camps, and perform art demos. I am very passionate about mixed media art and enjoy helping and watching others discover their creativity.

Monday, May 25, 2015

Shari's Tip of the Month

Hi!
 Thanks for stopping by to view my tip of the month.

I was cleaning out my studio and came across some packaging from some metal keys I had purchased. I was ready to put it in the recycle bin when an idea struck me. I wonder if these flimsy plastic packaging molds could be used with Creative Paperclay? The answer was YES!!

I cleaned it with soap and water just to make sure there was not any reside from shipping on them.
I packed in the paperclay leaving it clean around the edges of the mold. I  found that leaving clay in the mold till it was slightly dry made it easier to remove. (The paperclay will shrink slightly as it dries leaving a space around your piece.)Once removed I laid them on my drying table to finish drying.


This worked perfect! Now I will be looking at packaging a little differently on the products I purchase. What is even better than having a new mold? I am helping save the environment by reusing and re-purposing an item instead of just tossing or putting it in the recycle bin.

Shari

I have been creating art for as long as I can remember. I studied graphic design in Portland, Oregon before moving to Denton, Texas and putting all my focus on creating mixed media art. In addition to being on the Creative Paperclay design team, I am a contributor for the Robin's Nest Design Team, an article writer for Mixed Media Art, and an Outside Artist and blogger for DecoArt.
I strongly believe in giving back. I volunteer at Scrap Denton Creative Reuse Center where I teach workshops, art camps, and perform art demos. I am very passionate about mixed media art and enjoy helping and watching others discover their creativity.

Monday, May 11, 2015

Our Special Fairy Garden

Hi!

Today I wanted to share a fairy garden that my grandson and I created with a little help from Creative Paperclay®

He picked out some fairy garden items at the store, but I wanted to make it an extra special experience by creating some of our own. We had so much fun!

We created stepping stones, a pond with fish in it, some mushrooms, and flowers with faces.


Let me show you how we created the pond

I used wire mesh to create a curved shape and added paperclay to it. I rolled a tube of paperclay, cutting pieces to create the bricks on the edge of the pond.


I painted it using Americana multi-surface paint. My grandson added sticker fish and I covered them with glossy accents to make it appear they were under water. Note: The glossy accents will be cloudy when you first pour it but will be clear once it dries.


This is how we created the mushrooms

My grandson took a piece of paperclay and rolled it into a ball. He took another piece and rolled it into what would look like a tootsie roll. I took over and formed the ball into the mushroom cap and the roll into the stem.


When dry, glue the cap to the stem and paint.


Lets make the stepping stones


My grandson made several small balls and flattened each of them with his palm. I helped to smooth the edges. When dry he painted both sides.


Creating the flower faces

I have a silicon form that has several sizes of faces. I chose the smallest size and painted them.


I picked up some small flowers at the craft store and glued the faces to the centers of the flowers.


 Here are some more pictures of our fairy garden.


This was such a special day of fun and creativity for my grandson and I. 
 
Like most boys, this fairy garden adventures involved large bugs attacking and magical gnomes coming to the rescue!   
 
Thanks you for stopping by! I hope this has inspired you to create some special memories with the little ones in your life using Creative Paperclay®

Shari


I have been creating art for as long as I can remember. I studied graphic design in Portland, Oregon before moving to Denton, Texas and putting all my focus on creating mixed media art. In addition to being on the Creative Paperclay design team, I am a contributor for the Robin's Nest Design Team, an article writer for Mixed Media Art, and a blogger for DecoArt.
I strongly believe in giving back. I volunteer at Scrap Denton Creative Reuse Center where I teach workshops, art camps, and perform art demos. I am very passionate about mixed media art and enjoy helping and watching others discover their creativity.

Monday, April 20, 2015

Alice Inspired Pin Cushion for Mom

 Good Morning!

If you have a Mom who likes to sew then this cute teacup pin cushion gift will be a real winner!


It doesn't matter how old you are, mom will always cherish something handmade by you. She still has a shoebox full of magnificent drawings you created in elementary school .... am I right?


Here is what you will need

Creative Paperclay®
Sandpaper
Sandits®
Styrofoam ball
Poly fiberfill
Fabric
Plastic flowerpot
Baking spray
Sewing pins
Needle and thread
Americana Muti-surface paint®
Mod Podge®
 E6000 glue

Let's get started

Making the cup
1. Lightly spray a plastic flower pot with baking spray so that your paperclay will not stick.
2. Roll out a sheet of paperclay and drape over the flower pot.
3. Trim off excess.
4. Smooth out paperclay using water on your fingertips
5. Cut a strip of paperclay and roll it to form a solid tube. (This will be for your handle)
6. When dry smooth out the cup more (if needed) using a fine grit sandpaper. The handle had a lot of  curves. I found it was easier to finish using Sandits®.
7. Paint your pieces and decorate to your liking.
8. Attach the handle to the cup using E6000 glue.
9. Mod Podge the entire piece to seal.


Making the pin cushion 
1.Cut a square piece of fabric large enough to wrap around your ball.
2.Wrap some fiberfill around the styrofoam ball.
3.Wrap your fabric around the ball to hold the fiberfill on pinning in place.
4. Take a needle and thread and stitch together at the bottom of the ball gathering excess as you go.
5. Remove the pins.
6. Glue the finished fabric covered ball into the cup using E6000 glue.


Top view of the finished pin cushion
Thanks for following along with the creation of my quirky Alice in Wonderland inspired pin cushion.

Happy creating!
Shari


I have been creating art for as long as I can remember. I studied graphic design in Portland, Oregon before moving to Denton, Texas and putting all my focus on creating mixed media art. In addition to being on the Creative Paperclay design team, I am a contributor for the Robin's Nest Design Team, an article writer for Mixed Media Art, and a blogger for DecoArt.
I strongly believe in giving back. I volunteer at Scrap Denton Creative Reuse Center where I teach workshops, art camps, and perform art demos. I am very passionate about mixed media art and enjoy helping and watching others discover their creativity.
Follow more of my creative journey on My Altered Life's blog and My Altered Life on FB

Monday, April 13, 2015

Shari's Tip of the Month

Good Morning!

 Today I am coming to you with 2 tips!

I am working on a project that I wanted to have detailed funky flowers. I tried stamping into clay but it wasn't giving me the image I wanted.

 I wandered into the baking isle at Hobby Lobby® to find exactly what I needed. These fondant flower punches were exactly what I was looking for.


 I loved the way these flowers turned out but they really needed some cleaning up. Regular sandpaper would be difficult to use to clean these delicate beauties and still keep the detail. I turned to a product we were recently given to try out.


Sandits® worked amazingly well!!  http://shop.sandits.com/
They gave me all the control I needed. It was easy to see what I was sanding because of it's design. There are several shapes and sanding grits you can choose from to adapt to all your needs. It gets into those small spaces that you would have struggled with before. I am sold!


I am always on the lookout for new tools I can use with Creative Paperclay®. Use your imagination and think outside the box.

Thank you for stopping by. I would love know if you have found an unexpected tool or a new find that works great for you.

Shari

I have been creating art for as long as I can remember. I studied graphic design in Portland, Oregon before moving to Denton, Texas and putting all my focus on creating mixed media art. In addition to being on the Creative Paperclay design team, I am a contributor for the Robin's Nest Design Team, an article writer for Mixed Media Art, and a blogger for DecoArt.
I strongly believe in giving back. I volunteer at Scrap Denton Creative Reuse Center where I teach workshops, art camps, and perform art demos. I am very passionate about mixed media art and enjoy helping and watching others discover their creativity. 

Follow more of my creative life at My Altered Life's blog page and My Altered Life on FB