Friday, March 25, 2022

Make a DIY Table Card Holder


Hello everyone, Cinnamon here and I am going to show you how I created this table card holder. This holder was inspired by the character from the Japanese brand Comme des Garçons. I fell in love with it and I finally got my hands on a pair of sneakers by the brand. Keep reading to see how this was created!

(Comme des Garçons character)

Supplies:

  • Creative Paperclay®
  • Pliers
  • Wire 
  • Small wooden disc
  • Tool or drill to  put a hole in the wood
  • Masking tape


Take your wire and begin to shape it to the length you would like your table card holder to be with your pliers. 


Create a loop at the top and go around two times. You want to make sure that a piece of paper will hold up and not fall through. Test your loop with paper as you go to make sure that it actually woks.


After you create your loops at the top, create a notch going across the middle so that you have a place to put your heart. This notch is what will keep your heart from sliding out of place on the pole later after it dries.


Cover your notch in the middle with masking tape so that you will have a foundation for your heart.


Cover the masking tape with a layer of clay. Begin creating the shape of the heart, it doesn't have to be perfect at this stage. When you are satisfied, put the piece aside to revist after it dries.


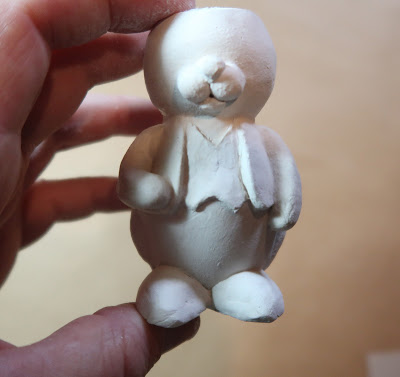
Now it is time to finesse the shape of the character. With the inner layer of the piece dry, you can now put another coat of clay on top of it for the final shaping of the piece. When you are satisfied with the shape, set the piece aside to dry.


After letting the piece dry, I am now getting ready to draw the eyes. I start by drawing a dot for the placement of the eyes from start to finish.  


Draw the eyes when the dots seem to line up at the starting point on the bottom and the end points on the top.


Start painting your piece when you are happy with the placement of the eyes.


I went over the eyes in red by mistake, I am correcting that in the second photo above with white paint.


Take your black paint and paint in the pupils. I dabbed the paint on in a playful way to match the look of the character. Set the piece aside to dry.


Take your wood and drill in the hole for the holder to go down into. I am using a clay tool but you can use what ever you have available to you.


I am cutting down my wire to the height that I would like my holder to stand. In the second photo I am putting the wire in place. You can use glue here to make sure that the wire stays in place with the wood


Here is the final piece in action with my sneakers that have the character in the background!

Thank you all once again for stopping by, and I hope that you enjoyed 
today's tutorial! You can find Creative Paperclay® at the following 

See more of my work at Melandolly.com, catch updates on 
my Instagram page and here is a link to my shop!


.  

Tuesday, March 15, 2022

How to create Easter Bunnies with Creative Paperclay

EASTER BUNNIES 


WHAT YOU WILL NEED 

Creative Paperclay® 

2 Styrofoam eggs

2 Styrofoam balls

Sandpaper

Paint Brush and water

Cardboard

Toothpicks

Glue

Paint

Gesso

Stain


Always keep the area wet when you are adding Paperclay to dry Paperclay.

I sand off rough spots as I go. You can also sculpt with a wet paintbrush.


Cut a 1" circle out of cardboard, glue a 6.5" x .5 strip of paper 

around circle. Let dry and the glue to 1.5" circle. 

Let dry and cover entire hat with Paperclay.


Cut 2" circle out of cardboard. Make a half circle out of Paperclay.

Let dry then cover entire hat with Paperclay.


Cut ears out of cardboard. Cover with Paperclay.
Cut feet out of cardboard.

Cut top and bottom of styrofoam egg. Cover with
Paperclay. Cover styrofoam ball with Paperclay. Let dry.

Glue feet to bottom of egg. Push toothpick into top pf egg.
Glue styrofoam ball to top of egg. Let dry.


Cut top of styrofoam ball off. Add Paperclay to 
cardboard feet and sculpt legs on side of egg.
Let dry.


Add strip of Paperclay around rabbit and up front. Smooth
clay to create jacket for boy. Let dry.

Add strip of Paperclay around rabbit and smooth upward to
create skirt. Let dry.

You don't need to add a whole jacket or skirt. Creating
the edge will give the look of a complete piece of clothing.


Add vest edge and two balls for rabbits face.
Add apron edge.Let dry.

Glue ears on both hats. Let dry.
Patch the ears to the hats with Paperclay. Let dry.


Add arms, nose and chin on both figures. Finish top of vest on boy
and blouse collar on girl. Let dry.


Glue hats on. Add strip of clay for shirt cuffs. Sculpt clay
away from hands. It will give the illusion of a complete shirt sleeve.
Let dry.


 Sand any rough spots and cover with gesso.
Paint and add details. If you are mixing colors keep 
colors in a container for touch ups. I use stain to
make the color pop a bit.


GOOD LUCK WITH YOUR PROJECT
R Michael Palan


Sunday, March 13, 2022

Four Leaf Clover Tutorial


Thanks for stopping by for a fun and quick project, perfect for St Patrick's Day. I am Susie Krichbaum of Art by SusieK and I am a Creative Paperclay® Design Team member. The design team presents tutorials and tips throughout the month and post them at https://creativepaperclay.blogspot.com/ SKILL LEVEL: beginner
VIDEO BELOW: filmed in real time and time-laspe with my voice instructing. SUPPLIES: Small canvas or canvas hardboard ** I prefer hardboard to canvas because it provides a stronger surface. I purchased my hardboard at the Dollar Store, but you could also use a flat piece of wood which would look so nice. Creative Paperclay® Available at Michael's, Joanne Fabrics and Dick Blick Art Supplies (online or store) variety of clay tools water gesso (optional) can use white acrylic paint acrylic paints You can glitz it up with glitter or shimmer paints all you want. I even added a few drops of Diamond Glaze® on the clover for water droplets. This project took about 1.5 hours to sculpt and then another hour to paint. **tip when I let the clay dry over night I placed heavy cups along the edges of the hardboard to prevent warping. You will see this in the video. Add a little easel photo stand for a cute little accent piece.


I hope you enjoyed this tutorial.  If you have any questions you can leave a comment below, find me in Creative Paperclay®Q & A Facebook group as well as my email ArtbysusieK@gmail.com


𝗜 𝗶𝗻𝘃𝗶𝘁𝗲 𝘆𝗼𝘂 𝘁𝗼 𝗺𝘆 𝗼𝘁𝗵𝗲𝗿 𝗮𝗿𝘁 𝘀𝗽𝗮𝗰𝗲𝘀 on Facebook and Instagram:

* @𝗮𝗿𝘁𝗯𝘆𝘀𝘂𝘀𝗶𝗲𝗸 𝐹𝑜𝓇 𝒫𝑒𝒸𝓊𝓁𝒾𝒶𝓇 𝒶𝓃𝒹 𝐻𝒶𝓁𝓁𝑜𝓌𝑒𝑒𝓃

* @𝗪𝗶𝗹𝗹𝗼𝘄𝗛𝗼𝗹𝗹𝗼𝘄𝗪𝗼𝗼𝗱𝘀   𝒻𝑜𝓇 𝐸𝒶𝓇𝓉𝒽𝓎 𝒞𝒽𝒶𝓇𝒶𝒸𝓉𝑒𝓇𝓈 𝒶𝓃𝒹 𝑀𝒶𝑔𝒾𝒸𝓀

*

            𝓒𝓡𝓔𝓐𝓣𝓘𝓥𝓔 𝓟𝓐𝓟𝓔𝓡𝓒𝓛𝓐𝓨® 𝓓𝓮𝓼𝓲𝓰𝓷 𝓣𝓮𝓪𝓶 𝓜𝓮  @creativepaperclay


Susie Krichbaum of Art by Susie K
www.ArtbySusieK.com

Monday, February 28, 2022


Earring Holder


Let’s make a fun DIY earring holder today.


All you need is:

Creative Paperclay 

Acrylic paint 

Knife

Rolling pin

Stamp or something to make a design 

Skewer or needle to make the holes


Take about 1/3 of a package of Creative Paperclay (More if you want to make a larger earring holder) and using your rolling pin flatten out the clay.  


Once the clay is flattened as thick as you would like (Don;t make it too thick or your earring won’t stay on it) cut out the shape of the holder.  For mine I just cut off the ugly edges but followed the rolled shape of the clay.  You could try cutting it rounded or leaf shaped.  Get creative!  Make sure to cut out a squarish base that is atleast 3” wide, the size will depend on how tall your top section is since this is what the holder will stand up on.


Now imprint the pattern.  You could use a stamp, like I did, a piece of lace, or maybe freehand draw a design onto it.


Next use a skewer, needle or even a pencil to create holes for the earrings.  You can group them in pairs or scatter them about like I did.


Using a box place the holder on the box with the bottom hanging over the edge to get the bend in the holder.


Keep an eye on it and once its about halfway hardened, but still pliable at the bend, remove it from the box and bend it a little deeper so that the top leans back away from you a little more.  Let it dry the rest of the way by sitting it on its base.  You may need to prop something against the from at first to keep it from slouching.


Let it finish drying.  It should take a day or two depending on your home.


Now grab your paint and paint it!  For mine I did an ombre look.  Start with your preferred color.  Then add a little white to lighten it slightly and paint a section.  Then add more white and paint another section.  Repeat until you reach the top.


Once the paint is dry it is time to add the earrings!  


I would love to see what designs you come up with!  Comment your photos below.


Cheers until next time!

Kelly Martin

Paper Hibiscus

www.Instagram.com/PaperHibiscus

www.PaperHibiscus.etsy.com

Thursday, February 24, 2022

How to Create a Bas Relief Sculpture: Revisited


Hello everyone, Cinnamon here and I am going to show you how I created this relief sculpture portrait.


I've done this tutorial sometime last year for the piece on the left, but I wanted to revisit this project to push the details a bit further. It's always a good idea to be critical of your work and see where you can make improvements as an artist. 

Supplies:

  • Creative Paperclay®
  • Small hand roller or something to flatten out clay
  • Exacto knife 
  • Sand paper
  • Wire bristle brush
  • Saran wrap
  • plastic knife


I chose to create my own silhouette from an image I found online in a computer illustrating program, you can make a sketch by hand if you want instead. This is a portrait from the project when I first did I last year. I chose to add some flowers to the neckline.


I took the silhouette and printed it out to the size that I wanted the portrait to be. Again, you can just do this by hand and not get on the computer to do this step if you choose. I put some saran wrap over the print so that the clay doesn't stick to the paper. This allows me to move my piece around and be able to check the progress without damaging the paper guide underneath.


I began to take my clay and started working on the shape over the portrait guide. You can use a plastic knife or anything that allows you to sculpt little details while the clay is still pliable. It's important to get your basic shape down at this point so that you don't have to do as much sanding and cutting into the clay later.


Keep building up the piece and focus on getting the profile to the point where you would like it to be.  


I used this ball point tool to add some texture to the hair by slightly pressing it into the clay


I knew that I wanted the piece to have a headband and a lot more details then the last one, so I kept building the pieces up as I went long and making adjustments as I go. 


Here I am experimenting with adding flowers to the base of the sculpt and I started experimenting with earrings to add to the piece. I also filled in some of the face like in the cheek area and around the forehead.


I was not happy with the hair at this point, I used this wire bristle brush to add some texture for a new hairstyle. 


I changed the hairstyle into dreadlocks to challenge myself since I've never sculpted them before. I used the wire brush here to give the type of texture that looked like real hair to me for the dreads. I set the piece aside to allow it to dry. I changed the earrings as well.


After the piece dried, I used a 1600 grit piece of sandpaper to get the piece to have a high gloss sheen to it. This is how she turned out.

Thank you all once again for stopping by, and I hope that you enjoyed 
today's tutorial! You can find Creative Paperclay® at the following 

See more of my work at Melandolly.com, catch updates on 
my Instagram page and here is a link to my shop!


.