Showing posts with label #darleneoliviamcelroy. Show all posts

Saturday, January 27, 2024

It's All About the Story

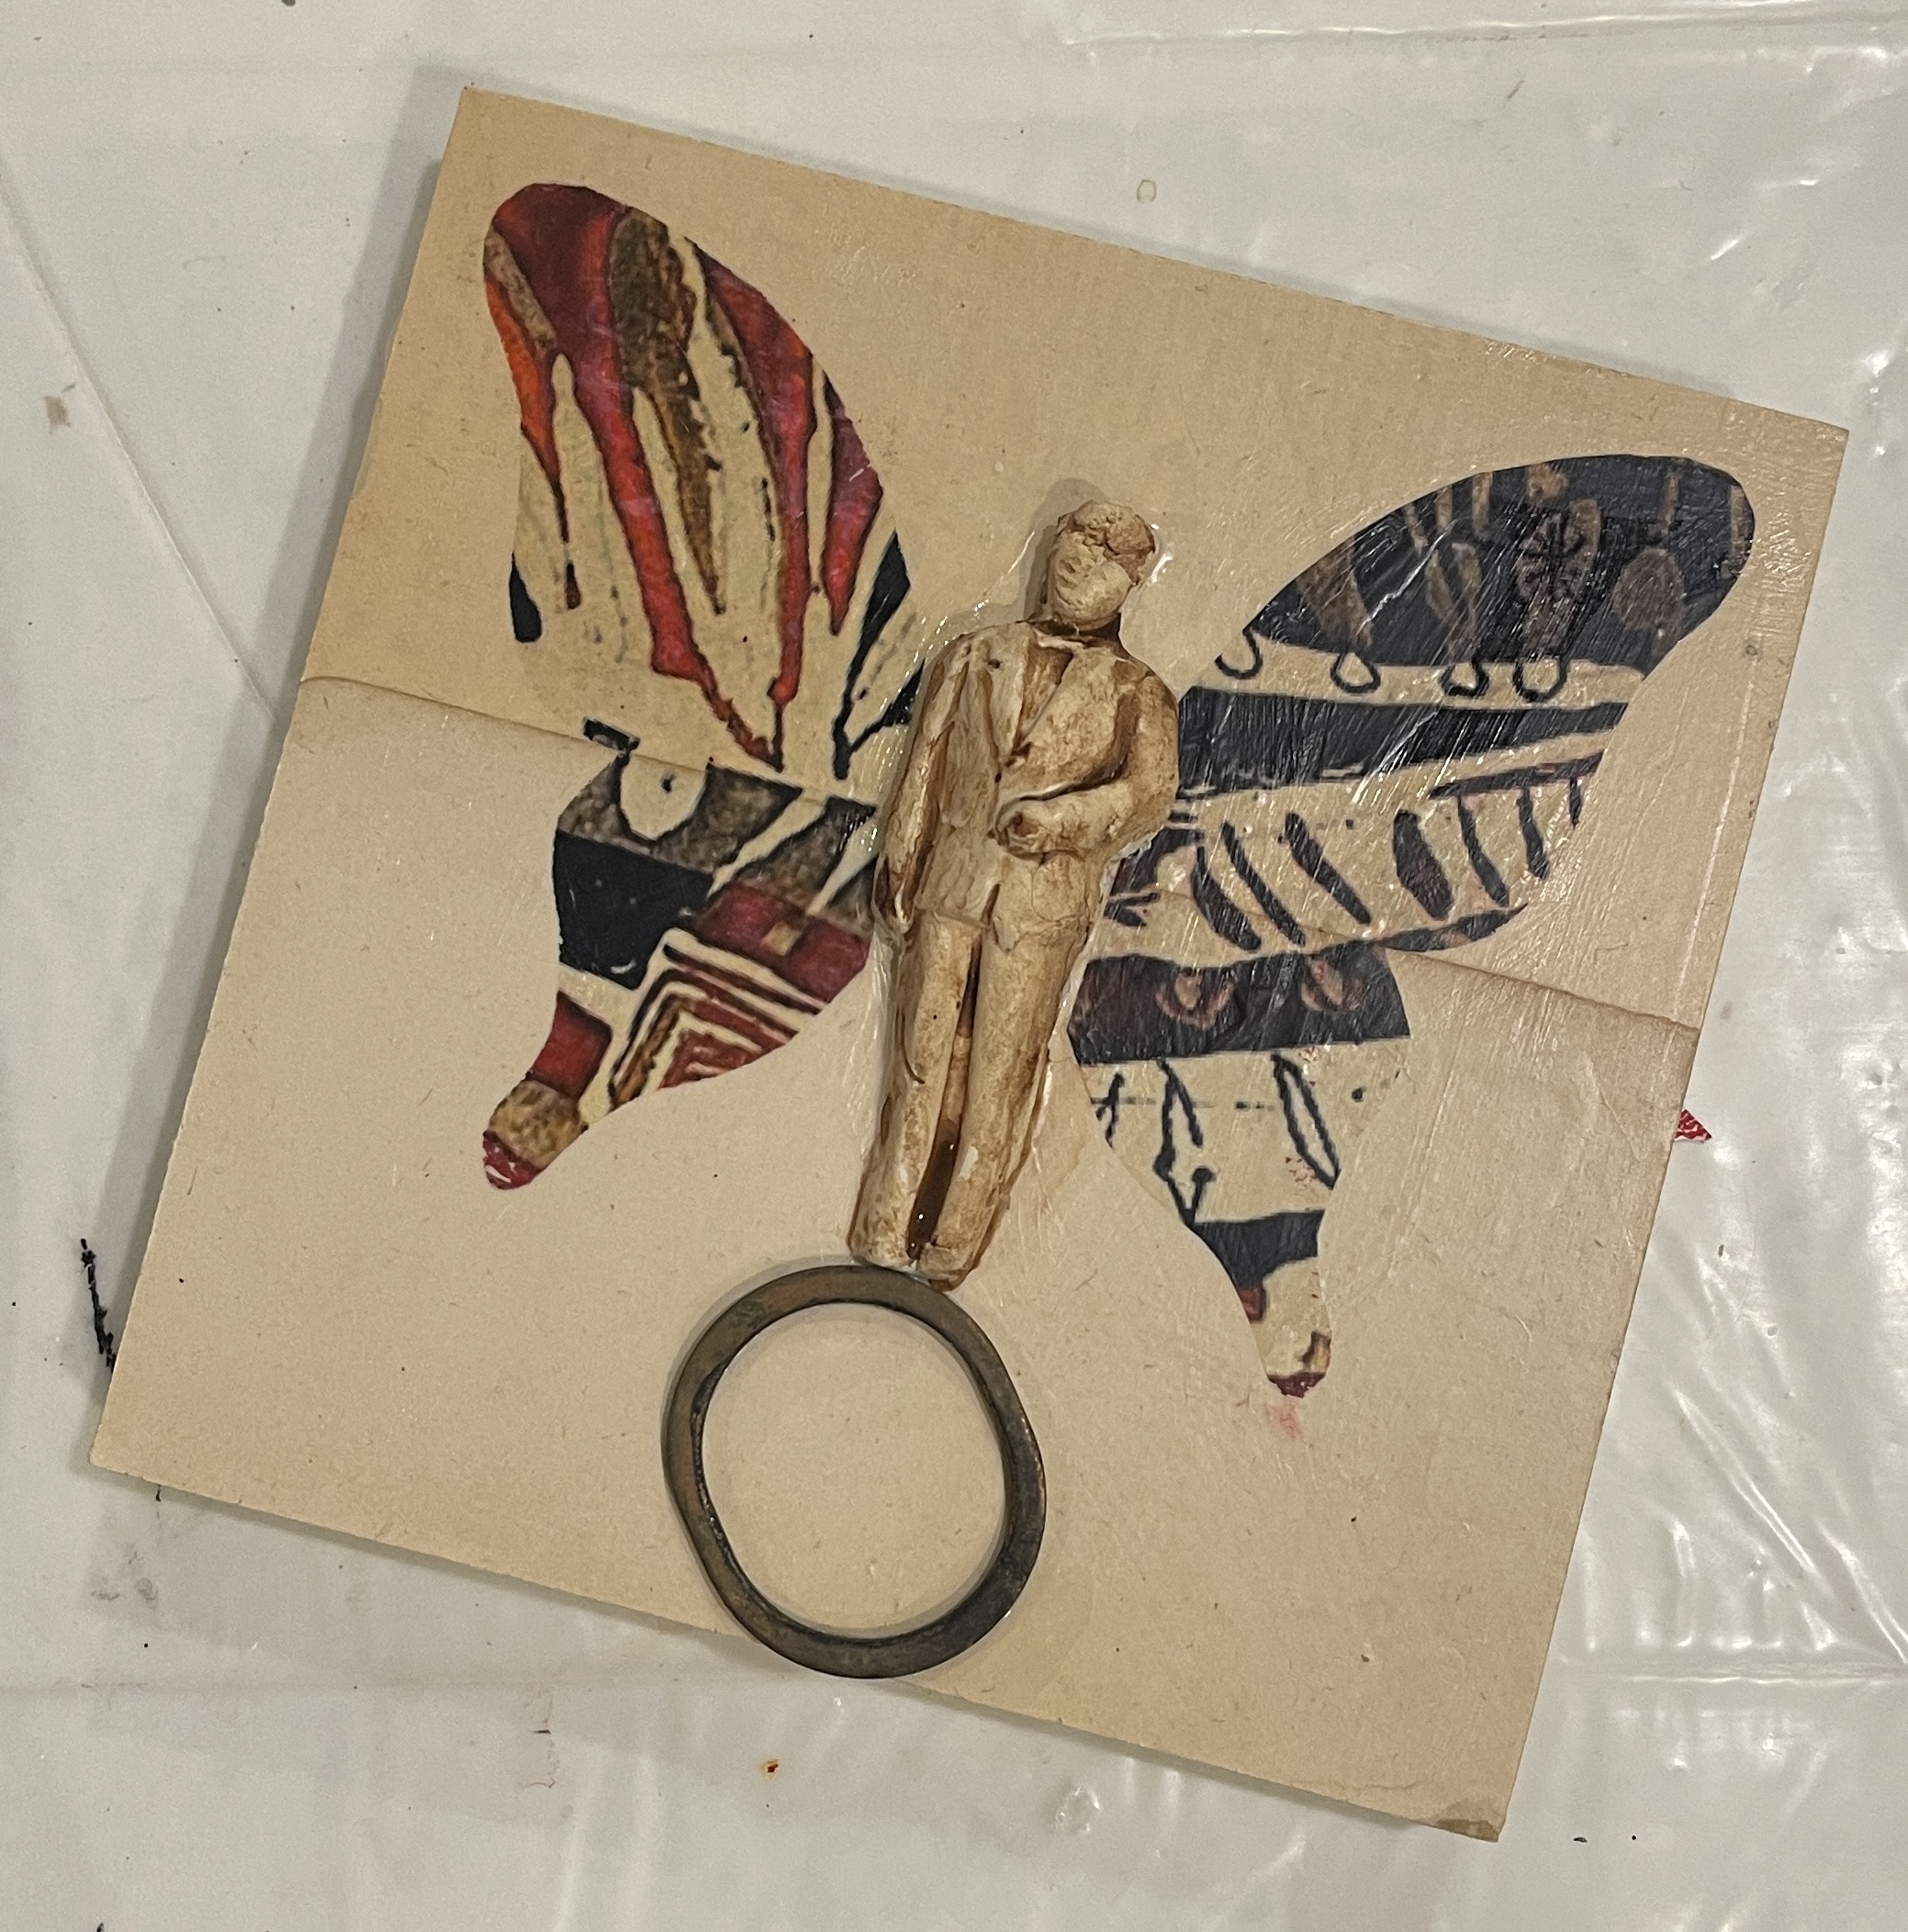
 Sometime simple is the best way to tell a story and, let's face it, all art tells a story. I just finished a big painting and had just enough time to do a small piece before I took off on vacation.

SUPPLIES

Creative Paperclay®
Waterslide Decal
Rust Metal Object
Wings
Fake Flower
Hand cut paper


I started by collaging old book pages with aged edges on my panel. Then I cast a man with Creative Paperclay®, letting it dry on the panel. Next, I gather collage elements and added the waterslide decal wings to the piece.


I wanted this piece to be about balance so the rusty metal ring was added.


After adding more collage details, I finished off the sides with a diamond pattern. This way it doesn't need to be framed.  I love doing these small simple pieces as it keeps me flexible and I never where it will lead me on my large pieces of art.

Dream in Color!

Darlene Olivia McElroy

darleneoliviamcelroy.com


Saturday, November 25, 2023

Odds & Ends Add "POP"


I love adding a bit dimensional pop to my collage paintings and what better to it with than Creative Paperclay®. Because of the diversity of uses for the clay, I can can get different looks depending on whether I am using a slurry, stamp into the clay or shape it with a silicone mold. 

With so many old paintings laying around, I have access to paintings that I can update with techniques I may not have known when I originally created them.

SUPPLIES

Creative Paperclay®
Acrylic paint including gold
Alphabet & floral stamps
Silicone mold
Substrate (old painting used here)


You can make a slurry from all the small dried up pieces of Creative Paperclay®. I prefer to grind it into very fine pieces then add some color and a touch of acrylic medium. It makes a texture with a fine grit.
I added the slurry to an old painting of mine. One edge was taped so I could get a straight line when the tape was pulled off. Lines were added with the edge of my ruler.
The slurry color was changed to have more of a blue tint and stamped. When it dried, an umber wash was applied to the slurry. Because it was a wash the color stayed in the stamped areas more.
The top bar of clay has been stamped into with alphabet stamps, allowed to dry then sealed with polymer medium.


When the medium has dried, paint with a burnt umber paint, let dry and then rub gold paint on it with your finger so it just picks up the high areas.
Clay was applied to a silicone mold then allowed to dry thoroughly before removing it. The same technique above is used to color this and add the gold highlights.

And the painting continues.

Dream in Color!

Darlene Olivia McElroy

darleneoliviamcelroy.com


Saturday, October 28, 2023

Making Molds and Milagros

I love to add dimensional details to my art with Creative Paperclay®. These little items are the sweet part of my paintings that add POP to the piece like the heart in this piece of art.

This lesson shows how to make a mold with Creative Paperclay® and then use the clay to make multiples. You get two tricks for the price of one

SUPPLIES

Milagros or dimensional objects
Creative Paperclay®
PAM no-stick cooking spray or talcum powder
Polymer Medium
Black acrylic paint
Krylon's foil metallic spray (in silver)

After rolling out the clay, I impress a vintage milagro into the clay before letting it dry. When dry, I seal it with polymer medium to seal the surface.

To use this as a mold, I either spray PAM on it as a mold release or apply talcum powder to it. Then I apply my clay to the mold and pull it out immediately.

The cast object is cleaned up with an exacto knife and edges are smoothed with water.

I am a happy accident kind of person so when this heart came out of the mold with a crack through the center, I was thrilled. This will go into a piece about a broken heart.

I use sandpaper or Sand-Its to clean up the edges. Sometimes, I like a raw, aged look.


Now it's time to paint. For my milagros, I spray Krylon's silver foil metallic spray paint. When that has dried, I apply a black acrylic paint that I wipe off while wet. This sticks in the crevices and gives it an aged look.

Of, course, Creative Paperclay® can be painted any color, gold leafed and more.

Dream in Color!

DarleneOliviaMcElroy.com


Saturday, September 30, 2023

Making Faces!


I love people and painting them. This is my first attempt at a dimensional character and it was enjoyable experimenting and adding the humor in creating this piece. And, what a great way to gift your friends with a crazy portrait of themselves.

SUPPLIES
Creative Paperclay®
Delight®
Acrylic paint
Chartpak colorless blender
Laser print
Scissors
Brayer

I started by laying Creative Paperclay® into my basic shape on a panel I had laying around the studio. I could have smoothed it out with a little water but I wanted it be remain clay-like. It was left to dry overnight.


Wet clay was added to the dry clay shape to give dimension to my character and texture was added to the bow tie and eye. When this was dry, I applied gesso to my character. This sealed the clay and prepared it for painting.


I always sit with a piece before I decide if it is finished or not. After painting it with acrylics, I felt it needed more elements to tell the story of this crazy guy.

I brought out Delight® and rolled out a thin sheet. Next, came a laser print and a Chartpak colorless marker so that I could make an image transfer. The laser print was placed face down and the blender was applied to the back of the print several times. This was then cut into a shape and added to the painting. I have shown this to you previously but it is my latest favorite technique.

Here is the finished piece, Flowery Words. You never know what you will discover when you experiments with your art tools.

Dream in Color!

DarleneOliviaMcElroy.com

Saturday, July 29, 2023

Delightful Hand Wall Art


I  am loving playing with Delight® and have made some very cool discoveries. Gather your supplies and join me on this art adventure.

SUPPLIES
Delight®
Hand shape (cut out of cardboard or a sheet of Delight®)
Acrylic paint
Texture tools (stamps
pattern tracer, etc.)
Vintage elements

I had these hand shapes die cut for another project but thought I would try it with Delight. You can use a shaped panel or you can cut your hand shape out of cardboard or a sheet of Delight®.
I started by applying Delight® to my hand shape then brayering it flat. Then I embossed the surface with different stamps to give it texture. 

Next I brayered (rolled flat) the clay and made sheets of Delight® which I was able to cut into shapes. 


I cast a heart in a silicone mold that I was actually just using for the border and shape. Next leaf shapes were cut out of the sheet and applied them to the surface. I took my tracing wheel to make the dotted center of the leaves. It indented the leaf shape and poofed out the edges. I will definitely be doing more projects using the Delight® paper. 

After adding more leaves, a new center for the heart shape, I painted the hand shape. Then I applied vintage millinery flowers and some pearls to add more depth. With a hanger on the back, it can be hung in small places like the kitchen, bathroom or by your entry.

I will be trying this again but with different colors.

Dream in Color!

Darlene Olivia McElroy
www.darleneoliviamcelroy.com

Saturday, April 27, 2019

Quick & Easy Facelift for a Frame

Found this funky frame and painting at a junk/antique store and could see the potential in it. You can find these frames everywhere and don't worry if they are not perfect because we can fix that with cast objects. There are basically three easy steps to change the look of the frame.

As a mixed media artist, the hunt for these treasures it part of the joy when I do a piece of art. The magic of art is the other part.

SUPPLIES

Creative Paperclay®
Black spray paint (Krylon)
Fondant molds
E6000 glue


I have a large collection of fondant molds as well as silicone molds that I have created. Depending on the piece of art or the time I have, I may leave the paper clay in the mold until it has dried. If a piece has delicate edges this is a great way for it to dry. It also prevents warping. I keep a square of linoleum in my studio that I put my "wet" cast objects to dry. They tend not warp when I put them on the linoleum.


Next, I glued the cast pieces on to the frame with E6000. I like how fast it sets up. When working on a painting there is so much waiting time for paint or clay to dry. To spray the frame, I used a Krylon matte black.


 Close up of section of the painted frame with cast objects.


Finished painting collaged with part of the original painting an placed in the updated frame. Not only fun but looks so much better than the original. Now, wasn't that easy?

Dream in Color!

Darlene Olivia McElroy


Friday, March 29, 2019

Creative Paperclay® Lover's Eye

My friends call me a mad art scientist because I love to experiment. In this case, I am using a Creative Paperclay® element as a Lover's Eye inside a cigar box that has been laser cut and etched then embellished. The embellished clay eye becomes the "sweet" spot in this piece of art.

SUPPLY LIST

Creative Paperclay®
Acrylic Paint
Alcohol Inks
Silicone Molds
Cigar Box
Metal Leaf
Pearls & Rhinestones
Glass Eye


 The Creative Paperclay® flower was dry brushed with a Titan Buff acrylic paint after a wash of Quinacridone Nickel Azo Gold acrylic paint had dried. A glass eyeball was glued to the center then vintage pearls were glued around it.

The inspiration for this project was Lover's Eyes. In the 18th and 19th centuries, wealthy British and European lovers exchanged "eye miniatures" -- love tokens so clandestine that even now, in the majority of cases, it is impossible to identify their recipients or the people they depict.
Next I took a cigar box to the local makers space ( a makers space is a shared workshop and artist/artisan community.) These spaces throughout the country allow you to use 3D printers and laser cutters/etchers as well as many other techno tools. Often local junior colleges have these as well.

Before taking it in, I applied metal leaf to the box, sanded it and then worked out the design I planned to etch into it.


I laser cut the hole in the center and etched the floral design into the metal leaf box. I painted the etched flowers with alcohol inks then added the rhinestones and crosses. The inside of the box was painted black.


I added my Creative Paperclay® eye by building up a backing to it and gluing it to the back of the box so the eye floated in the hole. A circle of rhinestones was added before I placed it in place.


Have fun. Dream in Color.

Darlene Olivia McElroy


Saturday, February 23, 2019

Creative Paperclay® Tea Party

I like to push my art skills and what I can do with different techniques. And, of course, as a mixed media artist I have to glue something dimensional onto my pieces.

In this lesson I am going to create an abstracted still life with Creative Paperclay® and image transfers.

SUPPLIES

Creative Paperclay®
Toner image (lase/xerox) (reverse image)
Chartpak Admarker colorless blender
Acrylic paint
Button & rhinestones
Wood panel or canvas
Lace


I started with a light tan wash on my surface then added the Creative Paperclay® that I had cut into shapes and embedded a lace design into the tea pot and cups. I let the clay dry overnight.


Make sure your toner image is reversed because you will be flipping face down on your surface. Then rub the Chartpak colorless blender over it and burnish it immediately. Repeat. You will want to do small areas at a time and repeat the process several time until you get a good transfer.

Note: The transfer was done on unsealed clay.


Depending on the look you are going for, you can either leave the soft transfer look or paint on top of the transfer for a more finished look.

Using a Molotov pain pen, I added the white marks then collaged painted paper, rhinestones and an old civil war button to the piece.

Dream in Color!

Darlene Olivia McElroy

See more of my work on Instagram and DarleneOliviaMcElroy.com.


Friday, February 23, 2018

Making Creative Paperclay® Look Like Metal

I found a new product that I hadn't known about - foil spray. This week is experiment with foil spray week and this is just the start. I created a little animal with Creative Paperclay® on my plastic covered work table. Note: If left to dry on the table, it won't warp.

SUPPLIES

Creative Paperclay®
Krylon Metallic Foil Spray
Polymer Medium
Dimensional Paint (for dots)
Burnt Umber Paint


I added dots with dimensional paint in a bottle. Any brand will work. This was added so I could see how foil works with texture. When the dots dried, I coated the dog shape with polymer medium in order to seal the surface. The foil will absorb into the clay if it is not sealed and loses the foil look.


Krylon Metallic Foil Spray canister.


Metallics are difficult to photograph so you will have to trust me that this looks like real metal.


To age the piece, rub burnt umber paint on it. If you put too much on and can't get it off just slightly spray with alcohol and wipe excess off with paper towel.

Not sure which I like better. Aged and not aged have interesting looks.

Dream in Color.

Darlene Olivia McElroy


Friday, February 9, 2018

Creative Paperclay® slurry + Scissors = WOW

Want to cut Creative Paperclay® slurry with scissors? Sounds weird but always great to know all kinds of little tricks to expand that ever growing art arsenal.

SUPPLIES

Creative Paperclay® slurry
Wax paper
Soft gel or Modge Podge

Start by thoroughly mixing Creative Paperclay® slurry and soft gel together. I add approximately 40%-50% soft gel to the clay slurry.


My work table is cover with a plastic tarp. I spread the mixture on the plastic and cover with wax paper before rolling it out with a rolling pin. Because no air is getting to it because of the wax paper and plastic it will take 1-2 days to dry depending on humidity and thickness. I live in the desert so things dry faster than other places.


 When it has dried, it can be peeled off the plastic and cut with scissors. Great way to cut shapes for mobiles, gift tags, collage elements for art, etc. A small idea with endless possibilities.

Dream in Color!

Darlene Olivia McElroy


Friday, January 12, 2018

Doll Up Bisque Ware with Creative Paperclay®

 I have kept my pencils in the bisque ware vase for years but decided it needed a facelift and what would be better than using Creative Paperclay® to jazz it up.

SUPPLIES
Creative Paperclay®
Bisque ware vase
Stamps & molds
Adhesive size
Metal leaf
Image transfer
After transferring an image onto the vase, I added stamped and molded Creative Paperclay® embellishments and let it dry.

The image transfer here was done with a toner image and Chartpak blender pen.


I then added a dirty wash to the surface. A dirty wash is the dirty water from cleaning your paintbrushes. It is a great way to add a hint of color.


I then applied an adhesive size for metal leaf onto the vase. I goes on white but when it becomes clear it is ready to apply the metal leaf. A large brush was used to remove the excess leaf. The inside was painted with a gold gesso. Great way to start the New Year is with a new look.

Dream in Color!

Darlene Olivia McElroy