Showing posts with label Bronx. Show all posts

Friday, February 26, 2021

Create an Articulated Doll from a Sketch


Hello and happy Friday everyone, Cinnamon here and I am going to show you how I created this articulated doll out of one of my sketches. Since paperclay is made with paper fibers, you can draw directly onto it with pencils. Follow the steps below to see how this was done.

Supplies:
  • Creative Paperclay®
  • Small hand roller or something to flatten out clay
  • Thread
  • Exacto knife or plastic knife
  • Sand paper
  • Thin 22 gauge wire
  • Colored pencils
  • Sealer, Varnish


I started off with a sketch that I did years ago. I scanned it into my computer and made a few changes to it so that I could turn it into a doll such as made some legs and turned the skirt into pants. (I ended up not using the skirt in the photo at all by the way.)


I printed out the new sketch and cut out the pieces. I then took my clay and flattened it out with the hand roller. This could also be done with getting something flat like a book and pressing down onto the clay until it is the thinness that you would like. I recommend not going thinner then 1/4 inch in thickness, thin pieces are prone to warping when they dry.


When you are happy with the thickness of your clay, you can press your cut out pieces of paper into the clay. After your sketch pieces are flushed to the clay, you can use them as a guide to cut out the pieces from the sheet of clay.  I used a tool that was flat like an exacto knife to give me clean cuts but you can use a plastic knife to get the same results. Begin to separate your pieces from the clay.

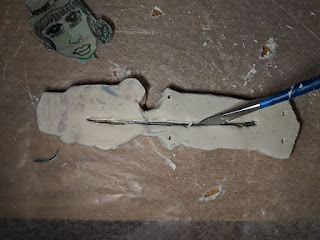


After separating the pieces, I noticed that a few of the thinner areas were tearing after cutting the pieces out. I put them face down and reinforced them by inserting a thin piece of wire in those areas and smoothed the clay around it to conceal the wire. Remove the pieces of paper after you used them to shape your pieces around them. I left the face on because I wasn't sure how to go about redrawing it. I suggest to remove all pieces before the clay dries since it is a lot harder to remove after the fact which I found out the hard way.


While the clay is still moist, poke all of your holes in for you to later attach the limbs with thread. Set the pieces aside to dry. I noticed after the pieces started drying that a few were beginning to warp. I sat a cup on top of those pieces to help them dry flat.


When the pieces are dry, sand them down so that you can get a smooth surface for drawing onto.


Begin drawing straight onto your pieces, paperclay is made from paper fibers so it easily accepts pencil as well as paints. Color in your pieces with colored pencils or paint if you would like.


Take all of your pieces and coat them with a varnish at this stage so that you don't smudge the pencil while you are threading the pieces.


Take your needle and thread and run it through the holes to attach each piece. Make sure you put the knots in the back when you tie the pieces together.


This is how she looks, AND she's flying!

Thank you all once again for stopping by, and I hope that you enjoyed 
today's tutorial! You can find Creative Paperclay® at the following 

See more of my work at Melandolly.com, catch updates on 
my Instagram page and here is a link to my shop!


.  

Friday, June 26, 2020

Learning From Our Past, Creating a Sankofa Bird Sculpture


Hello everyone, Cinnamon here and I am going to show you how
I created this piece. The “Sankofa” is a symbol used by the Akan people
of Ghana, which translates to "Go back and get it". It's depicted as a
bird with its head turned backward taking an egg from its back. It is
 the importance of going back to our roots to learn from our past so
 that we can achieve our full potential as we move forward in the future. 

Materials: Creative Paperclay®,Wire 16 guage, Masking tape, Exacto 
Knife, Sand paper, E600 Craft Glue, Acrylic paint, Sealer, Varnish


Begin by shaping out the frame for the piece which would be the armature. 
This gives the piece a  solid structure to be able to build on top of.


When you are done with the wire portion of the armature, you 
can begin to bulk it out with either masking tape or aluminum foil. 
I use masking tape because I always have an issue getting clay 
to stick the foil. Use what ever you feel comfortable with.


Here I am putting the first layer of paperclay. I always have a
rough start with the first layer so I'm not looking for detail at this 
stage. Set it aside and allow to dry for roughly 24 hours.


After the piece dries, go on to working up the second layer. On this
 layer you want to smooth the clay out while you work so that you'll 
have less sanding to do after it dries. It helps to smooth a drop of water 
on while the clay is still moist to get some of the wrinkles out.


After setting the piece out to dry again, it is time to sand it smooth. 
I am using an 800 grit sheet of sand paper to get it nice and smooth.


This is a reference photo that I made of the Sankofa bird. I wanted to add
 my own twist to it and not necessarily copy one that someone else created. 
The first one is a popular one that is often used and the other ones I drew 
myself in illustrator. I took pieces from the first and gradually made 
changes to it in each version that followed.


I added a bump to the bird's neck so that it would establish the head of the bird.


I had a few details to work out with the the tail feathers so I used some
 of this product that was sent to me to try out from Creative Paperclay®. 
I don't know what it's called but the texture is a little thicker then modeling
 paste and it dries really hard. I was able to mush it into those hard to 
reach places in between the feathers without disturbing them. When it dries,
 it is just as sandable as the paperclay. I wish I could tell you what it is!


Here I am just painting the piece black so that it could look like 
some of the African wood sculptures that I have in my collection.


I decided to paint the egg gold since it represents knowledge
 and knowledge is golden. I just stuck a small sewing needle into
 the egg so that it would be easier for me to paint it. You can do 
what ever works best for you.


I decided to lay the egg on the back of the bird instead of putting
 it into it's mouth like I originally planned. You can use glue to
 put it in place, I just used Aleene's Tacky glue.

Thank you all once again for stopping by, and I hope that you 
enjoyed today's tutorial! You can find Creative Paperclay® at 
the following retailers Creative Paperclay® Online Store,

See more of my work at Melandolly.com and be
sure to catch updates on my Instagram page


Friday, June 22, 2018

How to Create an Artdoll Bust with Creative Paperclay®


Hello everyone! My name is Cinnamon Willis and I am going to show you all how to create an Artdoll bust using Creative Paperclay®.

Supplies
  • Chicken/poultry Wire
  • Thin wire
  • Pliers
  • Scissors
  • Creative Paperclay®
  • Newspaper
  • Masking tape
  • Sand paper
  • Wool
  • Acrylic paint
  • Sealer, Varnish
  • Fabric
  • Needle and thread
  • Aleene's Tacky glue


Start with a sheet of chicken wire, cut it down to the size you would need it to be for the head, neck and shoulders for your piece. Start shaping it with your hands and pliers, be careful not to poke yourself. I usually take the ragged ends of the chicken wire and fold them into each other. Take the lose wire and weave it if needed to fasten the ends of the chicken wire together.


Take your masking tape and wrap it around the piece completely. You could paint a layer of gesso on top of the tape so that the clay could adhere better to it, or you could cover it with a layer of newspaper with paper mache paste as I have done here. The paste could be as simple as water mixed with flour if you take that route.


Which ever way you decide to go, make sure that the piece is dry before you start adding the clay to it.


Start adding clay to the base. Once the piece is dry, you could begin working on the details such as the face shape and features. This can be done by adding a drop of water onto the places that you would like to add clay to and blending the new clay into it. Don’t worry about getting things perfect when working with moist paper clay, most of the sculpting is done when it is dry.

Allow the piece to dry for roughly 30 hours depending on how thick the layer of clay is. This can also be sped up with a toaster oven set to approximately 200- 220 degrees. Make sure to check on it every twenty minutes to ensure it doesn’t get burned.


Use an exacto knife to carve out features and sand the details until you are satisfied with them. This takes a few attempts of building up with the clay and taking it away to get things right or close to how you would like them. When I am happy with the piece, I use a 400 grit sandpaper to get the piece smooth.


When you are done with sanding, you can paint your piece. I use acrylic paint, soft pastels, and sometimes colored pencils for the details.


When I am done with this process I use a sealant to protect the paint job. I like the results I get from the Winsor and Newton Matt varnish, as you can see, it gives the doll a nice satin finish.


At this stage I add the hair. I like to use wool since the strands are thin and don't look like spaghetti in proportion to the size of my dolls. You can use hair from the hair shop as well, but keep the thickness of the strands in mind, and figure out what is right for you. I use Aleene's Tacky glue to attach the hair to the piece.

When you are done with the hair, you can now make an outfit out of fabric for the piece and adorn as you would like.

Thank you for stopping by, and I hope that you enjoyed today's tutorial! You can find Creative Paperclay® at the below listed retailers.