Hello everyone! My name is Cinnamon Willis and I am going to show you all how I created this soft bodied art doll with fabric and Creative Paperclay® for the limbs and head. I normally sculpt my dolls completely out of clay but I wanted to step out of my comfort zone and attempt to make a soft bodied doll. There are many different ways to go about doing this, but I took the steps that I listed below, let me know if you try this method out and I hope you enjoy!
Supplies
- Pencil
- Cardstock paper
- Muslin Fabric
- Thread
- Skewers
- Scissors
- Sewing machine or be prepared to stitch by hand
- Creative Paperclay®
- Newspaper
- Masking tape
- Sand paper
- Wool
- Acrylic paint
- Sealer, Varnish
- E600 Craft Glue
- Beads and buttons
- Rocks or bean bag filler
I started out with drawing a basic shape of a torso and some limbs on a piece of cardstock paper. Next, I cut them out and traced them onto the muslin cloth. After tracking these pieces, I cut them out from the cloth making sure to cut two of each piece so that they could be sewn together. Save the card stock pieces so that they can be used again for another doll. Note that I only have the top portion of the arms and legs here. We will be sculpting the bottom parts from paper clay and attaching them with beads in later steps!
With your cloth pieces, line up the matching pairs so that they can be sewn together, use straight pins to keep them in place once the alignment is right.
This is where you will be sewing the pieces together for your doll. This can be done either by hand or by a sewing machine. As you can see from the photos above, I used both. My machine konked out on me in the middle of this project. Whichever method you feel comfortable using, make sure to leave a seam allowance or about a ¼ of an inch from the edges free when you sew the pieces together. Also be sure to leave about and inch free at the top of each piece so that they can later be turned inside out and stuffed.
Turn the pieces inside out, I use the eraser end of a pencil to do this so that I don't poke through the material. With the torso, I filled the bottom with little pebbles so that the doll could have some weight and sit by herself.
This can also be stuffed with bean bag fill. From the chest up, I filled the piece with fiber. I stitched the neck up by hand and placed a wooden skewer down the middle of the doll so that the head could later be attached to it. After stitching the neck around the skewer, I secured it with e600 glue and made sure that the skewer sat in a good place at the bottom where it wouldn’t wobble to much. I filled the limbs with poly fiber after turning them inside out and stitched up the remainder of the fabric by hand trying hard not to make the stitches visible.

Once the neck is dry, you can now move on to attaching the limbs. I did what was called a basic button joint for the limbs. What you’ll need to do is line up the shoulders to the top part of where the arms would meet, take a long needle and sew straight through the button, arm, torso and, the other arm and button on one pass. Do another pass through, coming out the other side and lining up to where the other button is on the arm. Do this two more times ensuring each hole on both button sides have been passed through. Do the same for the the bottom half with the legs.

Now that you know how big the doll will be, you can start working on the head and the limbs in paperclay. Make a ball of newspaper and wrap it around a skewer that is the same size as the skewer in the torso with masking tape. (If you are more comfortable working directly on the doll, do so but try not to get any clay on the body.) Start adding clay to this, keep in mind that this will need to match the body of your doll so keep it in proportion to it. Since you are using masking tape here, you can pop it off of the stick and try it on the stick of the torso to see how it matches up to the body. Keep doing this until you get the proper size that you are going for.


Once you allow the head to dry, you could begin working on the details such as the face shape and features. This can be done by adding a drop of water onto the places that you would like to add clay to and blending the new clay into it. Don’t worry about getting things perfect when working with moist paper clay, most of the sculpting is done when it is dry with sanding. Once you are done and have worked out the face, you can sand it down with a very fine grit of sandpaper to smooth everything out. I usually work with a 400 grit sheet of sandpaper for getting Creative Paperclay® super smooth. Seal with varnish when complete.
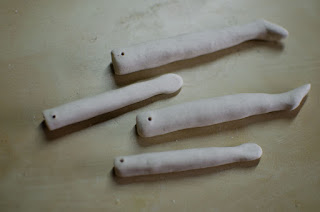
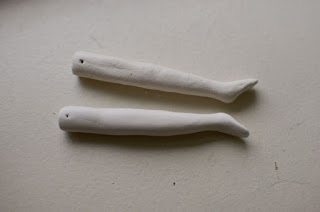
At this stage you can start making the lower half of the legs and arms to attach to the body. Here I cut four skewers down about an inch smaller than the size of what I would want the limbs to be, and wrapped them with masking tape. Cover them with the clay and make sure to leave about a half of an inch at the top so that you can burrow a hole straight through. This will be where you attach the limbs to the body. Make sure to burrow the holes while the clay is still moist and in the right orientation as shown in the first picture above. (Ex. if the foot is facing forward, burrow the hole horizontally at the top so that the foot swings in the right direction.) The second picture shows the difference between the sanded and unsanded versions of the legs.

Paint the limbs and head to the color that you would like them to be. After the pieces have dried use a varnish to cover and protect the paint from chipping.You can also paint the muslin fabric as I did here. I used acrylic paint and thinned it out a bit with water for easier paint application. Keep in mind that this stiffens up the fabric a bit so try not to put paint that is too heavy on the fabric. I suggest trying it out on scrap pieces thinning the paint out with water first to see how it turns out before painting the body.
Now that the limbs are painted, you can attach them to the torso with the beads and thread. Make sure that the beads are sideways where the holes of the beads are facing the same direction as the holes on the button joints. This is important for the movement of the limbs, otherwise they will swing sideways which would be unnatural.
Last but not least comes the head, take the head and burrow it back on to the skewer to make sure it still sits on it. If it doesn’t fit, make adjustments so that it does. Take it back off of the skewer and squeeze a bit of E600 glue into the hole at the bottom where the masking tape is. Immediately position it back onto the skewer on the body and place it where you would like for it to sit. Set this aside and allow it to dry for at least 12 hours.
You can now accessorize your doll if you wish with hair, clothing and whatever else you would like to add. I had a beautiful piece of African print fabric, some tulle and a brand new sewing machine that I wanted to try out. For the hair, I used some beautiful Border Leicester grey wool with caramel tips that I had in my supply bin.
Thank you for stopping by, and I hope that you enjoyed today's tutorial! You can find Creative Paperclay® at the following retailers
Creative Paperclay® Online Store, Michael's,
Amazon, Joann's
The paints that I used can be purchased directly from Plaid at
https://plaidonline.com/brands/plaid
See more of my work at Melandolly.com, and head over to my Instagram page to see other projects that I am currently working on!


