Showing posts with label figurative art. Show all posts

Friday, October 25, 2019

Create a Ring holder with Creative Paperclay


Hello everyone! My name is Cinnamon Willis and I am going to show you how I created this sculpture. With Election Day coming up, I was inspired to create this hand with the fingers shaped in a "V" to inspire all who are capable to go out and vote! This sculpture also doubles as a ring holder, you can create this with all five fingers extended to have a full hand of ring holders if you would prefer.

Supplies:

  • Creative Paperclay®
  • E6000 Glue
  • Wire to build an armature with, can be aluminum
  • Pliers
  • Acrylic paint
  • Sanding paper
  • Drill
  • Wooden base
  • Dowel


To begin, take the wire and bend it into the shape of a hand. Do this step with pliers so that it would be easier.


Cover the armature with masking tape and newspaper to bulk it up. If you plan to have any fingers bent, cover them with tape in newspaper and leave the knuckle exposed so that you can manipulate the fingers to get underneath them to sculpt later.


Begin to add the clay onto your hand, leave knuckles exposed if you plan to bend the fingers and pose them afterwards. It will be easier to work on shaping and sanding them last after you are done working on the rest of the hand. When you have worked out the overall shape of the hand, proceed to go back to bend the fingers in place to work on the knuckles. Wrap the wire with masking tape and then cover with clay.


When the piece is dry, sand if you would like a smooth finish and paint with acrylics.


Take the base that you plan on using for the piece and drill a hole in it that would be roughly the same size as the dowel that you plan on using. Take the same drill bit and use it on the base of your sculpture.


Paint the base with your choice of paint before attaching it to the sculpture. When it dries, take your E6000 glue and attach the rod to the base. Sit the base out for 24 hours and allow to dry.


Attach the base to the sculpture with the E6000 glue and allow it to dry.


Take a photo and remember to go out and vote!

Thank you all once again for stopping by, and I hope that you enjoyed today's tutorial! You can find Creative Paperclay® at the following retailers Creative Paperclay® Online Store, Michael'sAmazon, Joann's.

See more of my work at Melandolly.com and be sure to catch updates on my Instagram page


Friday, February 22, 2019

Create a Faux Bronze Bust with Creative Paperclay ®


Hello everyone! My name is Cinnamon Willis and today's tutorial is going to show you all how to create a faux bronze bust using Creative Paperclay®. In honor of Black history month, I am going to introduce you to an African American sculptor who was part of the Harlem Renaissance named Augusta Savage. She was a notable sculptor, teacher and an activist that fought for equal rights in the arts for African Americans. Most of her work was done in clay or plaster and painted to look like it was a bronze sculpture since she couldn't actually afford to work in bronze. Her art was heavily documented, but the location of most of the pieces are unknown. Her most notable work is the bust above called Gamin which is also made of plaster and painted to look like bronze. In today's tutorial, I'll be working in a style that resembles Mrs. Savage's style more so then my own. I hope you enjoy and take time to look at some of Mrs. Savage's other incredible works.


Courtesy Federal Art Project, Photographic Division collection, 1935-1942. Archives of American Art, Smithsonian Institution.

Supplies:
  • Chicken/poultry Wire
  • Thin wire
  • Pliers
  • Scissors
  • Creative Paperclay®
  • Newspaper
  • Masking tape
  • Sand paper
  • Acrylic paint
  • Sealer, Varnish


Start with a sheet of chicken wire, cut it down to the size you would need it to be for the head, neck and shoulders for your piece. Start shaping it with your hands and pliers, be careful not to poke yourself. I usually take the ragged ends of the chicken wire and fold them into each other. Take the lose wire and weave it if needed to fasten the ends of the chicken wire together.


Take your masking tape and wrap it around the chicken wire completely. You could paint a layer of gesso on top of the tape so that the clay could adhere better to it or just stick it on as I sometimes do. You may need to add a drop of water to the surface for the clay to grab hold to better.


Start adding your first layer of clay to the base. Once the piece is dry, which roughly takes 24 hours depending on the thickness of the clay, you could begin working on the details such as the face shape and features. This can be done by adding a drop of water onto the places that you would like to add clay to and blending the new clay into it. Don’t worry about getting things perfect when working with moist paper clay, most of the sculpting is done when it is dry.


When working on a piece like this, I find it easier to build up the face in different intervals and allow each stage to dry before I continue. This allows me to work without worrying about me ruining a part of the doll or bust that isn't dry yet. As I always state in my tutorials, the drying process can be sped up with a toaster oven set to approximately 200- 220 degrees. Make sure to check on it every twenty minutes to ensure it doesn’t get burned! It's great for those who are impatient like me!


While sculpting this bust I began to realize that it more closely resembled a man's face than a boy's. Instead of the painter's cap that was on the original sculpture, I decided to go with the classic Kangol cap.


After building up this piece quite a bit with the clay, I sanded down the parts that I wanted to be smooth such as the face. I use different grits of regular sand paper that you can find in the hardware store to get the results shown above.


I used Craft Smart's metallic brown to get the bust to look bronze. There are many other metallic brands that would give you the same results, this is just the brand that I had on hand. It took about 5 coats of paint to get the color to be even. If you want to take it a step further, you can do a wash with black paint over the piece to give it a worn look instead of this finish that I have.


Seal with varnish and you are done!


Thank you all once again for stopping by, and I hope that you enjoyed today's tutorial! You can find Creative Paperclay® at the following retailers Creative Paperclay® Online Store, Michael'sAmazon, Joann's.

See more of my work at Melandolly.com and be sure to catch updates on my Instagram page!


Friday, August 24, 2018

How to Create an Artdoll with Creative Paperclay


Hello everyone! My name is Cinnamon Willis and I am going to show you all how I created this soft bodied art doll with fabric and Creative Paperclay® for the limbs and head. I normally sculpt my dolls completely out of clay but I wanted to step out of my comfort zone and attempt to make a soft bodied doll. There are many different ways to go about doing this, but I took the steps that I listed below, let me know if you try this method out and I hope you enjoy!

Supplies

  • Pencil
  • Cardstock paper
  • Muslin Fabric
  • Thread
  • Skewers
  • Scissors
  • Sewing machine or be prepared to stitch by hand
  • Creative Paperclay®
  • Newspaper
  • Masking tape
  • Sand paper
  • Wool
  • Acrylic paint
  • Sealer, Varnish
  • E600 Craft Glue
  • Beads and buttons
  • Rocks or bean bag filler


I started out with drawing a basic shape of a torso and some limbs on a piece of cardstock paper. Next, I cut them out and traced them onto the muslin cloth. After tracking these pieces, I cut them out from the cloth making sure to cut two of each piece so that they could be sewn together. Save the card stock pieces so that they can be used again for another doll. Note that I only have the top portion of the arms and legs here. We will be sculpting the bottom parts from paper clay and attaching them with beads in later steps!

With your cloth pieces, line up the matching pairs so that they can be sewn together, use straight pins to keep them in place once the alignment is right.


This is where you will be sewing the pieces together for your doll. This can be done either by hand or by a sewing machine. As you can see from the photos above, I used both. My machine konked out on me in the middle of this project. Whichever method you feel comfortable using, make sure to leave a seam allowance or about a ¼ of an inch from the edges free when you sew the pieces together. Also be sure to leave about and inch free at the top of each piece so that they can later be turned inside out and stuffed.


Turn the pieces inside out, I use the eraser end of a pencil to do this so that I don't poke through the material. With the torso, I filled the bottom with little pebbles so that the doll could have some weight and sit by herself.


This can also be stuffed with bean bag fill. From the chest up, I filled the piece with fiber. I stitched the neck up by hand and placed a wooden skewer down the middle of the doll so that the head could later be attached to it. After stitching the neck around the skewer, I secured it with e600 glue and made sure that the skewer sat in a good place at the bottom where it wouldn’t wobble to much. I filled the limbs with poly fiber after turning them inside out and stitched up the remainder of the fabric by hand trying hard not to make the stitches visible.


Once the neck is dry, you can now move on to attaching the limbs. I did what was called a basic button joint for the limbs. What you’ll need to do is line up the shoulders to the top part of where the arms would meet, take a long needle and sew straight  through the button, arm, torso and, the other arm and button on one pass. Do another pass through, coming out the other side and lining up to where the other button is on the arm. Do this two more times ensuring each hole on both button sides have been passed through. Do the same for the the bottom half with the legs.


Now that you know how big the doll will be, you can start working on the head and the limbs in paperclay. Make a ball of newspaper and wrap it around a skewer that is the same size as the skewer in the torso with masking tape. (If you are more comfortable working directly on the doll, do so but try not to get any clay on the body.) Start adding clay to this, keep in mind that this will need to match the body of your doll so keep it in proportion to it. Since you are using masking tape here, you can pop it off of the stick and try it on the stick of the torso to see how it matches up to the body. Keep doing this until you get the proper size that you are going for.


Once you allow the head to dry, you could begin working on the details such as the face shape and features. This can be done by adding a drop of water onto the places that you would like to add clay to and blending the new clay into it. Don’t worry about getting things perfect when working with moist paper clay, most of the sculpting is done when it is dry with sanding. Once you are done and have worked out the face, you can sand it down with a very fine grit of sandpaper to smooth everything out. I usually work with a 400 grit sheet of sandpaper for getting Creative Paperclay® super smooth. Seal with varnish when complete.
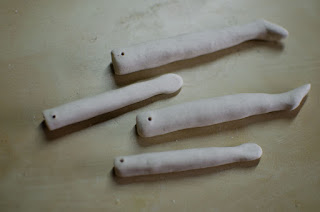
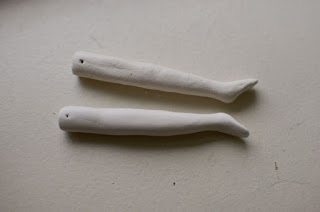
At this stage you can start making the lower half of the legs and arms to attach to the body. Here I cut four skewers down about an inch smaller than the size of what I would want the limbs to be, and wrapped them with masking tape. Cover them with the clay and make sure to leave about a half of an inch at the top so that you can burrow a hole straight through. This will be where you attach the limbs to the body. Make sure to burrow the holes while the clay is still moist and in the right orientation as shown in the first picture above. (Ex. if the foot is facing forward, burrow the hole horizontally at the top so that the foot swings in the right direction.) The second picture shows the difference between the sanded and unsanded versions of the legs.


Paint the limbs and head to the color that you would like them to be. After the pieces have dried use a varnish to cover and protect the paint from chipping.You can also paint the muslin fabric as I did here. I used acrylic paint and thinned it out a bit with water for easier paint application. Keep in mind that this stiffens up the fabric a bit so try not to put paint that is too heavy on the fabric. I suggest trying it out on scrap pieces thinning the paint out with water first to see how it turns out before painting the body.


Now that the limbs are painted, you can attach them to the torso with the beads and thread. Make sure that the beads are sideways where the holes of the beads are facing the same direction as the holes on the button joints. This is important for the movement of the limbs, otherwise they will swing sideways which would be unnatural.


Last but not least comes the head, take the head and burrow it back on to the skewer to make sure it still sits on it. If it doesn’t fit, make adjustments so that it does. Take it back off of the skewer and squeeze a bit of E600 glue into the hole at the bottom where the masking tape is. Immediately position it back onto the skewer on the body and place it where you would like for it to sit. Set this aside and allow it to dry for at least 12 hours.


You can now accessorize your doll if you wish with hair, clothing and whatever else you would like to add. I had a beautiful piece of African print fabric, some tulle and a brand new sewing machine that I wanted to try out. For the hair, I used some beautiful Border Leicester grey wool with caramel tips that I had in my supply bin.

Thank you for stopping by, and I hope that you enjoyed today's tutorial! You can find Creative Paperclay® at the following retailers Creative Paperclay® Online Store, Michael's, Amazon, Joann's

The paints that I used can be purchased directly from Plaid at https://plaidonline.com/brands/plaid

See more of my work at Melandolly.com, and head over to my Instagram page to see other projects that I am currently working on!


Friday, July 27, 2018

How to Create a Paperweight with Creative Paperclay®


Hello everyone! My name is Cinnamon Willis and I am going to show you all how to create a paperweight using Creative Paperclay®.

Here is what you'll need!

  • Creative Paperclay®
  • Scissors
  • Rocks
  • Newspaper
  • Masking tape
  • Sand paper
  • Acrylic paint
  • Aleene's Tacky glue
  • Lambs wool (or synthetic hair from the hair shop)
  • Felting needle (Optional)
  • Wool felt sheet (Optional)


First I start off by making a ball out of newspaper and putting something heavy like rocks in the center.


I wrapped it with masking tape to get it to hold its shape and put a coating of gesso on top. As I've said in my previous tutorials, the gesso just makes it a bit easier for the paper clay to adhere to the masking tape. You can totally add the clay to the tape without it, but it will be a bit more of a struggle. 


Here you can start bulking up the piece with paperclay. Allow the piece to dry and sand it to the level of smoothness that you are happy with.


At this stage I added little nubs to the bottom of the piece so that it becomes stationary and doesn't roll around.


Paperclay shrinks a bit when it dries, so be sure to check the nubs to see that both sides dried evenly and that the piece isn't wobbly. You may have to add a bit more clay to one side so that the piece is stable as I had to go back and do. Allow the nubs to dry and sand them down as well. 


Once the piece is stable, you can begin to work on the face. Here I started plotting with pencil where I wanted the eyes nose and mouth to go. I normally skip this step and work free style, but I would totally recommend doing this for those who are not comfortable working without guides, or those who are just learning.


When you are done with sculpting, you can once again let the face dry and sand it. You can now move on to painting your piece. 


On this piece, I was fortunate enough to be able to try out  FolkArt's ® Home Decor ® Texture Chalk™, which was sent over to me from PLAID. It has a nice gritty and chalky texture, so I ended up not covering this piece with varnish as I usually do out of fear that it would ruin the look of it. The color is Wet Sand that I am using here.


The paint gave the piece a nice and rough texture, and since it was so thick I ended up using just one coat which saved me a lot of time! Bonus points there!


Ok so this step is completely optional since I have a new obsession with needle felting and  already had some Leicester Longwool strands and wool felt sitting around in the studio. If you are unfamiliar with needle felting and are curious about it, please head on over to Youtube to see some videos on it. It's really easy to do, for the most part you are just stabbing wool with a needle until the shape that you are trying to get begins to form. It's kind of therapeutic, but that is a whole lesson within itself! Anywho, I made this hat and partial wig using that method and glued them on with Aleene's Tacky Glue. You can make something similar with good old fashioned glue or a needle and thread!


Thank you for stopping by and be sure to look for some Creative Paperclay® in your local craft store and also on these sites I listed below! I hope you all enjoyed this tutorial and come back on the fourth Friday next month for my next creation!
Michael's
Amazon
Joann's


You can find the texture chalk paint that I used at PLAID.