Showing posts with label how to use Creative PaperClay. Show all posts

Sunday, August 21, 2016

Lynda's Altered Box

I get a lot of boxes - and hate to throw them away!  I have a desk that holds most of my creative stuff - along with a few other small pieces which holds other small pieces that is!  Since I have all these boxes - I decided to alter one, using molded flowers using the Delight product!!!  

Supplies used:
Priority mail box 
Stampin' Up papers and cardstock
Stampin' Up white bakers twine
Sizzix vine and flower die cut
Flower mold
Delight product
Border punch

Bakers twine
Luminart Paint - Sunflower and Rose Gold
 
**Tip - make sure to find molds you will use a lot, and make up a bunch of them ahead of time!  This way - when you need them, they are made and ready to go!!!  

Directions:
Step one:  Start with the box and cut the flaps from the top of the box.  


Step two:  Start with the papers for the inside with the bottom first - then the 2 small sides, finishing with the 2 longer sides.  

Step three:  Add the outside papers - starting with the small sides first - then the longer sides.  


Step four:  Cut a "V" on each corner - to allow for the paper to be folded down to the inside.  Make sure you use adhesive to glue it to the inside to hold it down.

Step five:  Take a white sheet of cardstock - measure to just a bit smaller than the side of the box - border punch around the top and bottom edge.


Step six:  Take the vine die cuts and the flowers (I used two for each flower and layered) - and add them to the front on top of the white sheet from step five.  


Step seven:  Paint the already molded (and dried) flowers in the Sunflower and Rose Gold to go on top of the flowers - 2 of each color.  Then take 2 small flowers, paint in Sunflower and 1 larger one and paint in Rose Gold - add to bottom corner.  

Step eightFinish with the bakers twine going around the whole box and making a bow at the front!         


Step nine:  Add your scrapbook/creative items to the inside of the box and get ready to make more!!!   

Great to simply add things you are working on - at the time you need them, putting away when you simply do not have the time TO do something...  Plus you can simply grab a new box and alter it as you change designs or you find a new paper design you want to use!  Make more than one using one printed and solid pack that coordinates!   I know this will help me get very organized, keeping out only what I need at the time!  Easy project - can be used for so many things and so many rooms!  
Lynda Jeffs
Creative Paperclay Design Team 2016       

Sunday, July 17, 2016

Lynda's Recycled Cardboard Insert

I am all for recycled projects, this month's project, made from a packaging insert I got from a scrapbooking find!!!  I wanted something I could hang on my fridge in my kitchen, to hold "to do lists" and recipe's on!!!  I am making my space around me look nice, so these little things - will all tie together in the bigger picture soon!!!  We are starting in the kitchen and moving on from there!!!    


Supplies used:
Creative Paperclay product flattened
Filler product
Piece of chipboard
Magnet stripes
Paint (Sage green)
Binder clip
Flowers (paper, die cut and molded flowers)
Ink pad (Stampin' Up - Pistachio Pudding)
Bakers twine (Stampin' Up - white)
Hot glue


Directions:
Step oneFlatten out the brick of Creative Paperclay product - see video below if you need any help there!


Step two:  Cover the front part of the chipboard shape, wrapping a small bit around to the back side.  Add a smaller piece to the back - using your fingers to blend the two pieces together.  Using your finger and water, make the Creative Paperclay smooth, especially watching the edges.  


Step three: Allow the piece to dry - making sure to turn the piece over and over again to allow for both sides to dry flat and dry consistently.  You could also try to put this in the oven for quicker dry time if you need to.  Make sure to allow a few days for this step if you don't dry it in the oven.

Step four:  Once thoroughly dried, make sure to inspect for any imperfections.  Once this had started to dry - I found a crack in it that needed to be fixed, I used some filler product we received as a design team to fix it!  Since I can't read the language on the bottle, I have no idea what it is, just that it has an awesome yellow lid and it is really great to fill in holes and cracks!   


Step five:  After everything dries - sand it on the front, back and sides, to make sure it is ready to go.  Once it is - you want to get it ready to paint the piece.  

Step six:  Put 2 coats of paint (at least) to the front and back of the piece, allowing to dry completely between coats.  

Step seven:  Start to add white bakers twine around the bottom of the piece, and the various flowers you have selected at the top and 1 on the bottom.  With the middle flowers, I added a bit of the Pistachio Pudding ink pad to the front of the flowers to add a bit of color to it!  


Step eight:  Add the 2 binder clips - one larger one at the top to add notepaper to, and the small bottom one to keep a recipe when you are cooking!  


Step nine:  Finish by adding the magnet strip's to the back of the piece!  From this picture, I added a small piece to each corner - and one more larger piece to help hold it up on the fridge!  

I can't wait to get the rest of the kitchen done - though this is the first of a few things I am creating!  I will have to purchase more paint, so I can coordinate the whole look!  This one space, will help the next space, and the next one, and the next one!  
Thanks for stopping by,
Lynda Jeffs
Creative Paperclay Design Team 2016 
and Memories in Tyme    
                

Sunday, March 20, 2016

Altered Organizer Box With Creative Paperclay Accents

I am a completely organized/disorganized mess!  Right now it is what it is - and I look forward to a bit more in the future, where I will be able to spread out and have my own space to create in!  In between time, I am going to have some fun in getting READY for that day, and today's project...well, lets just say it will really look great in my imagined space I am planning for!


Supply list:
Creative Paperclay and Delight products
Box
3 cans
Paper
Border tape
Mod Podge
Glue gun
2 sheets paper
White paint

This is the type of project that needed a video, instead of directions on how to create it!  I am really happy with how it turned out, and can't wait to see what I end up making next using the same "recycled" products!  I have a few things I am working on, including a bulletin board with decorated push pins made out of Creative Paperclay, and a few gift items for special ladies for Mothers Day coming up


For the title - check out the video on my Memories in Tyme blog that will show you how to use scrapbook templates and the Creative Paperclay productAs for the inside - you can see how I have everything from scissors to my trimmer to paint brushes...all inside this box!  I might even have to make a few others to match this one!  


So many things I am working on - and now a really nice thing to put my creative supplies in!  I am starting to create again, so having a nice place to put my supplies in - is perfect for me!  I hope you have enjoyed this project, and I hope you share with me YOURS!  

Thanks for stopping by,
Lynda Jeffs
Creative Paperclay Design Team 2016  

Sunday, February 7, 2016

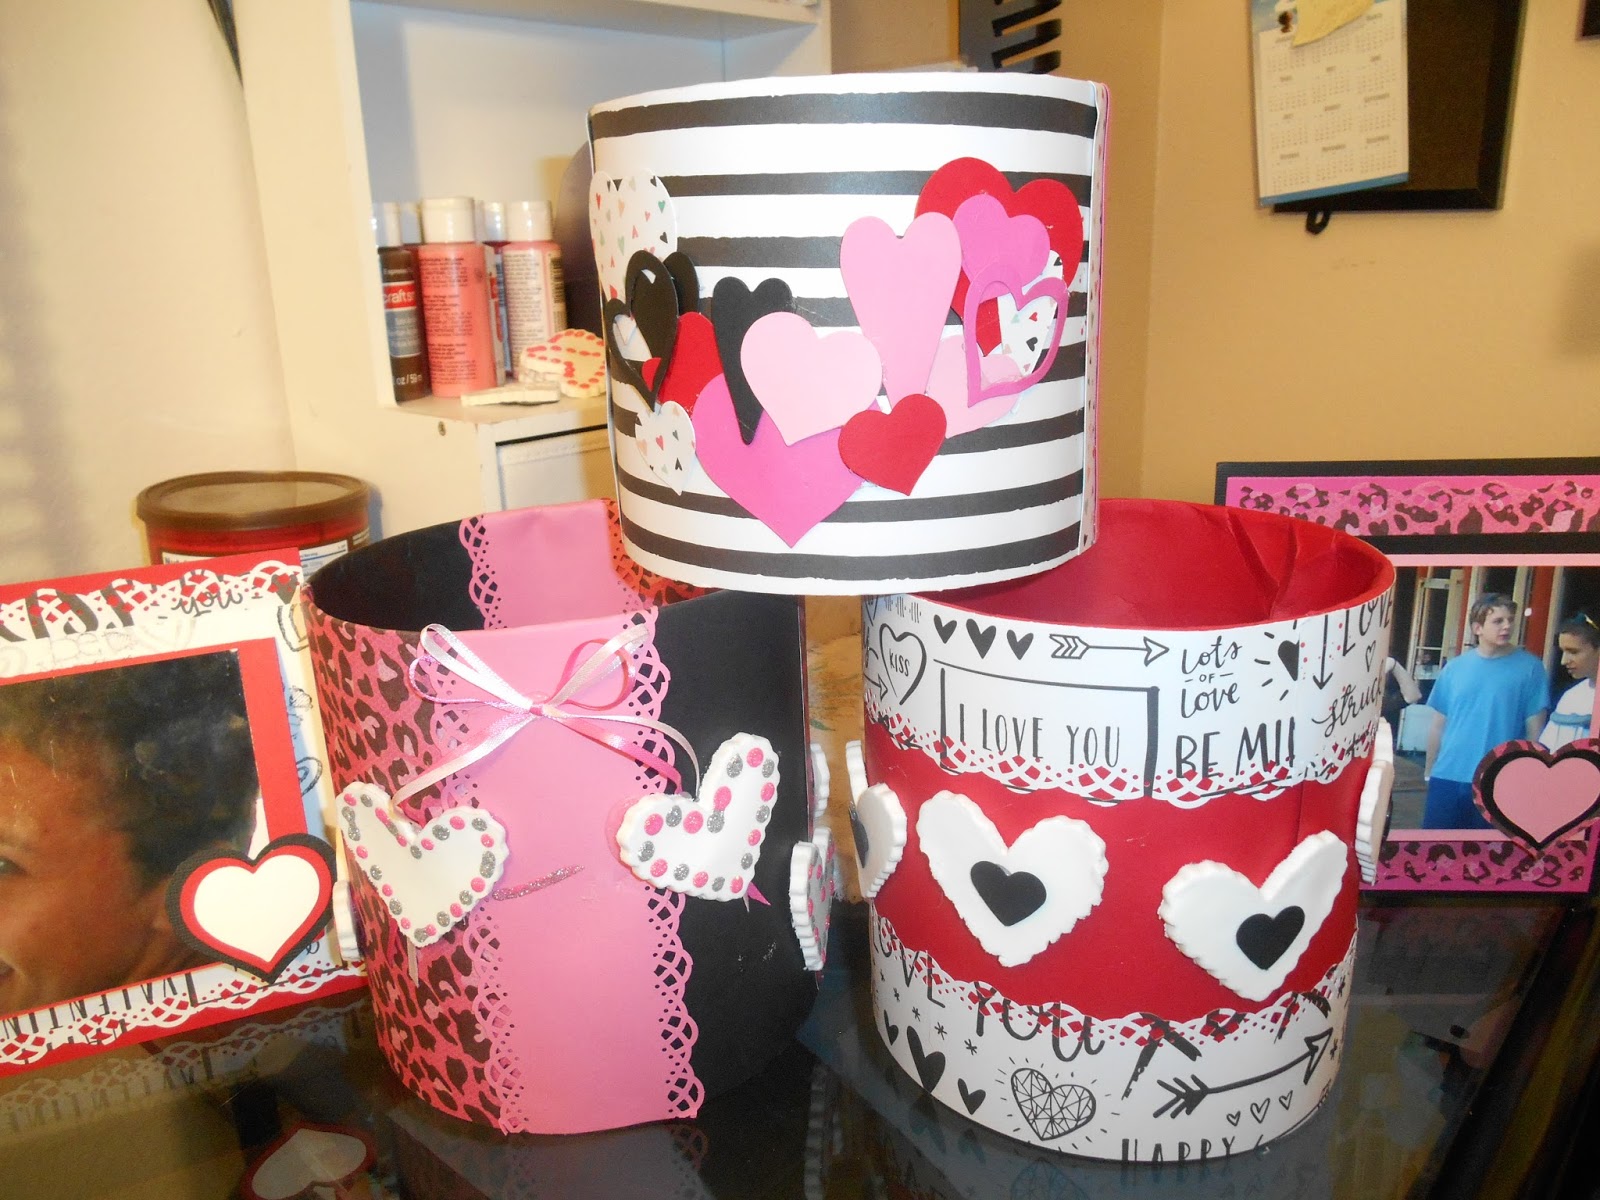
Fun Valentines Day Altered Can Project

When you give gifts out to your friends and family - are they works of art, or are they just shoved in a bag?  I love to reuse things - like coffee cans, to create one of a kind creations to put presents in - normally I am a shove things in a sack and here you go kinda gal!!!  Today's project - how to create your own one of a kind gift container, which can be tweaked for just about any kind of holiday!  Let's get started! 

Supply list:
Can - your choice of size... I use an MJB coffee can (empty of course)
Paper of your choice
Delight product
Heart cookie cutters
Glitter glue
Heart punch
Ribbon
Border punch
Die cuts 

Directions:  
Step one: Using the Delight product, flatten an entire package out to your desired thickness.  If you are reusing the Delight product after you have cut shapes out - simply roll in a ball - and flatten back out!


Step two:  Start to cut out hearts with your heart cookie cutter.  Repeat step one using the leftovers.  Set aside to allow to dry.


Step three:  Take your can and start to cover the outside in an attractive manner.  Measure the outside of your can and add about 1-2" extra paper to allow for you to glue the whole thing down.  


Step four:  Start to add the extra's that will make the can unique, such as a border using the border punch, die cuts or embellishment's that go with the theme you are working on.  

            
Step five:  After the Delight hearts are finished drying, decorate them with punches and glitter glue.  When glue is completely dry, add to the can.  With  the pink can, I added a bow, with 2 hearts on the top of the ends of the ribbon.  With the red can, I added a black heart on each of the Delight hearts, with 1 heart accented in the glitter glue.  


With these can's - you can customize to just about any gift giving event you have, or plain (in a favorite color) for "just because"!!!  Each of the cans are different, with tags created (directions on Memories in Tyme blog) to match each one!  They are a bit bigger - I wanted something they could frame if they wanted to!  

**Tip - watch for cookie cutters at Walmart for .98 cents for about 5 individual cutters!  Or - grab a coupon and go to your local craft store and get them!  You can even check out the thrift stores too!  I spent almost $5.00 at Michael's for 4 cookie cutters, went to Walmart later on - and found them for .98 cents! 

Cookie cutters, added with Delight or Creative Paperclay - can create so many different things!!!  Accents for your scrapbook albums or cards...magnets...or embellishments for altered items!  One package will go a long long way - unless you are making a larger item!!!  Delight product will dry quickly - and can be put in the microwave to create a more 3D look.  Creative Paperclay will dry hard and non-breakable, ready for acrylic paint!!!  So, depending on what you are looking to do - either product will help you get started in creating really fun one of a kind items!  I have a video coming up - tips on using molds to create embellishments and other fun things - I hope you will join me in 2 weeks!  

Thanks for stopping by,
Lynda Jeffs 
Creative Paperclay Design Team     

Sunday, January 17, 2016

Lynda's Creative Paperclay Keychain

I really like easy projects - things that just do not take a long time to finish up!  Yet, on the other hand, I also love to create more "in depth" projects too!!!  Today's project - well, doesn't require a ton of supplies - so lets get started!  

My daughters "word" is believe...  She is an amazing person, who has been through more than her fair share in life...  She has taught me more about life than I have taught her...  I am so thankful she is MY daughter - and that we have become as close as we are right now!  I love making little things for her - such as today's project!  I also decided it is MUCH easier to show you a video, than to explain the directions as to how to make something!!!  

Supply list:  
Creative Paperclay product
Saying stamp of your choice
Paint colors of your choice
Silent Setter (or something to create a hole
Ribbon
Rings

Directions:


Lynda Jeffs
Creative Paperclay Design Team

Sunday, January 3, 2016

Lynda's Tips for January

I have been more of a beginner, working with Creative Paperclay - more scared of what I can do with it than anything!  My husband on the other hand, a natural from the time he picked it up and started to play with it!  Watching him create the things he did for our Halloween scene, has helped me look at my next few projects a bit differently!  It is that in which I have learned I wanted to share with you today!  
  • If you are going to do a larger project, make sure to spend the time in sketching out the project and what you want it to look like!  
  • Do NOT bite off more than you can chew - start small and work your way up from there!   
  • When it comes to the ideas you want to create, make sure you get a list of what you need to make - and by when it needs to be done!  Have a sketch book to jot down ideas and sketch things out as the inspiration hits!  
I am working on some cost effective tips - and a video for my next project idea!  I have my calendar, some paper to sketch things out, and I am ready to plan the next few months of projects!  I can't wait to share with you what we end up creating!   
Lynda Jeffs
Memories in Tyme and
Creative Paperclay Design Team
 

Friday, September 11, 2015

"A" is for Apple

Today's How To is about making some Apple Ornaments for your favourite teacher!


Hi, it's Ann (from the blog at:  www.annmakes.blogspot.com) here today to share with you my latest Creative Paperclay® Project.  I was inspired by the Back To School Theme.  I still have one Teenager who is attending a new to him school this year, and with that came a lot of excitement and anxiety.  Now that the house is just a little bit more quiet and things are starting to calm down, I found some time and thought I would get a head start on some School Theme Ornaments.  Here is what I did:


First I dug out one of my kids' old plasticine making molds that looks like an apple.  I dusted the inside with some talcum powder, pushed in some Creative Paperclay® Modeling Material, and popped the apple piece out.  I repeated the process over and over to make a few apples.  


As the Creative Paperclay ® was air drying I inserted a paperclip into the back of each apple.


Once the apples were dry I smoothed out any roughness with an emery board, and I brushed off the excess dust.  I then Painted the apples in Red, and in Green.  I made some brown for the stems by mixing some red and green together and then painted the stems. 


As a final top coat I brushed on some Glossy Sealer.

I used some red and white twine for the small bows and as cords for hanging the apples.

The supplies I used:
Creative Paperclay® Modeling Material
DecoArt Crafter's Acrylics in Christmas Red, and Christmas Green
DecoArt Glue, Sealer, Finish in Gloss
Twine (Stash)
Paper clips from Staples

This is a fun and easy project that can be done with children.  I hope that you are inspired to make some fun ornaments.  To see other crafty goodies please come visit my blog at : http://annmakes.blogspot.com.

Thanks for stopping by.


Sunday, June 7, 2015

June Tips from Lynda -

Hello everyone,

I have learned so much since being on this design team, I couldn't be happier, let me tell you!  A few things that are helping me to create fun - one of a kind projects:

  1. Water truly is my best friend when creating with Creative Paperclay product!  
  2. When you are making your product flat for things you are creating, cut a piece a bit bigger than you really need so you can flatten it to one size all the way around.  
  3. Create a few pieces ahead of time, or when you create other pieces.  This way you have them ready when you need them!  
  4. Have something you can use to keep track of ideas you want to make, such as a sketchbook or notebook.  Make sure to jot down specific details for use later on!  
  5. Find something you can keep all of your tools, finished up pieces, and things you use when you work with the product.  Having it all in one place is much better than having to find it all!  
Thank you so much for stopping by!  Look back at all the fun tips, and add them to your Pinterest page or notebook somehow!  See you in two weeks with my fun idea for the month!  
Lynda Jeffs
Creative Paperclay Design Team 

Sunday, February 1, 2015

Beginner Creative Paperclay

Creative Paperclay is an amazing product you can do so many different things with!   This post is all about starting out using the Creative Paperclay and Delight products, and different supplies you will need for both of them both! 
A basic supply list will include things you already have at home and available to you, no need to purchase a ton of extra supplies to use, just the product itself when you are first starting out!  Most everything you will have available to you, or you can substitute with something else!
          
Basic supply list:
  • Creative Paperclay and Delight product
  • Water, small bucket of water and squirt bottle in a mist
  • Sand paper in various strengths/Sandit's sanding sticks 
  • Cookie cutters
  • Craft knife (Xacto is fine)
  • Knife
  • Ruler
  • Rolling pin (or other round object to roll out the clay)
  • Wet washcloth to wash your hands as you are working
  • Dry cloth to dry your hands
  • Aluminum foil and Saran Wrap (using the leftover roll part for rolling out the clay in a pinch)
  • Toothpicks
  • Popsicle sticks
  • Paint brushes
  • Things you have from cake decorating 
  • Anything small and sharp to shape and mold with
  • Fingers...your fingers will be a wonderful supply, CHEAP!
  • Something to keep it all in
  • Templates (if you happen to scrapbook)
  • Stamps
  • Molds
  • Acrylic paint
  • Ziploc style bags to keep opened clay package in
Tips to get started:
  1. For your supplies, look at what you have at home first - before you spend money on anything!  Things from other crafts you do, such as scrapbooking or cake decorating can be used to create your first projects!  
  2. Water will be your best friend when you are doing anything with Creative Paperclay!  It will help to smooth the pieces you are working on and make them look perfect!
  3. Things you would normally throw away - can be reused to make something different. One of the first larger projects I made, was using a small creamer container to make a snowman!  
  4. If you happen to do other crafts - you can use a lot of those supplies, with Creative Paperclay and Delight products!  
  5. Stalk the blog, Pinterest, and YouTube for ideas!  Think about things a bit before you get started, and substitute where you can to save money!  
  6. Step out of your comfort zone - start small - and work your way up from there!   
I am working on a few easy projects for you to start out with - make sure you check back in two weeks!  I have a fun birthday to create something for - and the ideas are just FLOWING!!!  Now to take the time to create it!  Plus with Easter coming up - my first idea in March will be a fun Easter basket idea I am working on!!!  So, grab your package of Creative Paperclay, a container to put all the stuff in, and start to work on your own projects!
Lynda Jeffs
Creative Paperclay Design Team