Showing posts with label creative paperclay projects. Show all posts

Sunday, August 21, 2016

Lynda's Altered Box

I get a lot of boxes - and hate to throw them away!  I have a desk that holds most of my creative stuff - along with a few other small pieces which holds other small pieces that is!  Since I have all these boxes - I decided to alter one, using molded flowers using the Delight product!!!  

Supplies used:
Priority mail box 
Stampin' Up papers and cardstock
Stampin' Up white bakers twine
Sizzix vine and flower die cut
Flower mold
Delight product
Border punch

Bakers twine
Luminart Paint - Sunflower and Rose Gold
 
**Tip - make sure to find molds you will use a lot, and make up a bunch of them ahead of time!  This way - when you need them, they are made and ready to go!!!  

Directions:
Step one:  Start with the box and cut the flaps from the top of the box.  


Step two:  Start with the papers for the inside with the bottom first - then the 2 small sides, finishing with the 2 longer sides.  

Step three:  Add the outside papers - starting with the small sides first - then the longer sides.  


Step four:  Cut a "V" on each corner - to allow for the paper to be folded down to the inside.  Make sure you use adhesive to glue it to the inside to hold it down.

Step five:  Take a white sheet of cardstock - measure to just a bit smaller than the side of the box - border punch around the top and bottom edge.


Step six:  Take the vine die cuts and the flowers (I used two for each flower and layered) - and add them to the front on top of the white sheet from step five.  


Step seven:  Paint the already molded (and dried) flowers in the Sunflower and Rose Gold to go on top of the flowers - 2 of each color.  Then take 2 small flowers, paint in Sunflower and 1 larger one and paint in Rose Gold - add to bottom corner.  

Step eightFinish with the bakers twine going around the whole box and making a bow at the front!         


Step nine:  Add your scrapbook/creative items to the inside of the box and get ready to make more!!!   

Great to simply add things you are working on - at the time you need them, putting away when you simply do not have the time TO do something...  Plus you can simply grab a new box and alter it as you change designs or you find a new paper design you want to use!  Make more than one using one printed and solid pack that coordinates!   I know this will help me get very organized, keeping out only what I need at the time!  Easy project - can be used for so many things and so many rooms!  
Lynda Jeffs
Creative Paperclay Design Team 2016       

Sunday, February 7, 2016

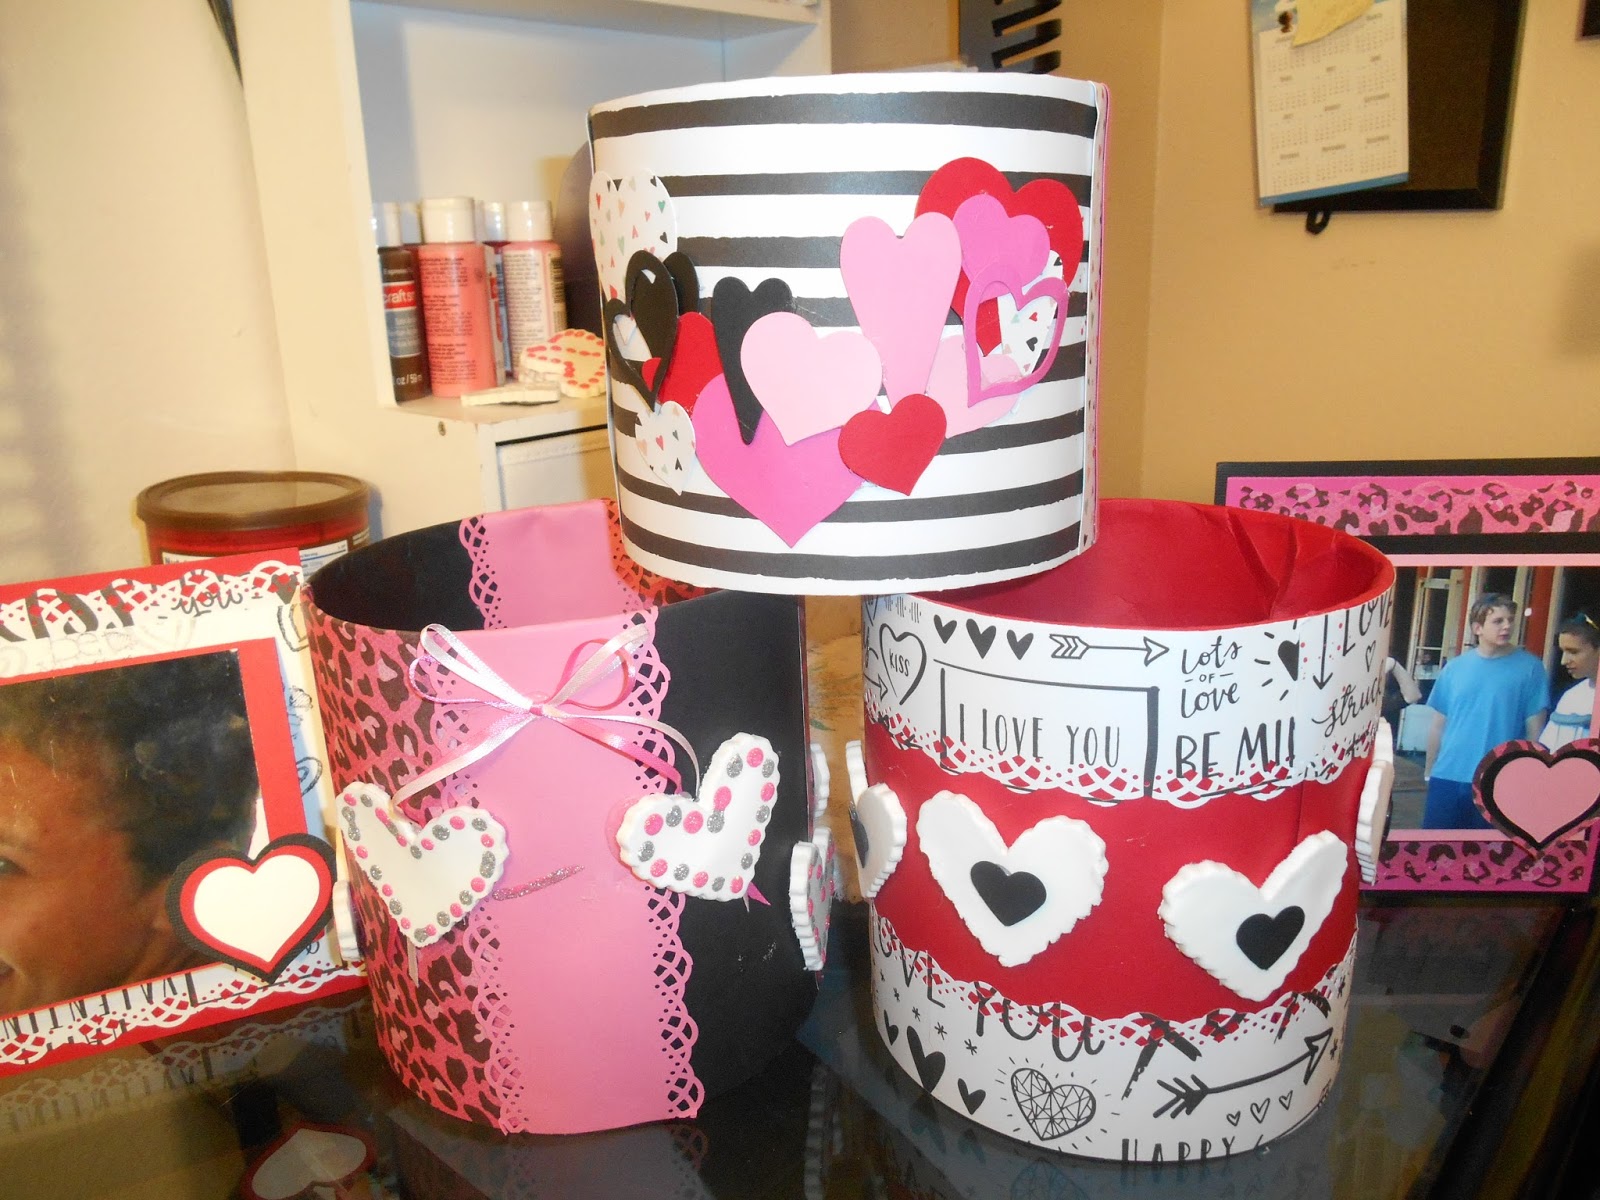
Fun Valentines Day Altered Can Project

When you give gifts out to your friends and family - are they works of art, or are they just shoved in a bag?  I love to reuse things - like coffee cans, to create one of a kind creations to put presents in - normally I am a shove things in a sack and here you go kinda gal!!!  Today's project - how to create your own one of a kind gift container, which can be tweaked for just about any kind of holiday!  Let's get started! 

Supply list:
Can - your choice of size... I use an MJB coffee can (empty of course)
Paper of your choice
Delight product
Heart cookie cutters
Glitter glue
Heart punch
Ribbon
Border punch
Die cuts 

Directions:  
Step one: Using the Delight product, flatten an entire package out to your desired thickness.  If you are reusing the Delight product after you have cut shapes out - simply roll in a ball - and flatten back out!


Step two:  Start to cut out hearts with your heart cookie cutter.  Repeat step one using the leftovers.  Set aside to allow to dry.


Step three:  Take your can and start to cover the outside in an attractive manner.  Measure the outside of your can and add about 1-2" extra paper to allow for you to glue the whole thing down.  


Step four:  Start to add the extra's that will make the can unique, such as a border using the border punch, die cuts or embellishment's that go with the theme you are working on.  

            
Step five:  After the Delight hearts are finished drying, decorate them with punches and glitter glue.  When glue is completely dry, add to the can.  With  the pink can, I added a bow, with 2 hearts on the top of the ends of the ribbon.  With the red can, I added a black heart on each of the Delight hearts, with 1 heart accented in the glitter glue.  


With these can's - you can customize to just about any gift giving event you have, or plain (in a favorite color) for "just because"!!!  Each of the cans are different, with tags created (directions on Memories in Tyme blog) to match each one!  They are a bit bigger - I wanted something they could frame if they wanted to!  

**Tip - watch for cookie cutters at Walmart for .98 cents for about 5 individual cutters!  Or - grab a coupon and go to your local craft store and get them!  You can even check out the thrift stores too!  I spent almost $5.00 at Michael's for 4 cookie cutters, went to Walmart later on - and found them for .98 cents! 

Cookie cutters, added with Delight or Creative Paperclay - can create so many different things!!!  Accents for your scrapbook albums or cards...magnets...or embellishments for altered items!  One package will go a long long way - unless you are making a larger item!!!  Delight product will dry quickly - and can be put in the microwave to create a more 3D look.  Creative Paperclay will dry hard and non-breakable, ready for acrylic paint!!!  So, depending on what you are looking to do - either product will help you get started in creating really fun one of a kind items!  I have a video coming up - tips on using molds to create embellishments and other fun things - I hope you will join me in 2 weeks!  

Thanks for stopping by,
Lynda Jeffs 
Creative Paperclay Design Team     

Friday, November 6, 2015

November First Friday Fan Day


Need some inspiration for your next Creative Paperclay® project? Check out what folks are making with Creative Paperclay™.


Full blooming rose
High heel doll shoes
Sculpted figure
Snow lady
Troll figure
Sculpt a mini doll
Wall planters
Forming hands and fingers tutorial
Spice bowls

Fox and dog charms
Monster container

HELP US FIND YOU!!
  1. Use the hashtag #CreativePaperclay on all your social networks.
  2. When using Facebook, be sure the your posts and images using the #Creative Paperclay hashtag are set to public, otherwise we won't be able to find you.
  3. Share your projects on the Creative PaperClay® Facebook page.
I'm always trolling the web, looking for great Creative Paperclay® projects. If you find something, post it on our Facebook page.

GOT QUESTIONS???

Find the answers to your paperclay questions. See what other folks are creating. Stop by our Facebook group and say, "Hi!" Creative Paperclay Q&A
Carole

Sunday, November 1, 2015

Creating Holiday Scene Tips by Lynda

I worked on my first scene using Creative Paperclay this past month, and will be making a huge Christmas scene based on what I learned with my Halloween
scene!!!  If you decide you want to work on one yourself - I have a few tips to make the project go a bit smoother for you! 
  • Plan things out a bit, instead of jumping right in and creating!  
  • Sketch things out, or write down your ideas and put them in one place!
  • Check out ideas on Pinterest or blogs - for inspiration!
  • Allow yourself more than enough time to create what you need to!  
With the Halloween project - it was made with my husband!  I am not sure if I had more fun creating it with him, or watching him create things himself!  Include your family in a day of creating - we really bonded, and for that - I recommend this for sure!  
Lynda Jeffs
Creative Paperclay Design Team

Friday, October 2, 2015

October First Friday Fan Day


Need some inspiration for your next Creative Paperclay® project? Check out what folks are making with Creative Paperclay™.


Modern art sculpture
Birds on a perch
Bird in a teacup
Mending Creative Paperclay® projects
Halloween ornament

Embossing with Creative Paperclay®
Paperclay snowman 

HELP US FIND YOU!!
  1. Use the hashtag #CreativePaperclay on all your social networks.
  2. When using Facebook, be sure the your posts and images using the #Creative Paperclay hashtag are set to public, otherwise we won't be able to find you.
  3. Share your projects on the Creative PaperClay® Facebook page.
I'm always trolling the web, looking for great Creative Paperclay® projects. If you find something, post it on our Facebook page.

GOT QUESTIONS???

Find the answers to your paperclay questions. See what other folks are creating. Stop by our Facebook group and say, "Hi!" Creative Paperclay Q&A
Carole

Friday, July 24, 2015

Sticky Tip

Hello, I m Ann from The Design Team here at the Creative Paperclay® Blog  Design Team, I also have a blog at : http://annmakes.blogspot.com.  Today I have this fun tip to share.


Did you know that Creative Paperclay® sticks very well to chipboard and card board?  Well, I have tried it several times and it has worked well for me.  I have turned flat chipboard into dimensional embellishment by adding and sculpting Creative Paperclay®.


I found that by adding generous amounts of clay that go over the edge of a flat piece and spritzing with a bit of water  ensures success.  Once the project piece is dry then it can be enhanced in anyway. My preferred method is to use acrylic paints.  Such projects tend to be very light weight also making it easy to adhere them to a lot of surfaces: paper, card, and canvas especially.


So go through your own collection of forgotten chipboard pieces, or die cut some cardboard and transform them into clay embellishments.  Have fun!


Thank you for stopping by today.  Don't forget to pop over to my blog and see what other things I have to share.  I am here.

Supplies:
Creative Paperclay®
Chipboard pieces (from my stash)
Acrylic paints by DecoArt®

Sunday, May 17, 2015

Creative Paperclay Frames by Lynda


I love having my spaces look nice, especially my desk space at work!  If I have to be some place for 8 hours a day, I want things to have a good look and feel!  Today's project - is a great piece to add to my own work space, which will be the beginnings of a few pieces all created to match!  Another thing I love, is having pictures around me - that is why I scrapbook in the first place; with this project - I got the best of both worlds for sure!!!

**TIP**  To make your pieces completely flat, cut a piece a bit larger than what you actually need, and flatten the whole area again.  This way, it is all the same dimension the entire piece after you cut out the shape.  

Supplies to use:
Creative Paperclay product
Flower molds of your choice (Stampin' Up flower molds retiring here)  
Paint - (I used Twinkling H2O's African Jade and Rose Gold and white craft paint)
Alphabet letters (your choice - I used Cricut Ashlyn's Alphabet cartridge)
Die cut vine (your choice - I used Sizzix Vine)

Tools needed for this project:
Die cut shape of frame - (I used Sizzix frame die cut)
Xacto knife
Rolling pin
Sandit's product

Directions:  

Flatten out the clay to the thickness you want for your frame.  Using a template you create, make your frame - making sure to cut the inside out!  

Allow Creative Paperclay frame to dry fully, checking out the pieces as they dry.  Try to flip them over at least every 6-12 hours to dry on both sides.  Using the Sandit's, sand the piece to make it smooth!  


Paint the frame white (or any other color you want to work with) at least 2 coats.  Allow to dry between coats for better coverage!   

After you mold the flowers and let them dry, paint them in your choice of paints and colors like the next 2 photos! 
 

After flowers have dried, add the vine, and place the vine from the corner, and the flowers on top!  


Add the title at the bottom using your choice of titles!

I love how this turned out - and will make sure to share the others I am making using this same technique!  I just got a few more photos - so I can create a few more frames for my desk!  I hope you have enjoyed this piece - I love how it turned out, and can't wait to see my family every day!  
Thanks for stopping by, 
Lynda Jeffs
Creative Paperclay Design Team


Friday, March 13, 2015

Lucky Clover

Hi, it's Ann from annmakes and the Design Team here at Creative Paperclay® with my newest project:

It is intended to be inserted into a plant to give as a present.  It would also make a great prop to hold over someone's head while taking a picture!

To make this, here is what I used:

Creative Paperclay® modeling material
Craft acrylic paint in green (Plaid)
Micro glass beads in gold and green (Dollar store)
Chop stick (recycled from take out)
Brown ribbon (recycled from gift)
Green foamy clover (Dollar store)
Plastic green Leprechaun hat (recycled cake decoration)
Glue (Tombow)

1.  Mix a handful of Creative Paperclay® with a generous amount of green acrylic paint.  the moisture from the paint will allow you to have more time to work with the clay.  Now the white Creative Paperclay® is a mottled green.

2. You will need a mould in the shape of a hat.  I used a former cake topping decoration, I have also seen very similar ones at the Dollar Stores. Set aside a small ball worth of the new green mottled clay. Fill the mould with the green Creative Paperclay® and smooth it down.  Let it set for a while.

3.  Once the product is slightly harder gently tap the newly formed hat out of the mould.

4.  With the amount of green Creative Paperclay® set aside, use that to adhere the chop stick to the back of the hat.

5.  Cover the hat with the glass micro beads, pressing them down into the clay.  Let this dry overnight.

6.  Take one of the self sticking foam clovers, remove the backing exposing the sticky side.  Cover the clover with some gold glass micro beads.

7.  Once the hat is dry glue the ribbon and clover to the hat with a strong glue.

I had fun making this project and I hope you will enjoy working with this fabulous air drying Creative Paperclay®.  Thank you for stopping by.  Please stop at my blog and check out my other projects (http://annmakes.blogspot.com).