Friday, October 9, 2020

Ghost Stories


Ghost Stories Mini Journal by Art by Susie K


I don't know about you, but October is my favorite month of the year.  Although I live in South Florida I create my own change of seasons with my decor.  Halloween keeps me on my toes as I typically travel to Halloween Art shows along my coast and in Georgia.  2020 is a little different this year, so in the "Spirit" of keeping things small I created this little tutorial so you can create your own mini Ghost Story Book.  


SUPPLIES:
Mini Journal with hard cover
Creative Paperclay®  and/or Delight Air Dry Clay  
bowl of water
simple clay tools
string
foil
something for texture i.e. Lace, balled up foil, charms etc
acrylic paints
paint brushes
            ***and your imagination***

Enjoy the slide show tutorial which includes written instruction below each slide.  


Facebook and Instagram accounts:

o    @artbysusiek For Peculiar and Halloween

o     @WillowHollowWoods  for Earthy Characters and Magick

o     @FloorArtbySusieK  Art for your floors and other home décor

EMAIL:  ArtbySusieK@gmail.com

WEBSITE: https://artbysusiek.com

Sign up for my Creative Breakfast Club 🎨 for exclusive offers and updates on website
ETSY: www.artbysusiek.etsy.com
PINTEREST: https://www.pinterest.com/susiewhc/
CREATIVE PAPERCLAY® Design Team Member @CreativePaperClay


Thursday, October 8, 2020

SWEET TREATS - Vintage Bather Enjoying a Sweet Treat

SWEET TREATS 
Vintage Bather Enjoying a Sweet Treat 


Isn't this the universal picture of childhood happiness?

There are so many options for sculpting with Creative Paperclay.  Follow along and create your own characters to suit your mood or the seasons.

SUPPLIES:

Creative Paperclay
Newspaper, Aluminium Foil, Plastic, or Paper Bags
Masking Tape
Wire (aluminium armature wire 16 gauge)
Black Gesso 
Acrylic Paint
Acrylic Sealant (Mod-Podge - brush on or Krylon Crystal Clear - spray) 
Basic Sculpting Tools (Knitting Needles and Popsicle Sticks work well.
Paint Brushes
Wire Cutters
Sand Paper


I start by creating a basic human figure with crumpled paper, foil, and plastic bags.  This is a great way to save garbage from going into landfills!  Use wire for the arms legs and neck.


Once the body form is completed.  cover the entire thing with masking tape.  This will allow you to really see the shape and it is easier to work with than loose bits of paper, foil, and plastic.


Have fun playing with different poses and positions before adding any clay. 


Start your sculpture by adding a thin layer of Creative Paperclay over the entire piece.  Allow it to dry completely before adding subsequent layers of clay. I like working outside in the sun to speed up the process.  If you have any cracks or imperfections use sand paper to smooth things out.


Next sculpt in the features and any other details.  You can keep the sculpting very simple.  The painting will bring it to life!


I left the shoulders for last to accommodate the ice cream and painting in hard to reach places.


At this point I was still deciding on the final pose.  I also added a bit of fluffy hair and a sailors scarf for additional vintage flair.


This Ice Cream cone is as big as her head but I'm rolling with it.  I enjoy a bit of whimsy in my art.


Once the sculpture is completely dry apply 1 or 2 coats of black gesso. If needed sand between coats to get rid of any imperfections. Once the gesso dries paint with acrylic paint. I paint in many layers using a dry brush technique. don't try to rush this step. 


I have detailed painting videos on my YouTube channel if you need some guidance with that.


Lastly, fill in the shoulder areas, attach the ice cream or other accessories in place with wire,  allow to dry, them gesso and paint. 


Allow your paint to dry for 24 hours then spray or brush on your sealant of choice.


For a tutorial on the ice cream cone go here


I think she looks like baby Einstein.  Do you see it?  It cracks me up all the time!
                                         Instagram: https://www.instagram.com/redwoodcoastcreativearts/

                                                         https://lorraineteresina.wixsite.com/lala
          Pinterest: https://www.pinterest.com/lala_415/
                                              YouTube: https://www.youtube.com/user/babylalamermaid1

Monday, October 5, 2020

Make your own Jack o'lantern

 Hello, welcome to another blog post. Today I have a spooktacular project for you! 


Isn’t he adorable. We made him on Clay Talk last Thursday.  Here is the video. Unfortunately, I had a technical glitch with the sound, so you will have to turn your volume up high to hear. Regardless,  you can still follow along. 


Clay Talk is held once a month on the first Thursday. It takes place on Facebook Live on the Creative Paperclay Modeling Material page. The next episode will be on Thursday, November 5th, at 8pm EST/ 5Pm PST. We will be getting started on Christmas decorations! Be sure to join us!


You can share your creations with us on our Facebook page. We would love to see them! For more inspiration have a look around the blog. There are tutorials for many levels using Creative Paperclay®. You can also visit my YouTube channel, Paper Mache Patch. I have a host of videos using Creative Paperclay ® as well as mixed media.

You can find Creative Paperclay® online at Creative Paperclay Co and also at MichaelsHobby LobbyDickblick and Amazon. 

Thanks for stopping by!

Suzette


Friday, October 2, 2020

 ~Sweet Sentiments~

PaperClay Project by Sherri Welser


There are so many fun things you can create with PaperClay ! Today I will be creating tiles and using stamps, mica and embellishments to create these beautiful clay tiles! These tiles can be put on a wooden surface such as a plaque  as seen here.

Supplies

1 package of PaperClay

clay roller

cutter

rubber stamps

 2 stacks of 3 playing cards each ( for keeping the clay  level )

mica powder

metal embellishments

glass beads

e 6000


Set up your work station by laying down a mat and placing a stack of cards on either side of the ball of PaperClay. Using your roller ..roll over the clay and flatten out evenly. Take your rubber stamps and stamp into the clay. Using the cutter cut into squares and rectangles and with a small paint brush, brush on mica powered. At this point you can also push beads in and metal embellishments. and glue down . Let dry and these fun tiles can now be arranged and glued onto your surface. 


October 2020 First Friday Fan Day


Need some inspiration for your next Creative Paperclay® project? Check out what folks are making with Creative Paperclay™.


Toy Cookies and Biscuits
Ghost Tealights
Rainbow Wall Ornament
Air Dry Clay Beads
Miniature Teacups and Plates

Yarn Bowl
Kids' Project: Gilded Leaf-shaped Bowls
Custom Firefighter's Helmet

HELP US FIND YOU!!
  1. Use the hashtag #CreativePaperclay on all your social networks.
  2. When using Facebook, be sure the your posts and images using the #Creative Paperclay hashtag are set to public, otherwise we won't be able to find you.
  3. Share your projects on the Creative PaperClay® Facebook page.
I'm always trolling the web, looking for great Creative Paperclay® projects. If you find something, post it on our Facebook page.

GOT QUESTIONS???

Find the answers to your paperclay questions. See what other folks are creating. Stop by our Facebook group and say, "Hi!" Creative Paperclay Q&A
Carole

Friday, September 25, 2020

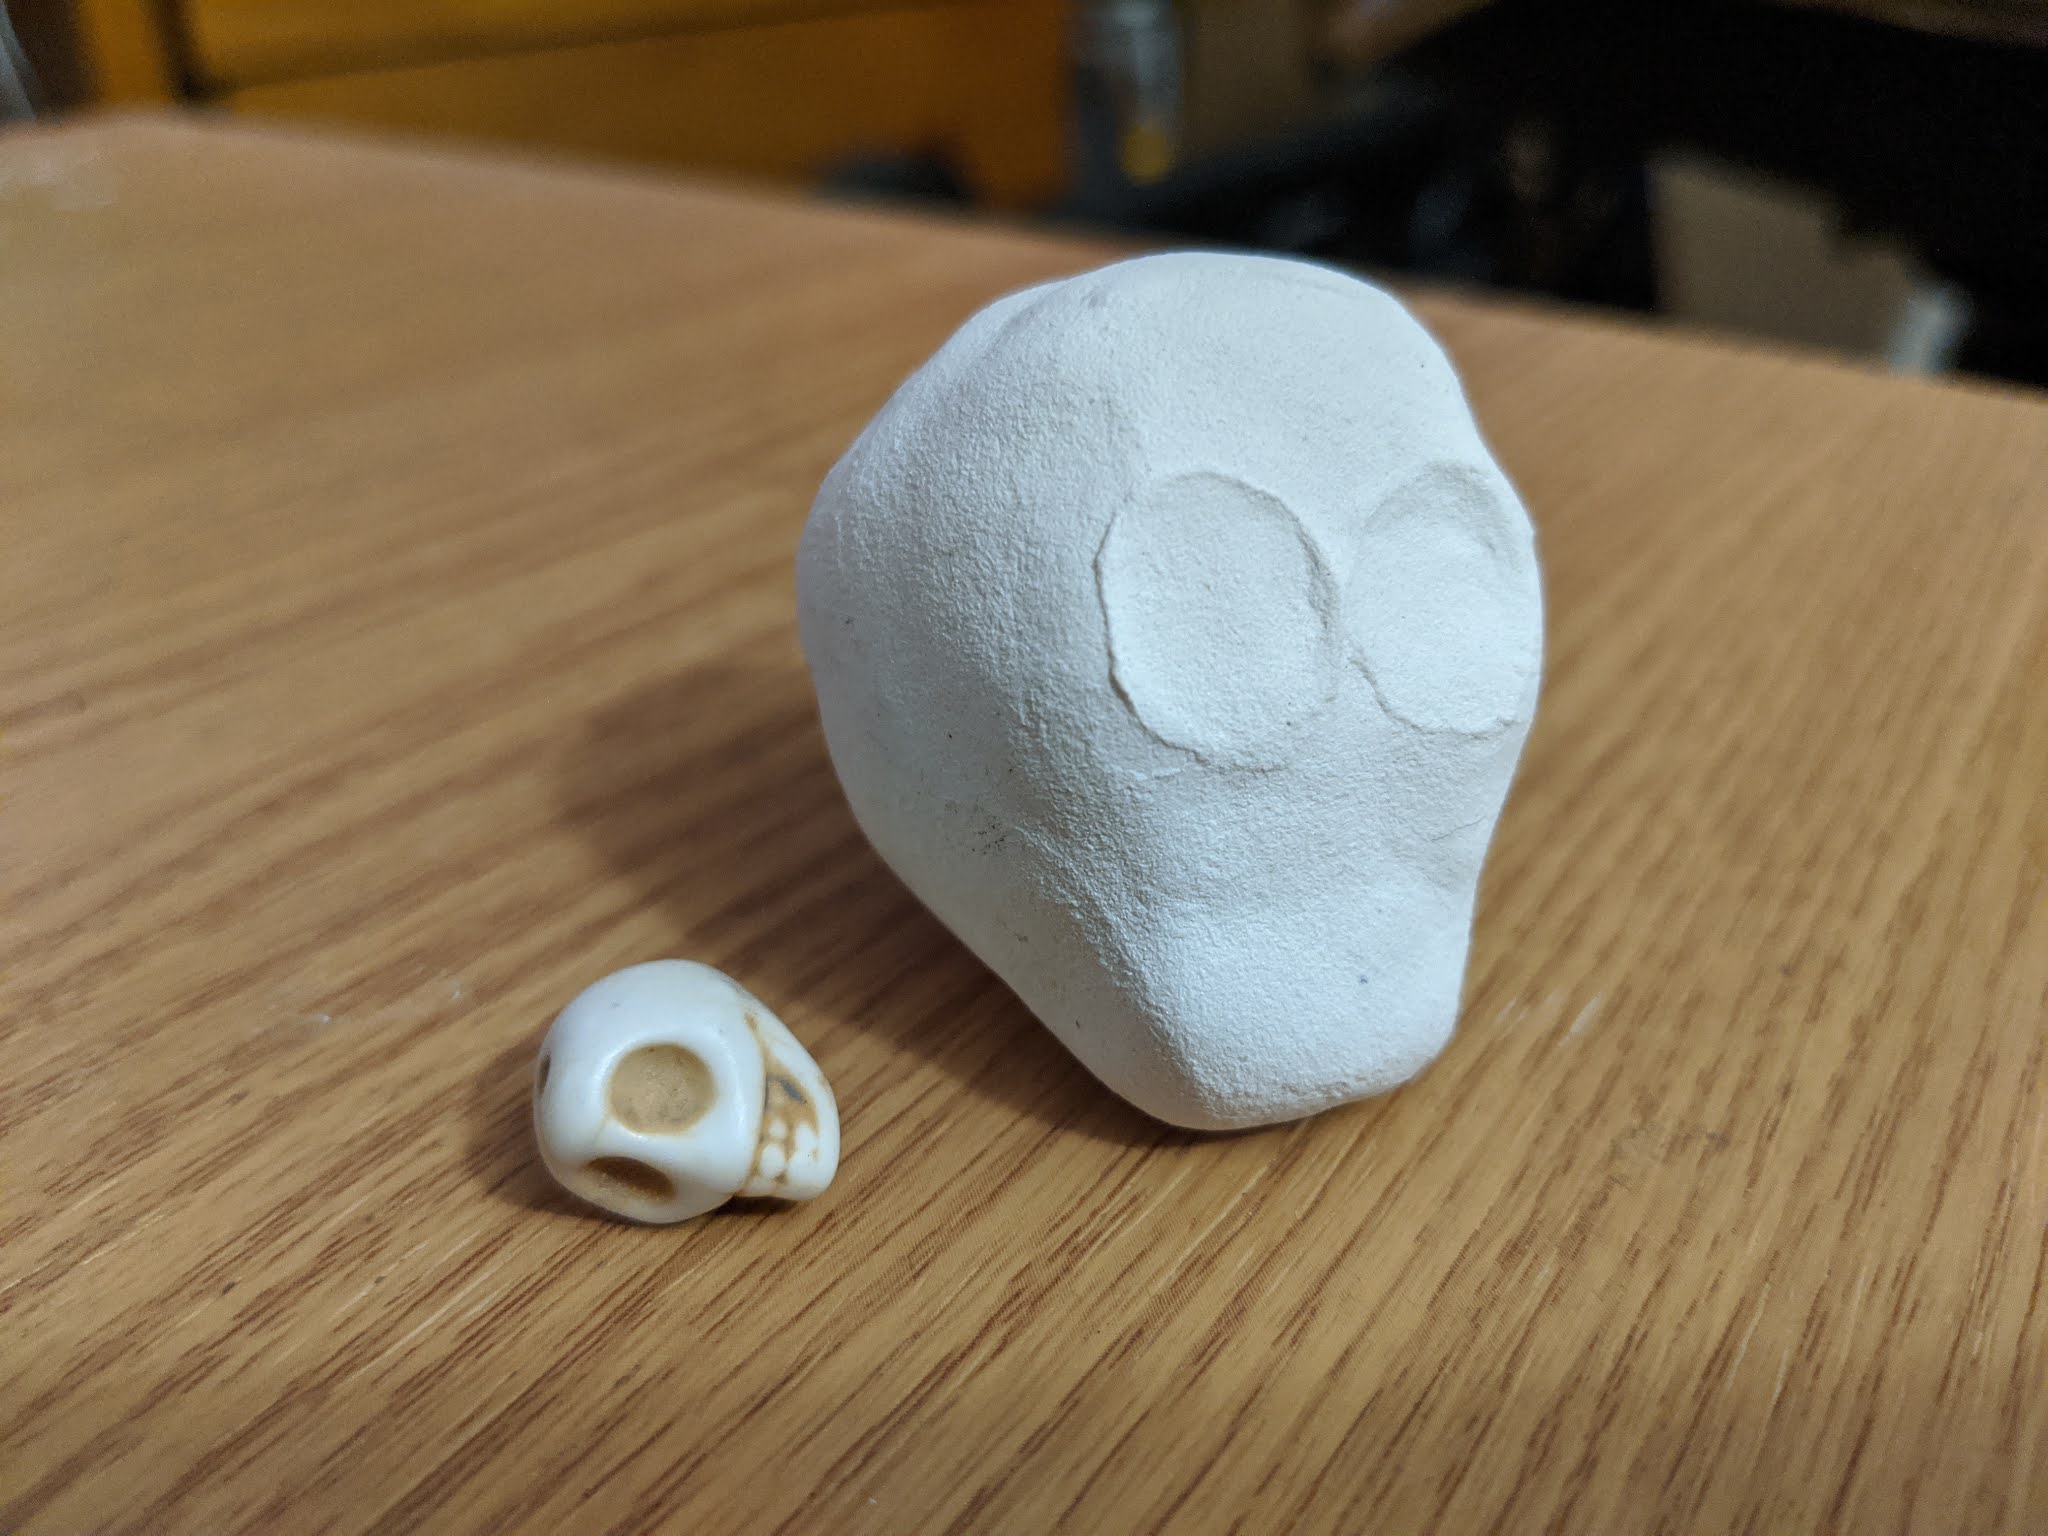
Create a Ghost like Skull for Halloween


 Hello everyone, today I am going to show you how I made 
this ghost like skull. With Halloween quickly approaching, 
I figured I'd make a small companion for my dolls. 
I will walk you through the steps that I took below.


Supplies: 

Creative Paperclay®
Masking tape
Scrap Paper,Cardboard or foil
Sand paper
Acrylic paint


I began by taking a piece of paper and rolling it up into a ball and taping
it in place with masking tape. When you are good the the shape,
begin to cover it with the clay.


When you have your ball nicely formed, set it aside and let it dry.


After letting the ball dry, begin filling out the jaw and the eye sockets.


I usually have a reference that I use when I am sculpting. 
I had this skull and the smaller one shown above that I
used while trying to create this piece. 


Here I am filling out the sides trying to find my way around 
the piece. It takes a few passes, so you need to have patience.
It took me a while to work this piece up to where I liked it.


I am building up the front of the skull. You need to 
emphasize the empty eye sockets when creating a skull.
I set this piece aside so that I could come back and 
work on it to build it up again when it dries.


Here is the next phase of me building up the front of the skull.


Here you can see that I am getting much closer in form 
of the skull. Keep building up until you are satisfied with 
the form of your skull as well.


This is the stage that I felt satisfied at. I did a very light 
sanding here so that I could keep it a bit rough.


I am painting the sockets and mouth black. This makes
these areas of the skull look like they are empty and hollow


 It kind of looks like the mask from Scream, but I am happy with it!


Thank you all once again for stopping by, and I hope that you enjoyed today's tutorial! You can find Creative Paperclay® at the following retailers Creative Paperclay® Online Store, Michael'sAmazon, Joann's.

See more of my work at Melandolly.com and be sure to catch updates on my Instagram page


Wednesday, September 9, 2020

Create an Eye-catching Face Shield with Creative PaperClay!


Teaching in the age of COVID has taken on an interesting list of "must-haves" to stay safe in the classroom.  None is more interesting (to me) than the face shield.  I teach in a private Catholic School, and we have returned to school 5 days a week, in-person.  The administration gifted every member of the staff with a God-awful ugly face shield to be worn whenever we cannot maintain a 6' distance between the students and us.  As an art teacher, that distance is basically impossible as I roam the aisles between the desks (6' apart), obviously getting in much closer than recommended.  With the reality that the shield would be a regular part of my outfit, I set to work accessorizing the accessory 😉

Materials:

Creative PaperClay

Plaid Folk Art paint in colors of choice plus a brush or sponge 

Aleene's "The Ultimate" tacky glue

assorted flexible molds

flexible face shield

tape (optional)

Procedure:


Decorating the face shield began by painting over the blue "FACE SHIELD" logo and directions (I think I am capable of figuring it out).  I mean, seriously, who needs directions on how to put the face shield on?!?!  For this, I went to my stash of paints and pulled 3 of my favorite Plaid Folk Art paints: #6313 Tanzanite Multi-surface Metallic, #5882 Purple Glitterfic, and #2797 black Extreme Glitter.  I painted the blue stripe with Tanzanite first, using multiple layers (drying between each layer) until the writing was hidden.  Next up, a thin layer of the Extreme Glitter.  I wanted bling, but I didn't want the black glitter to overpower the beautiful purple (obviously my favorite color).  The final paint applied was the purple Glitterific.  After all, everything is better with bling!!

NOTE:  Before applying paint, be sure to tape off a straight edge.  Trust me, I speak from experience that you cannot paint a perfectly straight line without it!

A few thoughts about painting the plastic:

1) A sponge works better than a brush for applying the metallic paint.  Using a sponge will add a texture to the color, which in turn will capture the glitter paint when applied.

2) Use a brush for the Extreme Glitter paint unless you want it to show more than the color behind.

3) And finally, use a sponge to apply the Glitterific paint.  A sponge will quickly disperse the glitter fibers into an even, blingy coat.  Both the Glitterific and Extreme Glitter paints will cover nicely with one coat.


I recommend removing the tape as soon as the painting is complete.  

Next up, decorating!!  I have a considerable stash of flexible molds in my studio and classroom.  I decided to go with faces and flowers for this mask (I am sure there will be more if in-person teaching continues since only one would be so dull!).  I chose Creative PaperClay for the dimensional components because of its weight...super lightweight!  Open a package of Creative PaperClay and pull off a small bit.  Wrap any remaining clay in plastic wrap or a Ziploc baggie (be sure to press all of the air out).
It doesn't take much to fill the designs in any of these molds.  Pull off a small bit of the clay, roll it into a ball, and then press it into the desired recessed area of the mold, flattening the back as you push.  To remove the component, simply flex the mold. 

Repeat until you have a variety of clay components to decorate the painted area.  


Allow the clay to dry overnight.  If you are an impatient person, they can also be placed in the oven (275 degrees) for about 10-15 minutes to quickly dry.  Arrange the clay components on the painted area, rearranging as they speak to you. 
Just a thought: Be sure to leave spaces between the pieces so the shield can still flex around your head.

 Once you are happy with the arrangement, apply a bit of Aleene's "The Ultimate" tacky glue (my favorite) to the back of each piece and press it into place.  Allow to dry and then go WOW your friends and co-workers with your unique face shield revamp!


Optional:  Creative PaperClay can be painted or powdered or inked easily.  If desired, components can be detailed before gluing to the face shield.  


Written and created by Linda Hess