Friday, November 26, 2021

Create a Bunny Skull Ornament


Hello everyone! My name is Cinnamon Willis and I am going to show you how I created this ornament! I was inspired by a logo of a clothing brand called Psycho Bunny and thought it would be cute to turn it into an ornament.

Supplies:
  • Creative Paperclay®
  • Masking tape
  • Filer such as paper, cardboard or foil
  • Acrylic paint
  • Sanding paper
  • jewelry wire
  • Pliers
  • Thick wire for an armature


Begin by creating your shape for the skull with the wire.


Wrap your piece with masking tape. Use paper or what ever you would like to use as filler to bulk it out so that you use less clay.


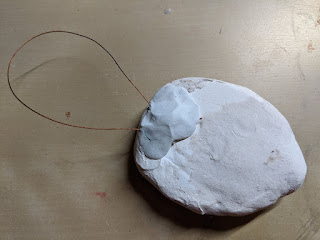

Take your jewelry wire or what ever you choose to use for your loop and create a knot at the bottom. When you make your knot, rap it up with masking tape. This is what I do to make sure that the wire doesn't slip out of the piece later once the ornament is complete which is what happens if you leave the ends loose.


Start adding clay to your piece. This is where you would add the loop that we created on the back of the piece and position it as shown above before the clay dries. After you have the basic shape of the head and loop in position, set it aside to dry.

It is much harder to add the loop afterwards which is what I ended up doing after creating this bunny! You will need to drill a hole into it and fill it back up with clay and maybe even glue.


I am using a skull here for reference to get an idea of how the bones should kind of look around the eye sockets.


Start working out the details of how you would like your skull to look. Pay attention to the sockets, where the nose would be, the ears and also the teeth!


When you are satisfied with how your skull has shaped up, sand it down to smooth out the lumps and bumps. I use a sandpaper with a grit of 800 to get things super smooth and around 400 grit to take out the larger rough parts.


It's time to beak out your acrylic paints! I use a black wash technique where I water down the black paint, paint it over the areas where I want the piece to look a little dirty and quickly wipe it off. It gives the piece a worn look, I do this a few times over the socket areas to make that part darker than the rest and I do it lightly over the rest of the piece. You can go over the areas that come out a bit too heavy with white paint in the same way to lighten them back up.


(This bunny has seen some things...)

Thank you all once again for stopping by, and I hope that you enjoyed today's tutorial! You can find Creative Paperclay® at the following retailers Creative Paperclay® Online Store, Michael's, Amazon, Joann's.


See more of my work at Melandolly.com, catch updates on 

my Instagram page and here is a link to my shop!


Monday, November 22, 2021


Tropical Leaf Ornaments

Do you love plants?  If you do then this is the tutorial for you!  I will be walking you through how to create your own Pink Princess Philodendron clay ornament.


All you need is:

Creative Paperclay

Acrylic paint - In greens, pinks, and white

Knife

Rolling pin


Take about ¼ of a package of Creative Paperclay and using your rolling pin (You can substitute a drinking glass if you don’t have a craft rolling pin) flatten out the clay.  


Once the clay is flattened as thick as you would like your ornament to be use a leaf template or create one by drawing a heart shaped leaf onto a piece of paper to cut out your leaf.  


After cutting the leaves out smooth out the edges using your fingers and a wet paper towel.  Put one hole in the top of the leaves using a pencil or needle.  


Let them dry out for a day or two!  


Now let’s paint!


I started with white, the lightest color, and painted a small section on my half moon leaf and then added in light and dark pink variegation.  On the green side I put some light pink splotches and then painted around them with the darker green.  I did blend in a little lighter green in spots to make it more realistic. 


Time to hang them.  Put a little string or yarn through the hole and hang them on your tree!


I would love to see all your different leaves!  Comment your photos below.


Cheers until next time!

Kelly Martin

Paper Hibiscus

www.Instagram.com/PaperHibiscus

Monday, November 1, 2021

A Paper Mache Christmas Bobble

 Hello, Christmas is around the corner so it's time to start making Christmas ornaments! Today I will show you how to make this metallic Christmas bobble. isn't it beautiful?


Here is a list of supplies that you will need:

  • Creative Paperclay®
  • a paper mache bobble (or a styrofoam ball covered with newspaper strips)
  • diluted white glue
  • a rolling pin
  • clay cutters
  • gesso
  • gold acrylic paint
  • Pebeo Bronze Wax Paste (gilders wax)
  • paper towel

Follow the steps below:

Step 1

Roll out the clay and cut circles with the clay cutter.


Step 2

Stick to paper mache ball using diluted white glue. Press down each circle firmly to ensure a proper seal. Allow it to dry thoroughly.


Step 3

Remove the hanger if there is one. Paint with a coat of gesso.


Step 4

Apply a coat of gold acrylic paint. Dry thoroughly before moving on.


Step 5

Apply a coat of Gilders Wax. When dry you can give it a light buff.


Step 6

Reattach the hanger.


Thank you for stopping by. You can share your creations with us on our Facebook page. We would love to see them! For more inspiration have a look around the blog. There are tutorials for many levels using Creative Paperclay®. You can also visit my blog Paper Mache Patch.

You can find Creative Paperclay® online at Creative Paperclay Co and also at Michaels, Hobby Lobby, Dickblick and Amazon. 


Thanks for stopping by!


Suzette


Blog/website: https://www.papermachepatch.com

Instagram: https://www.instagram.com/papermachepatch/

Pinterest: https://www.pinterest.com/suzettehussey/

YouTube: https://www.youtube.com/c/PaperMachePatch

Skillshare: https://skl.sh/2QyIn93


Monday, October 25, 2021


Easy Bat Ornaments


If you are anything like me you are always behind in decorating for holidays.  

So today I am going to be showing you how to create some cute, quick, & 

easy bat ornaments to hang around your house for Halloween fun!


All you need is:

Creative Paperclay

Acrylic paint - black and white

Knife

Rolling pin

Bat template or cookie cutter


Take about ¼ of a package of Creative Paperclay and using your rolling pin

 (You can substitute a drinking glass if you don’t have a craft rolling pin) 

\flatten out the clay.  


Once the clay is flattened as thick as you would like your ornament to be

 use either a bat shaped cookie cutter or bat template (I’m crafty so I drew a

 bat but you can also easily search for one online to use.  Mix up a couple 

different ones for variety too!) to cut out your bats.  Go for one or make a 

whole family of bats!


After cutting the bats out smooth out the edges using your fingers and 

a wet paper towel.  Put one or two holes in your bats using a pencil or needle.  

One hole if you want them to hang down and two for a more realistic flying bat.


Let them dry out for a day or two!  

To really give the bats character dry them over your rolling pin for a flying bat.


Now let’s paint!

Go for plain black or get creative and add a little shading.


Time to hang them.  Put a little string or yarn through the holes and hang 

them up next to a window or make a bat corner.  


Thanks for joining and Have fun and share what you create with us below!  

We would love to see where you hang your bats!

Find your Joy!


Kelly


Instagram: https://www.Instagram.com/PaperHibiscus


Thursday, October 21, 2021

How to Make a Standing Bird


Hello and happy Friday everyone! This is Cinnamon here with you all today and I am going to show you how I created this bird. I had planned on making a raven at first but I ended up with something that looks more like a stork of some sort. Always work from reference pictures if you are dead set on what your project is going to be.

Supplies:

Creative Paperclay

Masking tape

Wire for armature

Acrylic paint

Exacto Knife

Needle nose pliers

Probond Elmer's Glue

Aleene's Tacky Glue

Feathers

Sealer


Take your wire and shape it into the shape of the bird that you would like it to be. Cover it with masking tape to create a base for you to add your clay.


Start adding the clay when you are done covering the wire with tape. Build it up in layers. Allow the first tacky layer to dry and come back to further bulk it out.


Keep building up the layers of the bird and allow it to dry in between stages.


When the layers are dry, smooth them down with sanding paper.


Take your wire and start shaping the feet with pliers. Make sure they are large enough to support the weight of the body


Here I am using a dental tool to make a hole in the dried clay to stick the legs into the bird. You can use whatever tool that you have available to make the holes.


Stick the Elmer's Probond glue into the holes so that you can set the legs in place


Set the legs in place and allow to dry


Start painting your piece with acrylic paint and set aside to dry.


Now prepare to set your feathers onto your piece.


Use your tacky glue here to glue the feathers onto the bird.


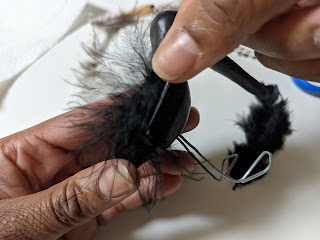
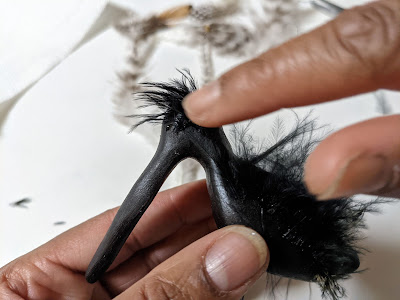
Here I glued some feathers onto the head, use as many feathers as you'd like


I glued a bigger feather in the back of the bird to make a tail.


And all done!


Thank you all once again for stopping by, and I hope that you enjoyed today's tutorial! You can find Creative Paperclay® at the following retailers Creative Paperclay® Online Store, Michael's, Amazon, Joann's.


See more of my work at Melandolly.com, catch updates on 

my Instagram page and here is a link to my shop!