Showing posts with label tutorial. Show all posts

Thursday, October 21, 2021

How to Make a Standing Bird


Hello and happy Friday everyone! This is Cinnamon here with you all today and I am going to show you how I created this bird. I had planned on making a raven at first but I ended up with something that looks more like a stork of some sort. Always work from reference pictures if you are dead set on what your project is going to be.

Supplies:

Creative Paperclay

Masking tape

Wire for armature

Acrylic paint

Exacto Knife

Needle nose pliers

Probond Elmer's Glue

Aleene's Tacky Glue

Feathers

Sealer


Take your wire and shape it into the shape of the bird that you would like it to be. Cover it with masking tape to create a base for you to add your clay.


Start adding the clay when you are done covering the wire with tape. Build it up in layers. Allow the first tacky layer to dry and come back to further bulk it out.


Keep building up the layers of the bird and allow it to dry in between stages.


When the layers are dry, smooth them down with sanding paper.


Take your wire and start shaping the feet with pliers. Make sure they are large enough to support the weight of the body


Here I am using a dental tool to make a hole in the dried clay to stick the legs into the bird. You can use whatever tool that you have available to make the holes.


Stick the Elmer's Probond glue into the holes so that you can set the legs in place


Set the legs in place and allow to dry


Start painting your piece with acrylic paint and set aside to dry.


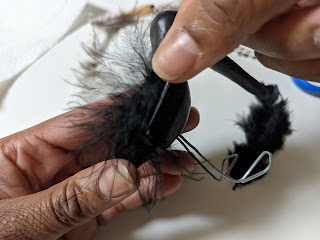
Now prepare to set your feathers onto your piece.


Use your tacky glue here to glue the feathers onto the bird.
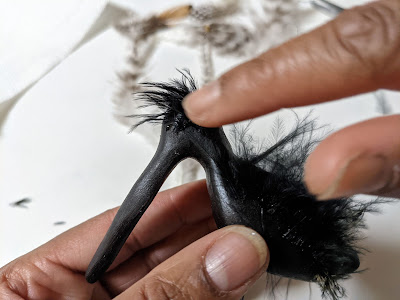


Here I glued some feathers onto the head, use as many feathers as you'd like


I glued a bigger feather in the back of the bird to make a tail.


And all done!


Thank you all once again for stopping by, and I hope that you enjoyed today's tutorial! You can find Creative Paperclay® at the following retailers Creative Paperclay® Online Store, Michael's, Amazon, Joann's.


See more of my work at Melandolly.com, catch updates on 

my Instagram page and here is a link to my shop!


Friday, October 26, 2018

How to Create An "Elkey" Sculpture with Creative Paperclay


Hello everyone! Cinnamon here, I'm going to show you all how I created what I call "Elkey" with Creative Paperclay® (Scroll down to the bottom to see the piece in it's entirety!). With Election Day creeping up on us November 6th, I was inspired to create this donkey/elephant hybrid as a reminder for us to mark our calendars and get ready to go out and be heard! Below are the steps that I took to create this creature!

Here is what you will need:
  • Steel wire, 18 gauge and 22 gauge 
  • Pliers 
  • Creative Paperclay® 
  • Newspaper 
  • Masking tape 
  • Sand paper 
  • Wool 
  • Acrylic paint 
  • Sealer, Varnish 
  • E600 Craft Glue 
  • Reference photos for elephants, donkeys and horses 


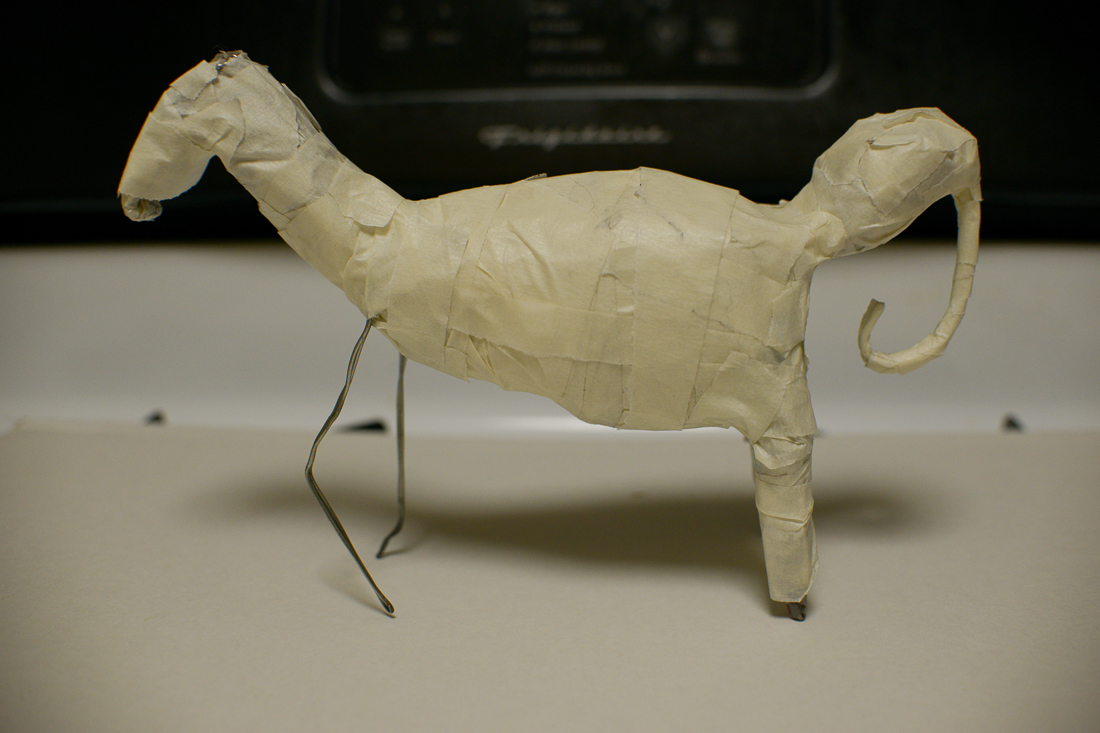
I first started this project out by manipulating the 18 gauge wire and turning it into a rough frame for the piece. I needed the wire to be sturdy enough to be able to support all the added weight of the elephant.


I began to bulk out the body with newspaper and masking tape, in addition to building up a neck for the donkey half of the creature.


After studying my reference photos, I created the head for the elephant half. I made sure to keep it lower to the shoulders of the piece for accuracy.


I didn't want to fuss too much with the positioning of the ears and tusk at this stage so I decided to work on them separately with wire connecting them in the middle and attach them later. This way it would be much easier for me to figure out where they looked best after the piece has all of it's meat on it's bones.


Once I was done with working out the shape for the ears, I put them aside and started adding clay on the body of the creature. I bulked up the legs for the elephant and tried to go light on the legs for the donkey.


I had to study both the photos for a donkey and a horse to make sure that I wasn't sculpting a horse. They are very similar but there are small characteristics that stand out such as the short stubby neck, shorter legs and large ears that donkeys have in comparison to horses.


At this stage where I'm satisfied with how the body looks for both animals, I begin to work out the  placement of the ears. For the elephant, I carved a little indent where the wire could rest for the ears and put some e6000 glue to secure them to the head and used masking tape to keep them in place. For the tusk, I had wire protruding from the top of them and just stuck them into some moist clay that I put on the sides of the elephant's trunk. I then covered the tusk with more clay and let it dry in place. For the donkey, I placed the ears in the same way that I did for the elephant. I concealed the wire by covering it with clay. After allowing the piece to fully dry, I began the process of smoothing out the clay with sanding paper.


After things were all smoothed out, I applied a few coats of paint to the piece until I was happy with the color. There is no reason why I painted the whole piece grey here, I was just playing with paint application.


With the donkey, I wanted to place a few tufts of hair on to the top of it's head. I used some wool here and Aleene's Tacky glue to attach the hair.


I sprayed this piece with a varnish at this stage and here is what it looks like. I wish I would have turned both neck so that they would be facing the camera :D


Thank you for stopping by, and I hope that you all enjoyed today's tutorial! You can find Creative Paperclay® at the following retailers Creative Paperclay® Online Store, Michael'sAmazon, Joann's

See more of my work at Melandolly.com and be sure to catch updates on my Instagram page


Tuesday, April 14, 2015

Tears Masquerade Mask Tutorial By Gloriann Irizary


Time to sculpt with Creative Paperclay® and with all these new products this sure will be a fun project full of ideas tips and tricks. Stay tune for the full tutorial .
 
Material List
 
Foam Mannequin Head
 Handrill
Water Bottle
Rolling Pin
Scissors
Aluminum Foil
Paper Tape
Xacto or hobby knife
Paint Brushes
Sponge Sands
Clear Acrylic Spray Sealer


Start by covering the entire foam head with aluminum foil and masking tape.
 
 
Roll a clay sheet  inches thick.
 
 
Cover the entire foam head with the Creative PaperClay® sheet
and smooth the edges with water and fingertips.
  
 
Cut the mask in half while the Creative PaperClay®  still wet
to create two  even mask halves .Set them aside to completely dry .
 
 
Once is dry it should be easy to remove from the mannequin head thanks to
 the aluminum foil and masking tape used.
 
 
Make sure to be gentle removing the mask from the foam head due to the clay sheet be delicate.
 
 
Draw your eyes lines with a pencil.
 
 
To cut the eye sockets a lot easier drill a hole to introduce the Xacto or Hobby Knife.
 
 
Very carefully use your xacto or hobby knife and cut the drawn line off.
 
 
Now to sand the sockets and be precise use the  Sandits® to make the sockets finish complete.
 
 
Use the 3M Medium Sand to smooth the mask off.
 
 
Now that the Mask is all Medium sanded. Clean and remove any remaining dust.
 
 
Use the 3M Fine grain sand to finish the mask up. Make sure you remove any excess dust off.
 
 
To paint the mask Sun Flower yellow just  get your favorite brush wet and use the water color technique to start painting the piece little by little.
Here 2 layers were used to create a beautiful gold finish look. 
 
 
Painting the eye showdown Boysenberry.
Use the Vavoom red and paint the underneath of the eye. 2 layers were used here.
 
 
Add a pair of Vavoom Red lips to the mask and set it down to dry. 
 
 
To create the tears make sure you water down the African Jade and Sapphire on ice and slowly tilt the mask to make the tear run freely down.
 
 
Let the mask dry and then it will be ready for you to use your clear acrylic spray sealer.
 
Let it dry and the mask will be ready to wear or for home décor. The possibilities are endless .


Thank you kindly for viewing this tutorial is you have any questions feel free to contact me at my email Gloriann Irizarry or visit Creative PaperClay® Q & A Facebook Page
 
Sincerely
Gloriann Irizarry