Showing posts with label bird. Show all posts

Monday, May 2, 2022

A Beautiful Bird for Spring

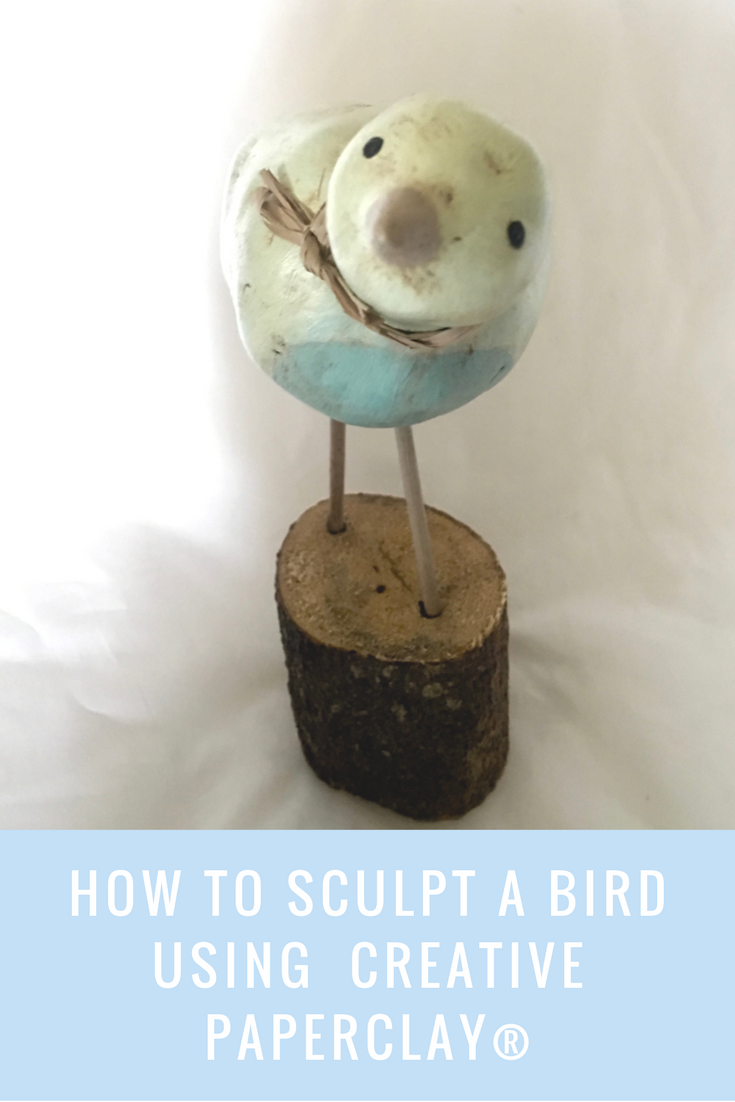
 Hello fellow artist! Today I am sharing a tutorial I did years ago; the most popular video on my YouTube channel. 😀


Isn't it just adorable? It is a simple project that just looks amazing!

The supplies used in this project are:

White Glue
Toothpick
Acrylic paints
A base of bird to be attached to. I used a piece of a branch.
2  1/4” dowels or chopsticks
Varnish
Raffia (optional)
Sculpting tools
Water
Paintbrushes


Follow along in the video below:


You can share your creations with us on our Facebook page. We would love to see them! For more inspiration have a look around the blog. There are tutorials for many levels using Creative Paperclay®. You can also visit my blog Paper Mache Patch.


You can find Creative Paperclay® online at Creative Paperclay Co and also at Michaels, Hobby Lobby, Dickblick and Amazon. 


Thanks for stopping by!


Suzette


Blog/website: https://www.papermachepatch.com

Instagram: https://www.instagram.com/papermachepatch/

Pinterest: https://www.pinterest.com/suzettehussey/

YouTube: https://www.youtube.com/c/PaperMachePatch

Skillshare: https://skl.sh/2QyIn93


Thursday, October 21, 2021

How to Make a Standing Bird


Hello and happy Friday everyone! This is Cinnamon here with you all today and I am going to show you how I created this bird. I had planned on making a raven at first but I ended up with something that looks more like a stork of some sort. Always work from reference pictures if you are dead set on what your project is going to be.

Supplies:

Creative Paperclay

Masking tape

Wire for armature

Acrylic paint

Exacto Knife

Needle nose pliers

Probond Elmer's Glue

Aleene's Tacky Glue

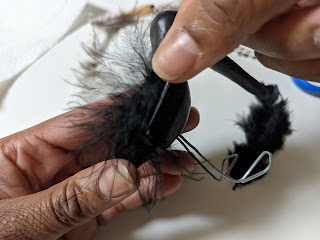
Feathers

Sealer


Take your wire and shape it into the shape of the bird that you would like it to be. Cover it with masking tape to create a base for you to add your clay.


Start adding the clay when you are done covering the wire with tape. Build it up in layers. Allow the first tacky layer to dry and come back to further bulk it out.


Keep building up the layers of the bird and allow it to dry in between stages.


When the layers are dry, smooth them down with sanding paper.


Take your wire and start shaping the feet with pliers. Make sure they are large enough to support the weight of the body


Here I am using a dental tool to make a hole in the dried clay to stick the legs into the bird. You can use whatever tool that you have available to make the holes.


Stick the Elmer's Probond glue into the holes so that you can set the legs in place


Set the legs in place and allow to dry


Start painting your piece with acrylic paint and set aside to dry.


Now prepare to set your feathers onto your piece.


Use your tacky glue here to glue the feathers onto the bird.


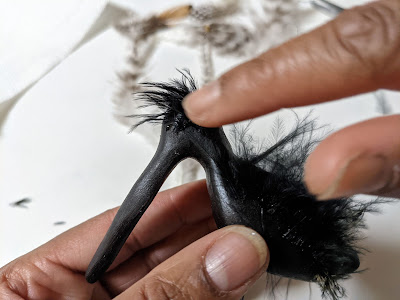
Here I glued some feathers onto the head, use as many feathers as you'd like


I glued a bigger feather in the back of the bird to make a tail.


And all done!


Thank you all once again for stopping by, and I hope that you enjoyed today's tutorial! You can find Creative Paperclay® at the following retailers Creative Paperclay® Online Store, Michael's, Amazon, Joann's.


See more of my work at Melandolly.com, catch updates on 

my Instagram page and here is a link to my shop!


Wednesday, November 16, 2016

A Little Birdie Told Me

I'm working on holiday ornaments. I love backyard birds! This was my first attempt, I love the way it turned out :o) I used the "Delight" clay so the ornament wouldn't weigh down the tree. I haven't attached the hanger yet, I'm using a eye hook at the base of the neck (hot glued in the hole) and ribbon to hang him.


Supplies:
Delight air dry clay by Creative Paper Clay 
Acrylic Paint: lt blue, copper and white
Medium wire
Black Sharpie
Eye hook, ribbon, clear glaze and hot glue

Instructions:
1. Form the bird body, wings and legs with Delight air dry clay.
2. Form bird feet from medium wire.
3. Let pieces dry overnight.
4. Paint with acrylic paints, let dry.
5. Use hot glue to attach wings and legs to the body.
6. Use a black sharpie for the dot for the eye.
7. Seal with clear glaze sealant.
8. Put an eye hook on the top at the base of the neck (secure with hot glue), add ribbon to hang.

Have a wonderful day!
Becky

Sunday, January 5, 2014

Chickadee Winter Wall Decor by Diane

Hello friends and Happy 2014' to you all!

I love the New Year. It's fresh, new and for some,  January is kind of a relaxing month.
 So, the other day, I was taking advantage of that relaxation all cuddled up on the couch, snug as a bug wrapped in a throw reading my favorite magazine, I happened to glance up and thought, " my that wreath just looks so bare ". Well, by golly I had to fix that, right?


With just a few supplies around the craft room and my Creative Paperclay® This Art piece was created and it fixed that bare wreath right up.


My inspiration; I love Chickadees...


I gathered some supplies.
1, 8" cardboard cake circle
Creative Paperclay
Acrylic paint- burnt Umber, Folkart Cobalt Blue,Folkart White, Folk Art Linen, Folk Art Silver Sterling, black.
A small branch or twig from your yard.
A small plastic snowflake ( for stamping ).
Bird stencil ( below ).
scissors
Xacto knife
paint brushes
Sculpting tools.
rolling pin.
Sealer.
Saran wrap.
Small bowl water.
Paper towel.

Please note that by clicking on any of these images, will enlarge the pic and give you a larger reference.


1. Very Lightly moisten the cake board with water. I dampen a paper towel and wipe the board.

2. Put a ball of clay onto the board and press out just a little, then place a piece of saran wrap over the clay and roll out to the edge of the cake circle.

3. With a damp finger pull your clay over the edge and just over to the back side of the board. If the clay is not sticking, a dab of white glue on the board will do the trick.

4.  On the clay covered cake board use your ball sculpting tool or the end of a pencil and press in a few random dots.


5. Cut out your bird stencil.

6. Position your branch on the circle. I placed the bird stencil on the circle to to help in the branch placement. When you know where you want to place your branch, add a few drops of white glue to the backside  smearing it down the length of the branch. Now you can push the branch into the clay. With a toothpick create a few twigs coming from the branch and with the end of a  pen push in to create berries.

7. I then took my plastic snowflake and pressed it in creating a stamped effect.


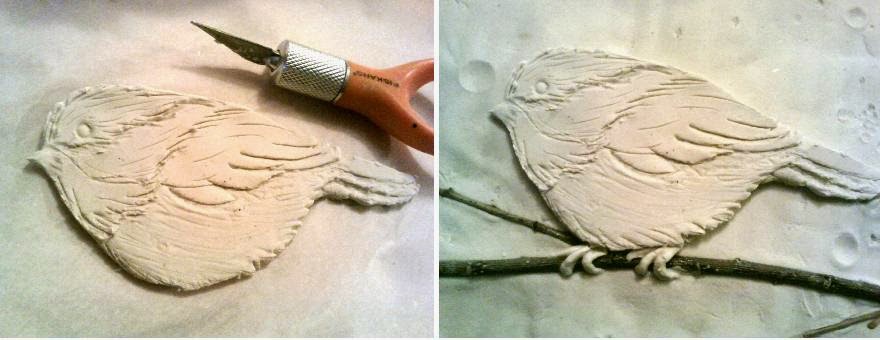
8. Now I set my bird stencil aside. i rolled out a ball of clay 1/2" thick. I then laid the bird stencil on the clay and cut out the bird using a xacto knife.


9. Still using the xacto knife I created the lines of the chickadee's feathers as seen in the above pic. The xacto knife worked beautifully for this. By laying the knife at a flat angle you can make a quick undercut to the wings for depth.

10. Now move your bird  and place him on the branch remembering to moisten the clay with water, where your bird will be placed. Press gently. Create little feet by making 3 little snakes and form around the branch.  Now this  piece is ready to dry.

I let this piece air dry. As it dries it will curl up slightly. After the piece has dried slightly where a crust has formed, you can turn it over for an hour or so to help the curling. I wanted my circle to have a slight curl, to resemble a plate so I did not turn it to often. You will get the knack for it the more you work with the clay.


Painting your piece.

Now that your chickadee wall decor is dry you can begin painting.  You might choose to paint your piece in a different color scheme to best fit your decor.
I chose grays and blues for the background as it reminds me of the winter skies and blends well with my decor. This is the steps I took to paint mine.

1. Base coat entire piece with burnt Umber. Except for the branch.

2. Dry brush using Cobalt blue, except for the bird. Except for the branch.


3. Dry brush Bimini blue  in a random pattern. Except for the branch.

4. Mix burnt umber and cobalt blue together. If you add more brown it will take on a brown grat tone. if you add more blu it will take on a blue gray tone. you want a brown gray tone with a little white added. Now dry brush the entire piece including the bird. Except for the branch.

5. Again mix burnt umber and cobalt blue, except this time you want more blue to give it a blue gray. add more white this time for a light blue gray. dry brush your piece except for the bird and the branch.

6. Now i make a wash using metallic silver sterling. this should be quite thin.  paint over entire piece except 
.for the branch


7. With your white paint lightly paint the snowflakes  and dots.

8. Paint the berries red.


9. The head of the chickadee in pic # 1,  I painted burnt umber, the wings burnt umber & white mixed.
the tummy is Linen.

10. In pic 2 ( the lighting was bad on this pic) I painted the head black then thinned my paint and shaded in the crevices of the wings.

11. I added the white as you can see in pic 3.

12. The eyes are a white dot, then a brown dot, then black.

13. The beak and feet are linen.


14. I made a wash of cobalt blue and randomly went in and around the snowflakes for shadowing and depth. i also did this under the branch and on the outer edges of the circle.

15. finally, I heavily loaded my brush with white and randomly in a dabbing motion applied to the edge.

 I sprayed the piece with a sealer and placed it in my wreath.

If you would like to hang the piece you could use a plate hanger or you could hot glue a simple picture hook to the back.


Feel free to save and print this image for your stencil. at 45%

Thanks so much for visiting today. I hope this tutorial has inspired you to play in the Creative Paperclay®.
~Diane
dianiemacdesigns.blogspot.comdianiemacdesigns.blogspot.com

Tuesday, November 12, 2013

Thanksgiving Turkey Creative Paperclay® Sculpture by Gloriann Irizarry


Hello my dear friends. I wanted to introduce my self.
My Name is Gloriann Irizarry and  I enjoy so much to Sculpt, craft and create all sort of items. I do have to say one of my personal favorites mediums is using paper clay and  sculpting with Creative Paperclay has made it easy. I like Creative paperclay,  because its gives me great results. My creations always have a great finish.
 I wanted to create a scultp piece and since this is the month of giving thanks and enjoy our family. I decided to create a cute center piece for eveyone to enjoy at the table or even has a gift to a love one.
Now my kids and I decided there would not be nothing better than a little turkey. So here I will show you step by step how to have fun and be able to complete this cute little project. I hope you enjoy it.


Materials

 
One pack of Creative Paperclay
Clay Roller
One Styrofoam ball

One Styrofoam circle base

Tim Holtz Adirondack Inks (Ginger, Red and orange colors)

Old fashion clothes pin

Popsicle sticks

Saran plastic wrap

One pair of latex or plastic disposable gloves
Pencil

Little cardboard

Scissors

Acrylics Paints ( Walnut, Orange, Red, Black, Light blue and white)

Brushes

Disposable plate

White Glue

Glitter ( Green, Gold and Bronze) 

Water and paper towels


Turkey project instructions:


Stick 2 popsicle sticks to the Styrofoam ball. These will later be the turkey legs.


 Place the ball on top of the base. Make sure the ball is not too big since this will later be our turkey’s body.


I use a old fashion clothes pin for the neck and head. Make sure the neck length is the way you want your final piece to look like.


I place Saran plastic sheet on top of my working surface then I open the Creative paperclay package cut the bar in half and place it flat sheet. Then grab the Tim Holtz Alcohol ink in Ginger tone and place drops on top of the flatten paperclay and mix thoroughly. Check the tone you are looking for the feathers if not yet to the tone your looking repeat the steps until your favorite tone is achieved.


Once the color is all mix and ready to be used roll the clay to ¼  deep sheet.


Then cover the Styrofoam ball completely and run the edged completely smooth.


Now place the old fashion clothes pin to the ball to place the neck to the desired length.


Place a ball to make the head shape and cover the neck area with regular clay.


Cut a rectangle shape to cover the neck area.


Fold the bottom part of the rectangle to create the volume for the turkeys’ neck area.


Roll it and cut the sheet.


Smooth the neck area to create a seamless transition from body to head.


To create the turkeys head I find the position were I want my eyes to be place. I use my thumb and first finger on each eye the pinch to create the eyes sockets.


To create the chubby cheeks roll a little ball and cut it in half. Place each half to each side of the head below the eyes sockets and smooth.


Now let color the clay in orange for later used in the making of the Turkey peek, feathers and legs using the same steps to color the clay for the body.


 I used two triangle orange shapes to create the turkeys peek. Roll a little circle ball. Cut it in half. Place the circle halves on each side of the peek to give the turkey some cute peek cheeks.


Place the peek to the turkeys head to finalize the head.


 Using the previous coloring steps grab a little piece in red to create the wattle.


To create the turkeys base I roll a ball of clay and using the roll toll flat the ball in to a ¼ sheet. Cover the Styrofoam base and smooth it completely.  


I cut a circle to cover the top. Then a roll a snake and flat it to a ¼ sheet to cover the side of the base and I smooth the edges.


To create the turkey’s legs I grab 2 Pop sticks and some of the orange tinted clay.
I stick the legs pop sticks to the turkeys body and cover them with the orange clay to shape the legs.


Then I place the turkey on to of the base to cover them completely and create the correct length of the legs.


To create the toes. I roll a little to the thickness of 1/4 inches and cut it in half. I repeat the steps for each leg.
Attach them to the leg and smooth in with water and a brush.


 Now I wanted to give some texture to the turkey sculpt. I grab a popsicle stick and little by little press it against the clay in different places to create the shape of the body feathers like shown in the photo above.


I create the wings I draw a little template of how you want your final wing to look like and cut it off. I later place it directly on the ¼ clay sheet lightly trace it. Flip the template and trace is again. Now cut the wings shapes out of the clay of sheet.


 Place the wings on the turkey’s body and smooth them in shape.


Now I grab the remaining Ginger and orange color clay and flatten them into a ¼ sheet.


I cut the big tail feathers like the one on the photo above.


I grab a Popsicle stick and break it in half. After I moist the feathers shapes. I use the rough Popsicle stick has a tool to create the feather lines by stroking the rought popsicle stick to draw in the veins.


Follow these steps for placement of the feathers


I place the big ones first then add the smaller ones after all until I create a beautiful feather fan tail.


Cut 2 big orange feathers for later be placed on the back.
Lay the fan flat to dry overnight. They need to be completly dry before attaching them to the turkey. 


Once dry attach the feather fan tail to the bird. After is secured and dry I grab my acrylic Walnut color paint and water it down to create a wash.


Little by little get the watered paint apply to the piece making sure all the details are wet soon after dap the piece dry with the paper towel removing all the excess paint out before it dry. This will enhance the sculpture details right out.


Do this water washed down acrylic paint technique all over the piece. It will sure make a total difference, once this technique is complete. You will notice all the feather veins and details done during the sculpting process.


Now to finalize the base I brush on the base a coat of white glue and sprinkle my glitter colors all over it. Yes a little glitter here and a little there in a random pattern. Feel free to add has much has you want.


Now I paint the eyes using a base of black to create the eyes.


After is dry I use now the light blue. I stroke the brush in the correct direction to create the iris effect.


After it dry I add the outline in black and round the center has well.


I use a very small brush use the white acrylic dab the brush once to add one big drop on the top of the eye and a smaller drop to the bottom of the eye. This will bring light to the eyes and gives personality to your character.  My Daughters found this little bowin my crafty box and could not resist to dress the little turkey up.
Well, I Guess this little guys is already dressed for the banquet.


 I hope you guys had fun creating this adorable little turkey. I wanted to take time and wish to all my family and Crafty friends a very bless holidays.
 Now stay tune for more projects to come and feel free to ask any questions at Gloriann@byglori.com

God bless you and happy crafting.

Sincerely
Gloriann Irizarry
www.byglori.com