Hello creative friends,
Diane here, back this month for a quick Spring & Summer tip with creative Paperclay®
If you are like our family, we're always on the go during the warmer months. Fishing & camping trips is a big deal to us and we go as often as we can.
I love to create and so do my grandkids. And just because were up in the mountains, doesn't stop us from creating.
I like to keep a "On The Go- Art Tote" handy.
I'm also one of those pack light type of gals, so my kit is very light and basic, but satisfies the creative desire quite well.
Here are some of my suggestions for a handy Art Tote
- I first find a nifty bag to put my supplies in. A favorite is those plastic zippered bags that you get when you purchase sheets or curtains sets. But anything will do.
- I gather tools such as, toothpicks, paintbrush coffee stir stick or Popsicle
sticks.
- A small roll of masking tape and a couple folded up sheets of tissue paper or newspaper, ( this is for armatures if needed ).
- I always throw in at least 3 Ziploc quart size baggies. this is great to store your un-used clay and also for gathering natures treasures to sculpt on such as, pine-cones, leaves, sticks or rocks.
- A small package of hand wipes.
- A small bottled water and a small plastic container for holding water.
- And of course, your Creative Paperclay®
Simply place your items in the bag, zip her up and keep close to the camping gear.
You will always be ready to create wherever the road takes you this summer!
I would like to say thank you for all you creatives support this past 6 months. This is my last post here at the CPC blog, as I will move forward to fulfill other obligations.
It has been such an honor and pleasure to be here each month and participate with you and the amazing design team.
Wishing you all the best on your creative journey :)
Hugs,
~Diane
Showing posts with label Dianie Mac Designs. Show all posts
Sunday, April 20, 2014
Sunday, April 6, 2014
Heart In Hand For Mom by Diane
Hello creative friends!
It's great to be back this month to share a fun and easy project with you.
This would be great for a Mothers day gift and can be tailored to your Mother's specific style and colors.
Heart In Hand Picture...
Getting started, you will need to gather a few supplies;
Creative Paperclay®. to purchase click here or go to any Hobby Lobby or Michaels store.
Basic sculpting tools.
paintbrush.
Hot glue or E6000.
Saran wrap.
Sharp knife or toothpick.
Scissors.
Your desired paint colors.
Your desired heavy cardstock.
A piece of paper for a template.
An old doily (optional)
styrofoam.
Frame
and Composimold ( if you want to make several molds of hands). to purchase Composimold go here.
Baby powder if using a mold.
This step is optional:
Because I wanted to use this frame for many projects, I decided to create a mold using ComposiMold.
Using a sharp knife, I cut out a piece of Styrofoam and placed it snuggly in the center of my frame.
I created my mold according to the directions on the ComposiMold product. However, in using the ComposiMold several times with other projects, I have found that using your mold release generously gives excellent results. For one of my tutorials using ComposiMold, where I go more in depth visit here.
After I created my mold, I made a cast using Creative Paperclay®. ( keep in mind, you will want to dust your mold with baby powder before you push your clay into the mold ).
Allow the clay to set about 10-15 minutes before removing from the mold.
Then, off to the oven at 200 degrees, turning over if needed to prevent curling or bending.
Bake until dry.
While the frame is in the oven,
Make a hand template and cut it out. I drew this hand, but it would also be so cute to use the outline of a childs hand.
Roll out your clay on a piece of saran wrap to about 1/4-1/2" thick. place your template onto the clay and cut out with a sharp knife or toothpick.
With a wet paintbrush smooth and round out your edges.
With a toothpick create the fingernail on the thumb, and the cuff. then set aside.
Roll out more clay and cut out a heart using your toothpick or you can use a cookie cutter if desired. It can be as small or large as you like, you can judge by looking at the hand you just made.
Using a toothpick, I did a quick free hand design on the heart, then smoothed a bit with water.
Then, off to the oven for the hand and heart.. 200 degrees until done, turning if needed.
After the pieces were dry and cooled, I painted them using acrylic craft paint, then sealed each of them with a mod podge sealer.
Putting it all together, I created the back by making an oval backing using heavy card-stock, then cut and attached my desired colored card-stock to the heavy card-stock. I then cut the doily to fit and glued it onto the colored card-stock, then attached the hand and heart.
As you can see this quick and fun project can be done in so many fun and cute ways, this is just a basic design and tutorial that I've made, but your creativity and colors will make it your own.
Thanks for stopping by!
~Diane
Dianie Mac Designs
It's great to be back this month to share a fun and easy project with you.
This would be great for a Mothers day gift and can be tailored to your Mother's specific style and colors.
Heart In Hand Picture...
Getting started, you will need to gather a few supplies;
Creative Paperclay®. to purchase click here or go to any Hobby Lobby or Michaels store.
Basic sculpting tools.
paintbrush.
Hot glue or E6000.
Saran wrap.
Sharp knife or toothpick.
Scissors.
Your desired paint colors.
Your desired heavy cardstock.
A piece of paper for a template.
An old doily (optional)
styrofoam.
Frame
and Composimold ( if you want to make several molds of hands). to purchase Composimold go here.
Baby powder if using a mold.
This step is optional:
Because I wanted to use this frame for many projects, I decided to create a mold using ComposiMold.
Using a sharp knife, I cut out a piece of Styrofoam and placed it snuggly in the center of my frame.
I created my mold according to the directions on the ComposiMold product. However, in using the ComposiMold several times with other projects, I have found that using your mold release generously gives excellent results. For one of my tutorials using ComposiMold, where I go more in depth visit here.
After I created my mold, I made a cast using Creative Paperclay®. ( keep in mind, you will want to dust your mold with baby powder before you push your clay into the mold ).
Allow the clay to set about 10-15 minutes before removing from the mold.
Then, off to the oven at 200 degrees, turning over if needed to prevent curling or bending.
Bake until dry.
While the frame is in the oven,
Make a hand template and cut it out. I drew this hand, but it would also be so cute to use the outline of a childs hand.
Roll out your clay on a piece of saran wrap to about 1/4-1/2" thick. place your template onto the clay and cut out with a sharp knife or toothpick.
With a wet paintbrush smooth and round out your edges.
With a toothpick create the fingernail on the thumb, and the cuff. then set aside.
Roll out more clay and cut out a heart using your toothpick or you can use a cookie cutter if desired. It can be as small or large as you like, you can judge by looking at the hand you just made.
Using a toothpick, I did a quick free hand design on the heart, then smoothed a bit with water.
Then, off to the oven for the hand and heart.. 200 degrees until done, turning if needed.
After the pieces were dry and cooled, I painted them using acrylic craft paint, then sealed each of them with a mod podge sealer.
Putting it all together, I created the back by making an oval backing using heavy card-stock, then cut and attached my desired colored card-stock to the heavy card-stock. I then cut the doily to fit and glued it onto the colored card-stock, then attached the hand and heart.
As you can see this quick and fun project can be done in so many fun and cute ways, this is just a basic design and tutorial that I've made, but your creativity and colors will make it your own.
Thanks for stopping by!
~Diane
Dianie Mac Designs
Sunday, March 2, 2014
Peep Easter Basket, by Diane MacNaughtan
Hello creative friends,
Diane here with a fun Spring / Easter project! I was so excited to jump into Spring creating and this little Peep basket got me even more excited for the warmer weather, green grasses and the sweet smell of flowers.
Remembering my childhood years at Easter time always makes me smile. One year in particular, I received a little chick basket. I loved that basket and after the candy was devoured, I kept my little treasures in it.
So, I was inspired to create a few Peep baskets this year in hopes to bring a little bit of happy to other little ones and older ones..
This was very easy to create.. It may look like many steps, but I wanted many pics. This is a great project to do multiples at a time.
If you want a larger view, click on the pictures.
Here's the supply list
1. creative paperclay
2. 4" paper Mache egg ( Hobby Lobby, Michaels)
3.tin foil
4. crepe paper, ribbon
5. pipe cleaner
6. Paint; FolkArt-Raw Sienna,Straw, Pueblo. Apple barrel-Whit,Black,Pale Daffodil
7. Matte Varnish or Polyurethane spray sealer
8.measuring tape
9.colored pencil
10.paint brushes and water
11.sculpting tools, straight pin
12. sharp knife or xacto
13. needle and thread
14.artist chalk or pastels
15. Candy for your basket
16, glitter (optional)
Let's get started!!!!
1. The Armature
With tin foil, I made a neck 1/2" tall. Then a ball about 11/2" round.
Next, take your paper mache' egg and cut out a section to create your basket. This is how you do it..The section to cut out is 21/2" wide at the top, 2" in length, and 11/2" at the bottom. Mark and cut with sharp knife or Xacto.
With the paper mache piece you cut out, cut length wise right down the middle.
Now you will have 2 pieces. The slightly long curved side will be the top of your wing. you want to cut the bottom corner off, like shown in the middle pic. Now set the wings aside for a moment.
Next, at the wide end of your egg mark a dot and one dot for the opposite side. Pierce with the point of the xacto or sharp Knife.
Using hot glue, attach the neck to the wide part of the egg, then the tin foil ball to the top of the neck.
2. Adding Clay
Roll your clay out. Wet your egg and cover the paper mache egg. Press and move the clay adding more if needed, then smooth out.
Cut a 11/2" round cardboard disc and place it at the bottom of the basket. Turn your basket right side up and move disc around until you like the way the basket is sitting, then turn it back over,cover with clay and smooth. Using a little water as needed.
3. Facial Features
Cover the head and neck with clay and blend into the body.
Roll out 2 little balls for the cheeks add to the face and smooth in. Then repeat for the chin, using a smaller ball of clay. Smooth to make a nice contour.
Now that the little face is shaped we will put in the features starting with the eye sockets.
With a flat sculpting tool, push the flat tip down at the top of the cheek, then press in, and pull upward.
Then in the center of the socket you just made, use your ball tool, wet it then make a eye by pressing in making a circular motion.
The beak and eyebrows are next.. Take a piece of clay and form a triangle. Wet the end and position on the face, then blend the beak into the face.
With a straight pin, draw a couple of eyebrows into the clay, then move down to the beak. Add your lines to make a smile and bring a line right around the beak. Take your flat tool and just kinda work the beak open a bit. Use your paint brush and water to smooth the lines and open the beak up more and define it.
To create a little tuft of hair take a piece of clay and pinch it into a little triangle,blend in and shape with your wet brush.
Before we go any further we need to give the little peep some baking time. Place the little fellow in the oven at 175 degrees for about 1/2 hour. Just enough to dry the face a bit so you don't mess up your masterpiece while going to the next step.
4. Giving it wings
Roll out your clay and cover the wings. Add water to the chicks body where the wings will be placed. Attach, adding clay if needed. blend in to body ,smooth out.
Using the straight pin, add lines, follow up by smoothing the lines with a wet paintbrush.
Create the rim of the basket by rolling a long snake. Wet around the opening of basket with water and apply your clay. Wet the clay you just added and press gently to adhere. The top of the zigzag towards the basket opening, roll just the tip of the clay zigzag over and onto the inside of the basket to make sure it adheres well. You can define your basket rim with your wet brush.
Return the Peep Basket to the 175 degree oven for about an hour or until thoroughly dry.
5. Painting the Basket
Ready to paint! I wanted my peep baskets to have the vintage look, so I gave it a light sanding, then gave it two good coats of Raw Sienna, I also did the inside of the basket.
Then I applied Straw by FolkArt over the entire basket. I applied this using the dry brush technique, though I didn't dry my brush to much, leaving just a bit of paint on the brush . The idea is to leave some of the Raw Sienna showing through in the cracks and crevices to give an aged look.
Next, I applied Pale Daffodil by Apple Barrel over the basket using the same dry brush method.
A tiny bit of white for the eyesockets ,then black for the eyes.
Pueblo by FolkArt for the beak.
After the painting was complete, I gave the basket a couple of coats of a matte sealer.
6. Finishing Touches
Create a collar using crepe paper with a gathering stitch. Attach around the neck and fluff.
I added a bow and flower.
For the handle take your pipe cleaner from the outside going in, run one end of pipe cleaner inside the basket and roll into like a coiled snake, hot glue to the inside of basket. Repeat on the opposite side.
And Wallah! You just made a darlin' little basket for gift giving or for your Spring decor.
Thanks so much for stopping by The Creative Paperclay Blog to
read my tutorial. I sure hope you'll give it a try. As always, if you have any questions or if you loved the tutorial, I'd love to hear from you, just leave me a comment.
~Diane
dianiemacdesigns.blogspot.com
Diane here with a fun Spring / Easter project! I was so excited to jump into Spring creating and this little Peep basket got me even more excited for the warmer weather, green grasses and the sweet smell of flowers.
Remembering my childhood years at Easter time always makes me smile. One year in particular, I received a little chick basket. I loved that basket and after the candy was devoured, I kept my little treasures in it.
So, I was inspired to create a few Peep baskets this year in hopes to bring a little bit of happy to other little ones and older ones..
This was very easy to create.. It may look like many steps, but I wanted many pics. This is a great project to do multiples at a time.
If you want a larger view, click on the pictures.
Here's the supply list
1. creative paperclay
2. 4" paper Mache egg ( Hobby Lobby, Michaels)
3.tin foil
4. crepe paper, ribbon
5. pipe cleaner
6. Paint; FolkArt-Raw Sienna,Straw, Pueblo. Apple barrel-Whit,Black,Pale Daffodil
7. Matte Varnish or Polyurethane spray sealer
8.measuring tape
9.colored pencil
10.paint brushes and water
11.sculpting tools, straight pin
12. sharp knife or xacto
13. needle and thread
14.artist chalk or pastels
15. Candy for your basket
16, glitter (optional)
Let's get started!!!!
1. The Armature
With tin foil, I made a neck 1/2" tall. Then a ball about 11/2" round.
Next, take your paper mache' egg and cut out a section to create your basket. This is how you do it..The section to cut out is 21/2" wide at the top, 2" in length, and 11/2" at the bottom. Mark and cut with sharp knife or Xacto.
With the paper mache piece you cut out, cut length wise right down the middle.
Now you will have 2 pieces. The slightly long curved side will be the top of your wing. you want to cut the bottom corner off, like shown in the middle pic. Now set the wings aside for a moment.
Next, at the wide end of your egg mark a dot and one dot for the opposite side. Pierce with the point of the xacto or sharp Knife.
Using hot glue, attach the neck to the wide part of the egg, then the tin foil ball to the top of the neck.
2. Adding Clay
Roll your clay out. Wet your egg and cover the paper mache egg. Press and move the clay adding more if needed, then smooth out.
Cut a 11/2" round cardboard disc and place it at the bottom of the basket. Turn your basket right side up and move disc around until you like the way the basket is sitting, then turn it back over,cover with clay and smooth. Using a little water as needed.
3. Facial Features
Cover the head and neck with clay and blend into the body.
Roll out 2 little balls for the cheeks add to the face and smooth in. Then repeat for the chin, using a smaller ball of clay. Smooth to make a nice contour.
Now that the little face is shaped we will put in the features starting with the eye sockets.
With a flat sculpting tool, push the flat tip down at the top of the cheek, then press in, and pull upward.
Then in the center of the socket you just made, use your ball tool, wet it then make a eye by pressing in making a circular motion.
The beak and eyebrows are next.. Take a piece of clay and form a triangle. Wet the end and position on the face, then blend the beak into the face.
With a straight pin, draw a couple of eyebrows into the clay, then move down to the beak. Add your lines to make a smile and bring a line right around the beak. Take your flat tool and just kinda work the beak open a bit. Use your paint brush and water to smooth the lines and open the beak up more and define it.
To create a little tuft of hair take a piece of clay and pinch it into a little triangle,blend in and shape with your wet brush.
Before we go any further we need to give the little peep some baking time. Place the little fellow in the oven at 175 degrees for about 1/2 hour. Just enough to dry the face a bit so you don't mess up your masterpiece while going to the next step.
4. Giving it wings
Roll out your clay and cover the wings. Add water to the chicks body where the wings will be placed. Attach, adding clay if needed. blend in to body ,smooth out.
Using the straight pin, add lines, follow up by smoothing the lines with a wet paintbrush.
Create the rim of the basket by rolling a long snake. Wet around the opening of basket with water and apply your clay. Wet the clay you just added and press gently to adhere. The top of the zigzag towards the basket opening, roll just the tip of the clay zigzag over and onto the inside of the basket to make sure it adheres well. You can define your basket rim with your wet brush.
Return the Peep Basket to the 175 degree oven for about an hour or until thoroughly dry.
5. Painting the Basket
Ready to paint! I wanted my peep baskets to have the vintage look, so I gave it a light sanding, then gave it two good coats of Raw Sienna, I also did the inside of the basket.
Then I applied Straw by FolkArt over the entire basket. I applied this using the dry brush technique, though I didn't dry my brush to much, leaving just a bit of paint on the brush . The idea is to leave some of the Raw Sienna showing through in the cracks and crevices to give an aged look.
Next, I applied Pale Daffodil by Apple Barrel over the basket using the same dry brush method.
A tiny bit of white for the eyesockets ,then black for the eyes.
Pueblo by FolkArt for the beak.
After the painting was complete, I gave the basket a couple of coats of a matte sealer.
6. Finishing Touches
Create a collar using crepe paper with a gathering stitch. Attach around the neck and fluff.
I added a bow and flower.
For the handle take your pipe cleaner from the outside going in, run one end of pipe cleaner inside the basket and roll into like a coiled snake, hot glue to the inside of basket. Repeat on the opposite side.
And Wallah! You just made a darlin' little basket for gift giving or for your Spring decor.
Thanks so much for stopping by The Creative Paperclay Blog to
read my tutorial. I sure hope you'll give it a try. As always, if you have any questions or if you loved the tutorial, I'd love to hear from you, just leave me a comment.
~Diane
dianiemacdesigns.blogspot.com
Sunday, February 16, 2014
A Delight-Ful Tip, By Diane
Hello there,
hey, how was Valentine's day? Did you spoil your Valentine rotten! That's what we creatives do.. right? We express ourselves with love, kindness and a heart-felt handmade gift ...
I kinda have to brag here for a second about our Design Team, THEY ROCK! Don't they? I hope you all had a chance to visit each of them on the Creative Paperclay's® Blog Hop,Link Party and try out some of their projects.
My head was just spinning with inspiration after visiting each of those creative gals. If you haven't had a chance to visit you can go HERE to see the amazing creations/ tutorials from our Designs Team.
Today for my tip, I would like to talk about Delight Modeling Compound . As you may remember, I used this modeling material for the first time on these two tutorials. " My Eye Is on You Valentine" & " A Monster Ornament/Treat holder".
I loved working with Delight. It is a different clay in some aspects, like it's texture is light and fluffy- kinda like a marshmallow and when it dries, it reminds me of one of those long foam pool noodle toys, and it's so light. Perfect to use with push molds, scrapbooking amd mixed media art.
The one thing that sticks out that I'd like to share is- I found that whether you are using it in a push mold, sculpting it, or cutting it out, it is much easier and in the long run, quicker to smooth away your imperfections, seams and unwanted edges using your damp finger or a paintbrush. before you allow your piece to dry.
I found by doing this, I was able to eliminate the sanding process once my Delight piece was dried.
Gosh, it's okay with me if I can skip the sanding step...right?
I'd like to thank you for visiting the Creative Paperclay blog today and I hope this tip comes in handy while working with Delight Modeling compound.
If you get a chance, come on over to my place. and have a look around.
Take care and happy creating!
~Diane
hey, how was Valentine's day? Did you spoil your Valentine rotten! That's what we creatives do.. right? We express ourselves with love, kindness and a heart-felt handmade gift ...
I kinda have to brag here for a second about our Design Team, THEY ROCK! Don't they? I hope you all had a chance to visit each of them on the Creative Paperclay's® Blog Hop,Link Party and try out some of their projects.
My head was just spinning with inspiration after visiting each of those creative gals. If you haven't had a chance to visit you can go HERE to see the amazing creations/ tutorials from our Designs Team.
Today for my tip, I would like to talk about Delight Modeling Compound . As you may remember, I used this modeling material for the first time on these two tutorials. " My Eye Is on You Valentine" & " A Monster Ornament/Treat holder".
I loved working with Delight. It is a different clay in some aspects, like it's texture is light and fluffy- kinda like a marshmallow and when it dries, it reminds me of one of those long foam pool noodle toys, and it's so light. Perfect to use with push molds, scrapbooking amd mixed media art.
The one thing that sticks out that I'd like to share is- I found that whether you are using it in a push mold, sculpting it, or cutting it out, it is much easier and in the long run, quicker to smooth away your imperfections, seams and unwanted edges using your damp finger or a paintbrush. before you allow your piece to dry.
I found by doing this, I was able to eliminate the sanding process once my Delight piece was dried.
Gosh, it's okay with me if I can skip the sanding step...right?
I'd like to thank you for visiting the Creative Paperclay blog today and I hope this tip comes in handy while working with Delight Modeling compound.
If you get a chance, come on over to my place. and have a look around.
Take care and happy creating!
~Diane
Sunday, February 2, 2014
My Eye Is On You Valentine, By Diane
Hello Creative friends!
Diane here with a fun Valentine project . This is a project that is "KID FRIENDLY" ages 4 and up, with a little help and guidance from an adult.
And what could be more fun for a kid to make, then a ONE EYED MONSTER!
Let's get started, shall we?
SUPPLIES: Here in the pic are the main supplies. There are a few supplies I don't have pictured and I will list them as well.
1.Cookie Cutters (Sesame Street) I purchased mine on eBay but any monster like cookie cutter will do. You can even use just a plain circle cookie cutter, in the end it will still be a cute "One Eyed Monster".
2. Paper straws- available at Walmart or any craft store.
3. Delight modeling Material. I chose this clay over Creative Paperclay® because it's light, and since it will be in children s little hands, it's less likely to break if dropped. You can purchase Delight Modeling Material here.
4. Googly eyes- I purchased mine at the $ Store.
5. A small heart cookie cutter or stamp - I also purchased my heart stamps at the $ Store.
6. Craft Paint. Purple and Pink.- at any Walmart or craft store.
7. Black Sharpie.- at any Walmart or craft store.
SUPPLIES not pictured:
1. child scissors
2. glue dots
3. Card-stock scraps
4. Wax paper
5. Rolling pin
6. Hot glue gun for the adult.
7. Wet Rag for wiping your hands.
8. Foil wrapped Chocolate Hearts
Step 1- Lay a piece of wax paper down as your work surface.With adult help add some paint to the Delight. Let those little hands mix it up. Then shape into a ball and flatten slightly. kids love this step.
Step 2- Clean the tiny hands off with the wet rag .Lay a piece of wax paper over your colored ball of Delight and begin to roll it out. You will want it to be a minimum of 1/4" thick. Remove wax paper and cut out your Monster shapes.
Step 3- Using your heart stamp or cookie cutter, lightly make an indentation for cheeks, as shown in pic above.
Now you can let your little Monsters dry thoroughly. Turning them every so often will keep them from curling.
Step 4- This step may require help from an adult if a child is making them. Monsters are imperfect little creatures and squiggly wiggly mouths and cheeks are always super awesome, especially when a kid creates it.
Create the facial details by dry brushing or painting the outside edge of your Monsters face purple.Then with the same purple paint, create a smile going from one point of the heart to the other point of the heart as in above pic. Then, paint in your hearts with pink paint. Lastly, go back over your mouth you previously created with purple paint, but this time use your sharpie.This just defines the mouth.
Step 5- Hooray for the "EYEBALL"! Put a glue dot in the center and press an eyeball on that monster.
Step 6- An adult can hot glue the straws to the back of the Monster. Leave about 3/4" of your straw at the top of the Monsters head. This will create his hair . Now, make 3 cuts and slightly bend down. Your Monster now has hair.
Step 7- For the Bow-tie, I took 2 candy hearts, points together and traced around, leaving about an 1/8" edge, this gave me a bow-tie template. I traced as many as I needed onto card-stock and cut them out. This is where the kids scissors come in handy and kids love to cut things out.
Lastly, dry brush the edge of the cut out bow-ties using your purple paint.
Step 8- Take another piece of your scrap card-stock, preferably a different color and cut out strips 4 and 1/4" long and 3/4" wide. Then with your sharpie you can write your message. My "EYE" is on you Valentine. You can also print these on your computer if desired.
Step 9- Using your glue dots, add your wrapped candy hearts.
Step 10- An adult can hot glue the tag to the straw, then the candy bow-tie.
YOUR DONE! Now you have some sweet Valentines for all the Lil' Monsters that bring you joy .
Thanks so much for stopping by the Creative Paperclay® Blog today. I encourage you to visit often, as there is always a fun new project or tip from our Design team.
And in case you haven't heard, The Creative Paperclay® Blog is having a Blog Hop Link Party February 8th Mark your calendars!
There will be fun projects from the Designs Team and I believe there will be a drawing or two.
And as always, your welcome to visit me at my place.
Happy creating,
~Diane
Sunday, January 5, 2014
Chickadee Winter Wall Decor by Diane
Hello friends and Happy 2014' to you all!
I love the New Year. It's fresh, new and for some, January is kind of a relaxing month.
So, the other day, I was taking advantage of that relaxation all cuddled up on the couch, snug as a bug wrapped in a throw reading my favorite magazine, I happened to glance up and thought, " my that wreath just looks so bare ". Well, by golly I had to fix that, right?
With just a few supplies around the craft room and my Creative Paperclay® This Art piece was created and it fixed that bare wreath right up.
I gathered some supplies.
1, 8" cardboard cake circle
Creative Paperclay
Acrylic paint- burnt Umber, Folkart Cobalt Blue,Folkart White, Folk Art Linen, Folk Art Silver Sterling, black.
A small branch or twig from your yard.
A small plastic snowflake ( for stamping ).
Bird stencil ( below ).
scissors
Xacto knife
paint brushes
Sculpting tools.
rolling pin.
Sealer.
Saran wrap.
Small bowl water.
Paper towel.
Please note that by clicking on any of these images, will enlarge the pic and give you a larger reference.
1. Very Lightly moisten the cake board with water. I dampen a paper towel and wipe the board.
2. Put a ball of clay onto the board and press out just a little, then place a piece of saran wrap over the clay and roll out to the edge of the cake circle.
3. With a damp finger pull your clay over the edge and just over to the back side of the board. If the clay is not sticking, a dab of white glue on the board will do the trick.
4. On the clay covered cake board use your ball sculpting tool or the end of a pencil and press in a few random dots.
5. Cut out your bird stencil.
6. Position your branch on the circle. I placed the bird stencil on the circle to to help in the branch placement. When you know where you want to place your branch, add a few drops of white glue to the backside smearing it down the length of the branch. Now you can push the branch into the clay. With a toothpick create a few twigs coming from the branch and with the end of a pen push in to create berries.
7. I then took my plastic snowflake and pressed it in creating a stamped effect.
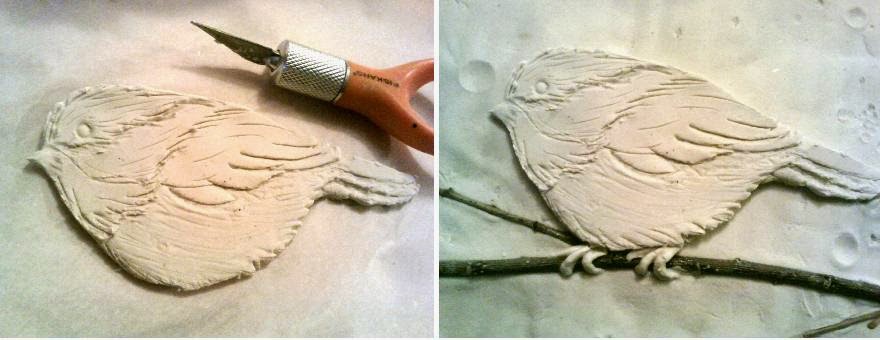
8. Now I set my bird stencil aside. i rolled out a ball of clay 1/2" thick. I then laid the bird stencil on the clay and cut out the bird using a xacto knife.
9. Still using the xacto knife I created the lines of the chickadee's feathers as seen in the above pic. The xacto knife worked beautifully for this. By laying the knife at a flat angle you can make a quick undercut to the wings for depth.
10. Now move your bird and place him on the branch remembering to moisten the clay with water, where your bird will be placed. Press gently. Create little feet by making 3 little snakes and form around the branch. Now this piece is ready to dry.
I let this piece air dry. As it dries it will curl up slightly. After the piece has dried slightly where a crust has formed, you can turn it over for an hour or so to help the curling. I wanted my circle to have a slight curl, to resemble a plate so I did not turn it to often. You will get the knack for it the more you work with the clay.
Painting your piece.
Now that your chickadee wall decor is dry you can begin painting. You might choose to paint your piece in a different color scheme to best fit your decor.
I chose grays and blues for the background as it reminds me of the winter skies and blends well with my decor. This is the steps I took to paint mine.
1. Base coat entire piece with burnt Umber. Except for the branch.
2. Dry brush using Cobalt blue, except for the bird. Except for the branch.
3. Dry brush Bimini blue in a random pattern. Except for the branch.
4. Mix burnt umber and cobalt blue together. If you add more brown it will take on a brown grat tone. if you add more blu it will take on a blue gray tone. you want a brown gray tone with a little white added. Now dry brush the entire piece including the bird. Except for the branch.
5. Again mix burnt umber and cobalt blue, except this time you want more blue to give it a blue gray. add more white this time for a light blue gray. dry brush your piece except for the bird and the branch.
6. Now i make a wash using metallic silver sterling. this should be quite thin. paint over entire piece except
.for the branch
7. With your white paint lightly paint the snowflakes and dots.
8. Paint the berries red.
9. The head of the chickadee in pic # 1, I painted burnt umber, the wings burnt umber & white mixed.
the tummy is Linen.
10. In pic 2 ( the lighting was bad on this pic) I painted the head black then thinned my paint and shaded in the crevices of the wings.
11. I added the white as you can see in pic 3.
12. The eyes are a white dot, then a brown dot, then black.
13. The beak and feet are linen.
14. I made a wash of cobalt blue and randomly went in and around the snowflakes for shadowing and depth. i also did this under the branch and on the outer edges of the circle.
15. finally, I heavily loaded my brush with white and randomly in a dabbing motion applied to the edge.
I sprayed the piece with a sealer and placed it in my wreath.
If you would like to hang the piece you could use a plate hanger or you could hot glue a simple picture hook to the back.
Feel free to save and print this image for your stencil. at 45%
Thanks so much for visiting today. I hope this tutorial has inspired you to play in the Creative Paperclay®.
~Diane
dianiemacdesigns.blogspot.comdianiemacdesigns.blogspot.com
I love the New Year. It's fresh, new and for some, January is kind of a relaxing month.
So, the other day, I was taking advantage of that relaxation all cuddled up on the couch, snug as a bug wrapped in a throw reading my favorite magazine, I happened to glance up and thought, " my that wreath just looks so bare ". Well, by golly I had to fix that, right?
With just a few supplies around the craft room and my Creative Paperclay® This Art piece was created and it fixed that bare wreath right up.
My inspiration; I love Chickadees...
I gathered some supplies.
1, 8" cardboard cake circle
Creative Paperclay
Acrylic paint- burnt Umber, Folkart Cobalt Blue,Folkart White, Folk Art Linen, Folk Art Silver Sterling, black.
A small branch or twig from your yard.
A small plastic snowflake ( for stamping ).
Bird stencil ( below ).
scissors
Xacto knife
paint brushes
Sculpting tools.
rolling pin.
Sealer.
Saran wrap.
Small bowl water.
Paper towel.
Please note that by clicking on any of these images, will enlarge the pic and give you a larger reference.
1. Very Lightly moisten the cake board with water. I dampen a paper towel and wipe the board.
2. Put a ball of clay onto the board and press out just a little, then place a piece of saran wrap over the clay and roll out to the edge of the cake circle.
3. With a damp finger pull your clay over the edge and just over to the back side of the board. If the clay is not sticking, a dab of white glue on the board will do the trick.
4. On the clay covered cake board use your ball sculpting tool or the end of a pencil and press in a few random dots.
5. Cut out your bird stencil.
6. Position your branch on the circle. I placed the bird stencil on the circle to to help in the branch placement. When you know where you want to place your branch, add a few drops of white glue to the backside smearing it down the length of the branch. Now you can push the branch into the clay. With a toothpick create a few twigs coming from the branch and with the end of a pen push in to create berries.
7. I then took my plastic snowflake and pressed it in creating a stamped effect.
8. Now I set my bird stencil aside. i rolled out a ball of clay 1/2" thick. I then laid the bird stencil on the clay and cut out the bird using a xacto knife.
9. Still using the xacto knife I created the lines of the chickadee's feathers as seen in the above pic. The xacto knife worked beautifully for this. By laying the knife at a flat angle you can make a quick undercut to the wings for depth.
10. Now move your bird and place him on the branch remembering to moisten the clay with water, where your bird will be placed. Press gently. Create little feet by making 3 little snakes and form around the branch. Now this piece is ready to dry.
I let this piece air dry. As it dries it will curl up slightly. After the piece has dried slightly where a crust has formed, you can turn it over for an hour or so to help the curling. I wanted my circle to have a slight curl, to resemble a plate so I did not turn it to often. You will get the knack for it the more you work with the clay.
Painting your piece.
Now that your chickadee wall decor is dry you can begin painting. You might choose to paint your piece in a different color scheme to best fit your decor.
I chose grays and blues for the background as it reminds me of the winter skies and blends well with my decor. This is the steps I took to paint mine.
1. Base coat entire piece with burnt Umber. Except for the branch.
2. Dry brush using Cobalt blue, except for the bird. Except for the branch.
3. Dry brush Bimini blue in a random pattern. Except for the branch.
4. Mix burnt umber and cobalt blue together. If you add more brown it will take on a brown grat tone. if you add more blu it will take on a blue gray tone. you want a brown gray tone with a little white added. Now dry brush the entire piece including the bird. Except for the branch.
5. Again mix burnt umber and cobalt blue, except this time you want more blue to give it a blue gray. add more white this time for a light blue gray. dry brush your piece except for the bird and the branch.
6. Now i make a wash using metallic silver sterling. this should be quite thin. paint over entire piece except
.for the branch
7. With your white paint lightly paint the snowflakes and dots.
8. Paint the berries red.
9. The head of the chickadee in pic # 1, I painted burnt umber, the wings burnt umber & white mixed.
the tummy is Linen.
10. In pic 2 ( the lighting was bad on this pic) I painted the head black then thinned my paint and shaded in the crevices of the wings.
11. I added the white as you can see in pic 3.
12. The eyes are a white dot, then a brown dot, then black.
13. The beak and feet are linen.
15. finally, I heavily loaded my brush with white and randomly in a dabbing motion applied to the edge.
I sprayed the piece with a sealer and placed it in my wreath.
If you would like to hang the piece you could use a plate hanger or you could hot glue a simple picture hook to the back.
Feel free to save and print this image for your stencil. at 45%
Thanks so much for visiting today. I hope this tutorial has inspired you to play in the Creative Paperclay®.
~Diane
dianiemacdesigns.blogspot.comdianiemacdesigns.blogspot.com
Subscribe to:
Posts (Atom)