Hi all
Yes its my last post on the blog... I have decided not to re-apply to be back on this design team. Its been an awesome year and I have worked with wonderful ladies! But one must move on.... I hope to start up my own nail art business soon so time will be needed there to build it up.
I also just love this product so no stopping me from using it. ;)
My tip is....
Keep reading the blog for great tutorials and tips. ;)
Very many talented people work very hard to put things on this blog.... please comment and encourage them.
Also....
Creative Paperclay® is great and light weight for making unique one-off embellishments for scrapbook pages....
The above layout was printed in Australian Scrapbook ideas magazine issue 15!
It has a Tuatara (New Zealand native lizard) on the page made with Creative Paperclay® molded by me by hand.
Hand painted with Stampin Up! reinkers and a brush with water. Made the perfect accent for this page.
Thank you all so much for receiving my creativity so well. I am honored.
If you want to continue to follow me online my blog is....
artycrafty.wordpress.com
May all your crafty days be fabulous!
Debbie Buckland
New Zealand
Showing posts with label New Zealand. Show all posts
Thursday, October 18, 2012
Thursday, July 5, 2012
Canvas Creative Paperclay art
Hi all
I have done a lot of experimenting for this piece this month. Thought I'd go special since I'm 40 at the end of the month... ;)
For this tutorial you will need:
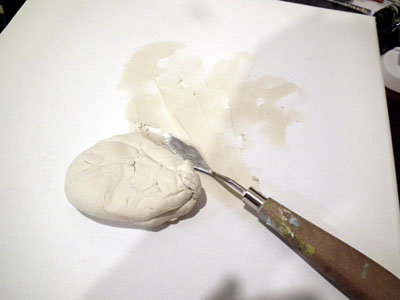
Step 1: apply paperclay directly to canvas with a painting or palette knife. Squishing it into the canvas.
Step 2: Next press a Fiskars texture plate into the clay on the canvas surface.

Step 4: With Amaizing Mold Putty I made a mold out of my sons eagle on his toy bow and arrow set.
All I had to do was mold an extra wing to put on the finished eagle. I painted it up with acrylic paints.
Step 5: then finished the Eagle off with bronze Terri Sproul Mixer and 3D crystal lacquer
Step 6:
Once your clay is dry on the canvas..
Paint up your canvas. I used different yellow browns to dark browns.
Step 7: Let your paint dry and then sand your canvas down lightly
This shows up texture and white areas, its awesome.
Step 8: Punch out some paper with the Fiskars Boarder punch. Then stick it on the boarder of the canvas.
Step 9: add your flowers - i glued the boarders and flowers down with crystal lacquer
Step 10: when your boarder strips are finished drying paint with burnt umber or a dark colour.
Then when the paint is dry..... mix up TS Mixer - I used interference green here and paint it on lightly to the surface. Its so sparkly and awesome and this reminds me so much of Jade or NZ Pounamu (Po-na-moo)
Step 11: now add the Eagle and the boarder strips to the canvas with your lettering....
Congrats you have finished your Canvas! yipee!!!
The words are from a song that we sing at our church.
The flowers are hand made by me and are called "Kakabeak"
The swirl boarder strips of paperclay are very similar to the Maori carvings seen around New Zealand.
Stay tuned later on in the month for my tip and I'll be showing you how to make paperclay letters!!!
Yes the lettering you see here are also made out of Creative Paperclay (R). yipppe!!!
Happy Crafting
from Debbie Buckland
http://artycrafty.wordpress.com
I have done a lot of experimenting for this piece this month. Thought I'd go special since I'm 40 at the end of the month... ;)
For this tutorial you will need:
- Amaizing mold putty - make a mold of something you love
- Creative Paperclay(R)
- Acrylic paint - your desired colours
- Painting or palette knife
- Canvas to the desired size
- Terri Sproul mixers - your desired colours
- Chipboard letters
- Paper flowers
- Fiskars texture plate or similar
- Brushes
- Fiskars paper boarder punch
- Cardstock or papers
- Sand paper
Step 1: apply paperclay directly to canvas with a painting or palette knife. Squishing it into the canvas.
Step 2: Next press a Fiskars texture plate into the clay on the canvas surface.
Now set canvas a-side to dry for about 24 hours.
Step 3: use the Fiskars texture plates to make your own mini boarders
set them a-side to dry on a drying rack - my drying rack is an old microwave rackStep 4: With Amaizing Mold Putty I made a mold out of my sons eagle on his toy bow and arrow set.
All I had to do was mold an extra wing to put on the finished eagle. I painted it up with acrylic paints.
Step 5: then finished the Eagle off with bronze Terri Sproul Mixer and 3D crystal lacquer
Step 6:
Once your clay is dry on the canvas..
Paint up your canvas. I used different yellow browns to dark browns.
Step 7: Let your paint dry and then sand your canvas down lightly
This shows up texture and white areas, its awesome.
Step 8: Punch out some paper with the Fiskars Boarder punch. Then stick it on the boarder of the canvas.
Step 9: add your flowers - i glued the boarders and flowers down with crystal lacquer
Step 10: when your boarder strips are finished drying paint with burnt umber or a dark colour.
Then when the paint is dry..... mix up TS Mixer - I used interference green here and paint it on lightly to the surface. Its so sparkly and awesome and this reminds me so much of Jade or NZ Pounamu (Po-na-moo)
Step 11: now add the Eagle and the boarder strips to the canvas with your lettering....
Congrats you have finished your Canvas! yipee!!!
The words are from a song that we sing at our church.
The flowers are hand made by me and are called "Kakabeak"
The swirl boarder strips of paperclay are very similar to the Maori carvings seen around New Zealand.
Stay tuned later on in the month for my tip and I'll be showing you how to make paperclay letters!!!
Yes the lettering you see here are also made out of Creative Paperclay (R). yipppe!!!
Happy Crafting
from Debbie Buckland
http://artycrafty.wordpress.com
Thursday, May 3, 2012
Creating Bracelets with Paperclay
How
to make a Creative Paperclay® bracelet
Hi all I’m baaaaack!!! I am so
excited to be back for a second term!!!! Did you miss me? ;)
You may see something new in
my posts in this six month term. I am working closely with Creative Paperclay® and Petra from
Zigzag.co.nz to help promote sales here in New Zealand (NZ). Why not keep this
great product international? It also helps our NZ customers knowing where to
find it closer to home. I love finding
my favourite products here in my own country and my own town. (Also saves a bit
on postage too, therefore helps me afford to buy more. ****shhhh*** don’t tell
the hubby!)
I am going to start this term
by showing you how to make your own bracelets by stamping, painting, crackling
and drawing on them. So let’s go!
You
will need:
·
Terri Sproul Mixers (TS Mixers) Purple, pink, blue set– available from
VLVstamps
·
3D crystal Lacquer - available in NZ from Zigzag.co.nz
·
Artline 210 medium 0.6 black pen
·
Archival Ink Jet Black stamp pad
·
Inkadinado 97615 Clear stamps
·
One Step Crackle by Decoart
·
Atelier – burnt umber acrylic paint
Take some paperclay out of its
packet and roll a long snake with it on your work space the length it would
take to wrap around your wrist.
Take a round container that
would fit your current bracelets and put the paperclay snake around it and
flatten it. Let it dry.
When it was half dry I removed
the paperclay bracelet and then let it dry completely.
I stamped one bracelet with a
clear stamp and the other bracelet I drew lines on it with a marker pen.
With TS Mixers I mixed them
with 3D crystal Lacquer and painted the bracelets
After the TS Mixers where dry
I applied One step crackle to the face of the bracelets.
When that was dry I applied burnt umber acrylic paint (dark brown) over the bracelet and then wiped it off leaving it in the cracks only.
Thicker the application of One
step crackle the bigger the cracks.
With the stamped bracelet I
sanded the edge of the bracelet applied burnt umber acrylic paint to the spot
that was sanded and then applied the One step crackle as above thinly to get
finer cracks.
And I have some groovy new
bracelets
These bracelets I made are a
little flexible. I also made them with a small gap instead of a complete round.
Thickness of my bracelets are about ¼ inch or 2-3millimeters.
Thanks so much for dropping by
I will be back later on in the
month with a tip...
Subscribe to:
Posts (Atom)