Showing posts with label skeleton. Show all posts

Tuesday, September 6, 2016

Tori's Tip - Bones, Horns, & Teeth - Painting Surface Finishes

Hi friends! Last month I gave tips for painting on Creative Paperclay® modeling material, and mentioned how the surface texture makes a big difference in the paint absorption.  This month, in preparation for my project at the end of the month, I want to show you an example of some of the surface texture finishes as it relates to making realistic bones, etc.  These techniques are great for adding dimension and texture to other projects as well, of course.


In the example above, some bands of a burnt umber wash have been painted over clay that was dried then sanded to various levels of surface finish.  I used the sandpaper in one direction only to create the grooves of various sizes - this is how the growth lines (and rings) are created on horns. It is also a good technique for adding texture to leaves, flowers, etc.

For bone finishes, what you choose will depend on whether or not you want the bones to look worn, what age and level of decay you want them to appear as, and what area of bone you are creating.  I may have said this a few (hundred) times before, but I'd like to say again that Creative Paperclay® modeling material is great for making bones, horns and teeth of all shapes and sizes!  Often, you don't need to do anything to the clay at all after sculpting it, other than give it a wash of acrylic or watercolor paint to bring out the sculpting details.


 In these photos of a miniature dragon skull, you can see the different finishes between bone, horns, and teeth.  The horns have lines made from the sandpaper, and have also been rubbed with paper to make them slightly shiny.  The teeth have been polished.


   To polish the clay, use fine grit sandpaper, then a piece of torn paper bag to buff the surface, and finally a piece of newsprint or packing paper.  Paint a wash over the clay, then polish again after the wash is completely dry- repeat as necessary until you have the desired effect.


For the miniature cattle skulls, you can see that the lines along the horns follow the shape, and the teeth are polished.  The skull bones were lightly sanded with 320 grit sandpaper stuck on a shaped toothpick.  I think the dirty greenish yellow cow teeth took three or four washes of various tints, polished in between.


This little (less than 5.5" tall) skeleton
was shaped with files and lightly sanded


and this one is a life-size pose-able hand - the clay was only lightly sanded to shape it, and it was painted with a light coat of gesso, then washes were added.  This is a good technique to use if the piece is going to be used in an area that is not well lit, as it will make the "white" of the bones stand out a bit.   This was one of my Halloween projects for the Design Team last year.  If you want full directions, including a pattern, click here  (The project is easier than it looks!)


Thanks for joining me here again!  As always, play, experiment, and have fun!

Tori
Find me on Facebook, or peruse & ponder pics with me on Pinterest


Tuesday, October 6, 2015

"Handy" Halloween Decoration - Poseable Skeleton Forearm and Hand by Tori West


Halloween is on the way!  It's one of my favorite holidays, and I can never have too many decorations.  Good thing it's also so much fun to design and make Halloween projects too!

I figure an extra skeleton hand around the house is a great addition for this year's party, and since it's poseable it can be used in many different ways.


To make a skeleton hand & arm like this one you'll need:

Creative Paperclay® modeling material
18 gauge wire
pliers
wire nippers/cutters
sandpaper, and/or files  Sandits sanding sticks are also helpful
scissors
white glue
coffee filters (other paper may be used, but I recommend using the filters)
corrugated cardboard
thin cardboard
acrylic paint
     -  I used Delta Ceramcoat black, walnut, burnt umber, magnolia white, spice tan
pattern
skeleton pattern free pdf file


reference material - if you don't have any "on hand" gather some from the web or library;
- do an image search for "human skeleton hand and arm bones" and print out the images you think will be most helpful.  Try to get views from all different sides.
- artist's books are sometimes more helpful than medical books when it comes to sculpting reference, with the exception of the classic "Gray's Anatomy".  Some good examples of art source books are: "Anatomy" by Walter T. Foster, and "An Atlas of Anatomy for Artists" by Fritz Schider.

_________________________________

Print hand and arm patterns and begin creating armature by bending wire around hand pattern as shown.  Try to keep the wires flat and right next to each other, not twisted together.  This configuration will help prevent the finger bones from twisting sideways accidentally.


Once the wire is bent, wrap with strips of coffee filter - start at the ends of the fingers, hold the strip at an angle and apply some white glue.  Fold the top of the filter over the end of the finger, then start wrapping the strip around the double wires.  Again, try to keep the wires flat and as close together as possible without overlapping or twisting.


Here is what the wrapped wires for the hand look like when completed -


Paint the wrapped wire black.
Next glue the hand pattern to a piece of thin cardboard, then use your craft knife to cut out the sections outlined in red (on the pattern in the photos there are red sections for the fingertips as well - they are not in the pdf pattern for this project because I realized they aren't necessary)
Put the pieces back in place on the cardboard, then add a line of glue along the center section of each of the pieces you cut out.  Carefully lay your wire armature on top of the pattern/sections and press into place.  Allow it to dry, then lift it out from the pattern.  It should come out like this.


For the arm bones, print out the pattern and create another wrapped wire armature as shown.  You can also use a heavier gauge wire if you choose.


Glue this pattern to corrugated cardboard with the "grain" or corrugation peaks running across the pattern (scroll down to side view showing the wire bending step).  Next cut out the red sections and follow the same process to apply the wire as you did for the hand, then glue the arm and hand armatures together making sure to leave enough space for wrist movement.


When the glue is dry, bend the wires in the arm bones (the radius and ulna bones) to show their placement according to your reference material.  You will also need to bend and cup the large end of the ulna to form the "cup" shape where the bone creates the joint with the upper arm, which is why there is no wire in that end of the armature.


When the cardboard and wire are in the desired position, add a layer of clay along the top and sides.  Push the clay into the corrugated sections to fill the cardboard completely.  Allow the clay to dry.


Add a thin layer of clay to both sides of the finger and wrist bones and allow that to dry also.


Using pliers, twist the double wires at the base of the thumb so that it points towards the hand rather than lays flat with the other fingers.

From this point on, it is just a matter of adding a layer of clay at a time and sculpting according to your reference.  I suggest building up the hand by starting with the wrist bones, then moving on to the fingers.  Sculpt the bone nearest the wrist on one finger and allow it to dry so that you can fit the bone next to it perfectly onto the dry clay.  You can sculpt the fingertips, etc. while waiting for the larger bones to dry.  Move around the bones shaping the joints by first allowing one end of the joint to dry, then forming the other side of the joint over that one with fresh clay, leaving only a small amount of space for the joint to move.  When both sides of the joint are dry, if necessary you can slide a folded piece of sandpaper in between the bones and sand until the joint moves freely.


Remember that with Creative Paperclay® you can sand, re-wet, and add more clay throughout the process and as many times as necessary - have fun, take your time, and you will be amazed with the results!  If desired, add a few thin washes of dark colors to enhance the recesses, and a few touches of thinned white paint for highlights.  Use tan, browns & black washes after the first have dried to age the bones as desired.


I'd love for you to join me for more projects & art adventures on my personal blog


Find me on Facebook, or peruse & ponder pics with me on Pinterest


Friday, November 21, 2014

Winter Skeleton Snowball Snowman by Rachel Whetzel

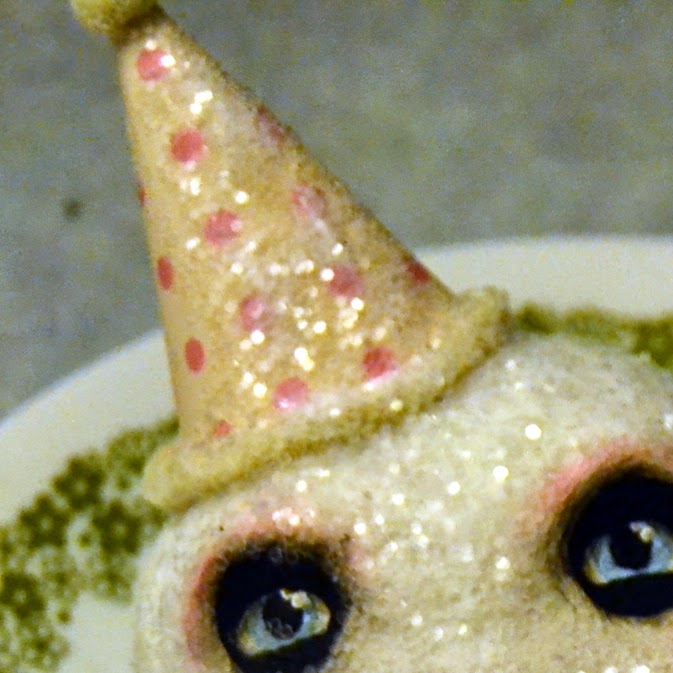
It's been CHILLY out in the world, Creatives!! Rachel Whetzel here! All the snow talk on line is making me feel very Wintery, so today, I'm sharing a little twist on a classic Winter icon, using Creative PaperClay® and a LOT of glitter.
I have made a few Skeletons using Creative Paperclay®, but never (I'm not sure WHY...?) any SNOWMEN... so I got started the other day, with a vague snowman/snowball idea in my head. As I worked, I changed directions a little bit, and ended up creating a Skull snowball. I may be a bit partial, but I really REALLY like how she turned out!


WHAT YOU'LL NEED to make your own Snowball Skeleton:
  • Scrap Paper and Tape (I used some old homework from the boys, and some Washi that isn't my favorite) 
  • Creative Paperclay®
  • Paints and Brushes I use Folk Art acrylic craft paints and Krylon Spray paints
  • Pastels 
  • A 3X3 inch (or so) piece of patterned paper. 
  • Yarn or metal pipe cleaners
  • Glue. I used E600 and Crafter's Pick the Ultimate
  • Glitter. I used an old jar of clear glitter I purchased at the thrift store, but you can get it at any crafting or school supply store.
  • Fake Holly or other collar decorations
To start, I create a core for my snowball. Using a core helps me use less clay, and also speeds up dry time, because innards don't need to dry! To create my core, I used a couple pages of old homework from my boys, and rolled them up into a ball. Then, to keep the shape, I wrapped the papers up in some of my less favorite Washi tape. Not because it needs to be Washi, but because that's what was close, and I was lazy. Any tape will do. Masking is nice too, because it's easy to shape as you tape. 


Once I had a good basic shape, I pressed Creative Paperclay® over the top, and created a more uniform roundness to the snowball.


When my shape was satisfactory, and while my clay was still wet, I layered on some more clay and shaped it into a face. You can add fresh clay to dry also. In both cases, you should use a bit of water on your finger tips and wiped onto the location you're adding new clay. This helps the two surfaces join well. Some rolled clay for the eyebrow bone, a rolled piece for the nose, and balls at the cheek and chin. Blend all the edges, and shape. I used my fingers for the whole process.


I also added a small round of clay at the bottom of the ball, to help the piece sit in one direction when it's resting on a counter or shelf.


I popped my piece into the oven at a VERY low temp (190 degrees) to speed up my drying time. Then I painted it with white gesso, and added the face of my piece. When I was working on the mouth, I originally tried to make an actual skeleton mouth, but I realized the piece would look more like a snowman if I used "coal" dots instead, so that's what I ended up with. For the eyes, the skeleton look is achieved by painting the black for the hollow eye sockets, and then painting eyes in over that. Notice that the nose is also similar to a skelton's. I think that is key to letting people know this isn't your ordinary snowman. Last, use your pastels to add a rosy glow to your skeleton's cheeks, brow bones, "nose" and chin.


Blend the eye socket area where the white meets the black with some shading. You can use your pastels for this area too. 


Now you're ready for your GLITTER!! I used Crafter's Pick, the Ultimate for this part. I kept the glue thin at the front of the face, and made it thicker around the sides and forehead.  I didn't put any glue on the eye area.


Sprinkle your glitter on, and while it's drying, get to work on your HAT! To make my hat, I used a large glass to draw a circle, and cut it out of my patterned paper. Then I folded it in 1/2, and rolled it into a cone. I cut a little of the excess off, and taped the inside seam of my cone to hold the shape. Then I glued the outside seam. I tied some yarn, cut the tip of the cone to create a hole the strings would fit through, and pulled the "pom" into the top of the hat. Then I glued the same yarn around the "bottom" of the hat, on the outside of the paper. Once that was dry enough, I glued the whole thing down onto my snowball snowman's head. I also added some glue and glitter to the top to make the hat look a little frosty! All of this gluing was done using Crafter's Pick. 


To create the "collar" on my snowball, I used some vintage Holly leaves and berries that I had saved from a thrift store find I have had stashed for years. For this part, I used my E6000 glue, because I wanted to make sure the plastic holly leaves and berries stayed in place well. 


Once that glue was also dry, I painted just a bit more glue (Crafter's Pick) onto the leaves and berries, and frosted them with some glitter! 


Here she is again! I feel like she needs a name... IDEAS!? 


Thanks for reading! If you'd like to keep up with me, and see more of what I'm up to, I'd also love it if you'd visit MY BLOG and Subscribe! You can also find me on FACEBOOK!

Wednesday, September 3, 2014

Boney Coffin using Creative PaperClay® by LuLu Lancaster

Spooky Boney Coffin ;)
I am adding pieces to my Pumpkin patch this year!
I bought a couple craft store coffins and decided to give them  little mixed up boney friend ;)
This project is super easy and with a  little bit of parental supervision even the kids can join in.

You will need:
a craft store 4" wood coffin.
Creative PaperClay®
an xacto knife (parental supervision)
paint brushes 
acrylic paints I used black and white craft paints
water
and tacky glue
floral moss

start by making the bones 
roll a log of clay and cut into lengths 
2 short for arm bones and 2 long for leg bones. 
create an elongated ball for the skull.


using the end of your paint brush create the eyes nostrils and teeth for your skull
create the indentations in the ends of the arm and leg bones. 

create feet and hands by making elongated forms for feet, and pancake forms for the hands. 
Using the xacto knife cut toes and fingers.

You can create a tiny ribcage as well by making small "snakes" of clay and forming them into 2 figure 8s. Place them side by side "squishing" the center with your paintbrush end to secure the 2 pieces.

While your bones are drying paint the inside and outside of your coffin with acrylic paint.

you can glue an extra skull or bone on the lid off your coffin...spooky

after your coffin has dried using tacky glue secure moss inside.

using tacky glue secure your bones in the moss. 
Placing the bones in a mixed up skeleton pose :)
Place any extra bones on the opposite side with a bit of tacky glue.
BOO! 
Now you have a spooky Boney Coffin to add to your pumpkin patch :D
Thank you for following along I hope you have enjoyed this project!
LuLu

Saturday, September 24, 2011

Halloween Magnets Tutorial

Halloween is my favorite holiday and the cooler autumn air has me thinking the same question I have pondered every year around this time since I was about 5 years old: What will I be for Halloween this year? I decided to make some cute Halloween magnets to celebrate this special and spooky time of year! This tutorial will walk you through the process of making a pumpkin, a witch's face, a ghost, and a skeleton's face.

What You Need
Creative Paperclay
Round magnets the size of nickels
Aleene's Tacky Glue (or your favorite craft glue)
Acrylic Paint (not pictured)
Cup of water for sculpting and paintbrush wash
Sharp pottery tool or toothpick
Chopstick and/or regular pen


1. Take a lump of clay at least the size of a quarter. You can work larger if you want as long as the piece is light enough for your magnet to hold it to your fridge or filing cabinet later!


2. Let's make a pumpkin first. Take your sharp tool or toothpick and carve two lines.


3. For the stem, make a small teardrop shape out of the clay. Use your sharp tool or toothpick to score the teardrop onto the top of the pumpkin. Basically, you want to take your toothpick and blend small the end of the teardrop shape into the top of the pumpkin. Don't worry about this being smooth. In fact, if it is a bit rough, it will look more realistic.


4. Set your pumpkin aside to dry. Let's start the witch! Start with a lump of clay the same size as the pumpkin.


5. Make another tear drop shape from the clay. Dampen this teardrop with a drop of water. Place it in the middle of your round shape of clay. This will be the witch's nose.


6. Poke two holes, one on each side of the nose you just created. Carve out a mouth as well. I prefer happy witches!


7. Make a witch's hat by sculpting a small cone-shape, and a flat round shape. Make a slip to attach the cone to the round, and then the hat to the witch's face. "Slip" as potters call it is a paste made from clay and water. Place a little paperclay on your finger, dip into water, and then rub between fingers. It should be sticky and paste-like. This is slip! Use it to attach sculpted parts together!


8. To make your witch's hair, take small bits of paperclay, dampen your toothpick or sharp tool in a bit of water, and poke the bits of paperclay under the witches hat. Once you've applied all of the hair you want (just a few in the front will do), press the back of the hat rim down. Remember, these are magnets, so they need to be relatively flat in the back. The good thing is, this will secure your witch's hat and her hair!

9. Set your witch aside next to your pumpkin and let's start on the ghost. Sculpt a bell shape out of paperclay about the same size as your pumpkin and witch. Pinch the bottom of the clay two or three times to make slight waves.


10. Use your sharp tool to poke eyes and a mouth. Again, I prefer happy smiling ghosts. Here's a picture of the three sculpted pieces together.


11. Finally, let's make a skeleton face! Make an egg shape with the paperclay. Take the end of your sharp tool, the blunt of a chopstick or pen and press two eyes. Take your sharp tool tip or toothpick and make a couple of holes for the skeleton's nose. You can carve out a mouth or paint it on if you prefer.


12. Now that you have your Halloween characters sculpted, allow them to dry completely or pop them in a toaster over - bake at 225 degrees for 10-20 minutes turning once halfway.

13. Now it's time to paint! Cheap acrylic paint works well!!! Michael's Craft Stores usually has a good deal where you can buy two 2 ounce bottles of acrylic paint for under $2. And then you can go over to the clay isle to get a few new packages of Creative Paperclay!


14. Once the paint is dry on both sides, apply a good drop of white craft glue to one magnet at a time and place your Halloween character on top. Give a good press and allow to dry before your adorn your fridge with your lovely new creation! Repeat three more times and enjoy!


Love Creative Paperclay? Let Michael's Craft Stores know as they may be discontinuing the sale of this excellent product!!! If they do, you can always purchase your Creative Paperclay on their website:

http://creativepaperclay.com/

Vist My Blog Here When You Get a Chance!
http://marissartdolls.blogspot.com/