I love to see how different surfaces take techniques and I hadn't
played with Delight very much. So in the spirit of the season, I rolled
out Delight and used my Halloween cookie cutters to make little skulls.
SUPPLIES
Skull cookie cutters
Delight
Paint
Glitter
Micro Beads
Objects
Curry powder
Left
to right: Skull coated with polymer medium followed by a wash of
Quinacridone Nickol Azo Gold when dry. My favorite. Clear glitter with
typewriter keys, black with a metallic pearl rub, and burnt umber with
curry powdered applied while wet. Now, I have to run to the fabric
store. I think collars out of netting would be cool.
Part of being an artist is being a mad scientist.
Dream in Color and Take Time to Play — Darlene Olivia McElroy
Showing posts with label skulls. Show all posts
Thursday, October 22, 2015
Friday, November 21, 2014
Winter Skeleton Snowball Snowman by Rachel Whetzel
It's been CHILLY out in the world, Creatives!! Rachel Whetzel here! All the snow talk on line is making me feel very Wintery, so today, I'm sharing a little twist on a classic Winter icon, using Creative PaperClay® and a LOT of glitter.
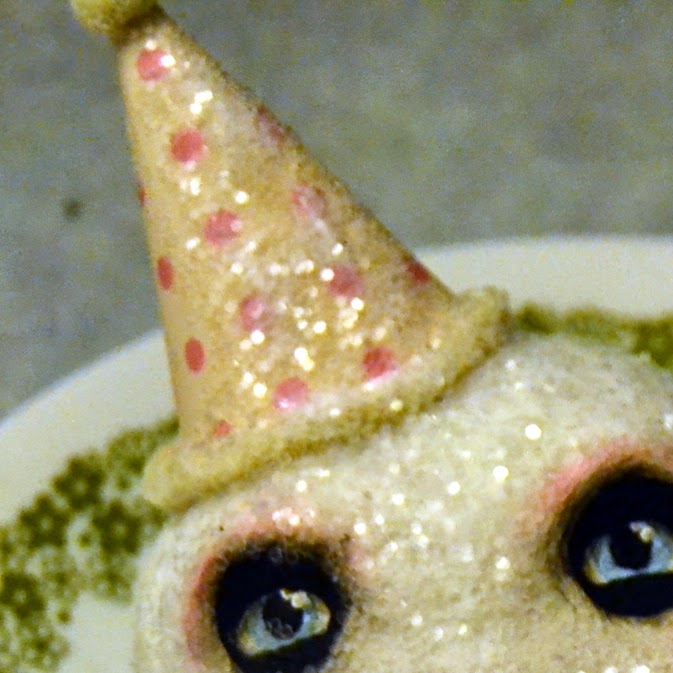
I have made a few Skeletons using Creative Paperclay®, but never (I'm not sure WHY...?) any SNOWMEN... so I got started the other day, with a vague snowman/snowball idea in my head. As I worked, I changed directions a little bit, and ended up creating a Skull snowball. I may be a bit partial, but I really REALLY like how she turned out!
Once I had a good basic shape, I pressed Creative Paperclay® over the top, and created a more uniform roundness to the snowball.
When my shape was satisfactory, and while my clay was still wet, I layered on some more clay and shaped it into a face. You can add fresh clay to dry also. In both cases, you should use a bit of water on your finger tips and wiped onto the location you're adding new clay. This helps the two surfaces join well. Some rolled clay for the eyebrow bone, a rolled piece for the nose, and balls at the cheek and chin. Blend all the edges, and shape. I used my fingers for the whole process.
I also added a small round of clay at the bottom of the ball, to help the piece sit in one direction when it's resting on a counter or shelf.
I popped my piece into the oven at a VERY low temp (190 degrees) to speed up my drying time. Then I painted it with white gesso, and added the face of my piece. When I was working on the mouth, I originally tried to make an actual skeleton mouth, but I realized the piece would look more like a snowman if I used "coal" dots instead, so that's what I ended up with. For the eyes, the skeleton look is achieved by painting the black for the hollow eye sockets, and then painting eyes in over that. Notice that the nose is also similar to a skelton's. I think that is key to letting people know this isn't your ordinary snowman. Last, use your pastels to add a rosy glow to your skeleton's cheeks, brow bones, "nose" and chin.
Now you're ready for your GLITTER!! I used Crafter's Pick, the Ultimate for this part. I kept the glue thin at the front of the face, and made it thicker around the sides and forehead. I didn't put any glue on the eye area.
I have made a few Skeletons using Creative Paperclay®, but never (I'm not sure WHY...?) any SNOWMEN... so I got started the other day, with a vague snowman/snowball idea in my head. As I worked, I changed directions a little bit, and ended up creating a Skull snowball. I may be a bit partial, but I really REALLY like how she turned out!
WHAT YOU'LL NEED to make your own Snowball Skeleton:
- Scrap Paper and Tape (I used some old homework from the boys, and some Washi that isn't my favorite)
- Creative Paperclay®
- Paints and Brushes I use Folk Art acrylic craft paints and Krylon Spray paints
- Pastels
- A 3X3 inch (or so) piece of patterned paper.
- Yarn or metal pipe cleaners
- Glue. I used E600 and Crafter's Pick the Ultimate
- Glitter. I used an old jar of clear glitter I purchased at the thrift store, but you can get it at any crafting or school supply store.
- Fake Holly or other collar decorations
To start, I create a core for my snowball. Using a core helps me use less clay, and also speeds up dry time, because innards don't need to dry! To create my core, I used a couple pages of old homework from my boys, and rolled them up into a ball. Then, to keep the shape, I wrapped the papers up in some of my less favorite Washi tape. Not because it needs to be Washi, but because that's what was close, and I was lazy. Any tape will do. Masking is nice too, because it's easy to shape as you tape.
Once I had a good basic shape, I pressed Creative Paperclay® over the top, and created a more uniform roundness to the snowball.
When my shape was satisfactory, and while my clay was still wet, I layered on some more clay and shaped it into a face. You can add fresh clay to dry also. In both cases, you should use a bit of water on your finger tips and wiped onto the location you're adding new clay. This helps the two surfaces join well. Some rolled clay for the eyebrow bone, a rolled piece for the nose, and balls at the cheek and chin. Blend all the edges, and shape. I used my fingers for the whole process.
I also added a small round of clay at the bottom of the ball, to help the piece sit in one direction when it's resting on a counter or shelf.
I popped my piece into the oven at a VERY low temp (190 degrees) to speed up my drying time. Then I painted it with white gesso, and added the face of my piece. When I was working on the mouth, I originally tried to make an actual skeleton mouth, but I realized the piece would look more like a snowman if I used "coal" dots instead, so that's what I ended up with. For the eyes, the skeleton look is achieved by painting the black for the hollow eye sockets, and then painting eyes in over that. Notice that the nose is also similar to a skelton's. I think that is key to letting people know this isn't your ordinary snowman. Last, use your pastels to add a rosy glow to your skeleton's cheeks, brow bones, "nose" and chin.
Blend the eye socket area where the white meets the black with some shading. You can use your pastels for this area too.
Now you're ready for your GLITTER!! I used Crafter's Pick, the Ultimate for this part. I kept the glue thin at the front of the face, and made it thicker around the sides and forehead. I didn't put any glue on the eye area.
Sprinkle your glitter on, and while it's drying, get to work on your HAT! To make my hat, I used a large glass to draw a circle, and cut it out of my patterned paper. Then I folded it in 1/2, and rolled it into a cone. I cut a little of the excess off, and taped the inside seam of my cone to hold the shape. Then I glued the outside seam. I tied some yarn, cut the tip of the cone to create a hole the strings would fit through, and pulled the "pom" into the top of the hat. Then I glued the same yarn around the "bottom" of the hat, on the outside of the paper. Once that was dry enough, I glued the whole thing down onto my snowball snowman's head. I also added some glue and glitter to the top to make the hat look a little frosty! All of this gluing was done using Crafter's Pick.
To create the "collar" on my snowball, I used some vintage Holly leaves and berries that I had saved from a thrift store find I have had stashed for years. For this part, I used my E6000 glue, because I wanted to make sure the plastic holly leaves and berries stayed in place well.
Once that glue was also dry, I painted just a bit more glue (Crafter's Pick) onto the leaves and berries, and frosted them with some glitter!
Here she is again! I feel like she needs a name... IDEAS!?
Thursday, March 6, 2014
Crystal Skull Fun and Easy Bling Project by LuLu Lancaster
Hello There This is LuLu Lancaster and I have a little project for you that is easy and fun and full of spooky bling!
There is always room in my home for another skull and this one has some sparkle!
You will need a tub of assorted acrylic gems
2 styrofoam balls
xacto knife
Creative PaperClay®
Black Acrylic paint
a couple toothpicks
Triple Thick Gloss Glaze
Available at Michaels craft stores
First thing you will do is to cut a styrofoam ball in half.
poke the half with a couple toothpicks
Push the half into the whole styrofoam ball
Now cover the styrofoam with Clay.
with your fingers you can push out the eye sockets and the nostrils, using your exact knife cut a slit for the mouth. This is really only need for a guide where to put your gems.
wet the entire head with a few drops of water so that the clay is sticky.
Once your skull is covered in gems and has dried go ahead and paint the eye sockets and nostrils and a line for the mouth.
Once your paint has dried you will cover the entire skull in Triple Thick gloss.
While it is still sticky you can pop on some more gems if you like or even take it one step further...Cover it in sparkly glitter!
Thank you so much for reading along and I hope you have a Blingy Spooky filled day!!!
LuLu
Thursday, February 6, 2014
Mini Spooky Spring Maypole Project with Delight ™ Air dry modeling Material
Hello There! This is LuLu Lancaster with a little spooky Spring Mini Maypole :)
I have many of these Vintage Industrial Bobbins. I have them in baskets and have used them for projects but am always looking for another way to use them creatively. You could use any type of hollow length of material for this project, perhaps Bamboo? If a Bobbin is not readily available.
This is very easy to make
First Gather your materials
A Vintage Bobbin or any hollow length of material like a bamboo stick
Ribbons~Approx. 20" lengths
Delight™ air dry Modeling Material
a 3" styrofoam ball
an xacto knife
needle and thread
acrylic paint
paintbrush
silk or paper millinery flowers
clay shaper tool or chopsticks
Tacky Glue
The fist thing you will need to do is make sure your vintage bobbin has a clear opening all the way through ;)
Next you will sew approx. 8 ~20" lengths of ribbon at the end just a couple stitches will do.
Now that you have stitched the ribbons at one end,
you will drop the needle into the larger end of the Bobbin.
When the needle comes out the smaller end you will pull tightly (but not too tight you may snap the thread) add a dab of tacky glue to the small end to hold the thread in place.
Taking your Styrofoam ball and your xacto knife carefully cut the ball in half.
You will only be using 1 half so save the other for another project or maypole :)
Insert the small end of the bobbin into the styrofoam. with some water and your clay start covering the foam. This will be your base of your maypole.
Making the tiny skulls
Now you will shape small skulls.
With small thumb size pieces of clay make a rough ball and pinch the bottom half.
using a clay shaper tool or even chopsticks poke eyes in the clay nostrils and teeth if you like.
It takes approx. 24 small skulls to cover the base.
using the tacky glue start applying the skulls to the base.You do not need to wait for the Delight™ material to dry ;)
Once you have the base covered take a little Black watered down acrylic paint and
paint the eyes nostrils and teeth on your skulls :)
You can add small silk or paper flowers in the spaces if you like also.
Thank you again for reading along and may you have a Fun Spooky Spring!
LuLu
Subscribe to:
Posts (Atom)