Showing posts with label Butterfly. Show all posts

Wednesday, January 29, 2020

The Transformation of Dough Art Using Delight Air Dry Modeling Compound!

 
Hello all!
Recently a Facebook post has been making the rounds on multiple artist friends' pages as well as on my own from well-meaning friends who said: "This made me think of you!".  Well, I had to rise to the challenge.  Could I take the pastry art shown and create the same pieces using Delight Air Dry?  I had to try and do it.  I grabbed a package of Delight and went to work.

The video is from a Chinese artist (I apologize, but I cannot pull up a working link to share).  The speed in which she works had me watching each segment multiple times to be able to create just one piece (haha).  After my "painstaking" research, I have broken down the steps into photos for you.

First up, "The Heart":
The heart begins with one circle.  (NOTE: The cutter size doesn't really matter since I believe these simple directions will work no matter what size you are creating.)  I own a set of Ateco circle cutters (12 pcs) and they worked great for this project!
Pull off a bit of Delight Air Dry Modeling Compound and flattened it with a roller on my work surface.  Cut three circles and place the remainder of clay in a damp paper towel to keep the clay moist.


Next, stack the 3 circles, one on top of the other, without squishing them together.
Use a skewer or needle tool of some sort to press the stack together in the center without cutting through.  I used a darning needle, but a knitting needle or turkey lacer or (in a pinch) a pencil should work just as well.
Fold the stack in half.  Again, do not squish (that is the technical term) the layers together.  Use the skewer to once again compress the stack together in the center without cutting through.  Fold the stack in half again, then turn it so the flat side is on your work surface.
 
Pinch the bottom to form the heart bottom and manipulate the rest of the layers to form a beautiful layered heart!
Set aside to dry.  Once dry, the heart can be painted with watercolors or acrylics OR it can be left white.  That's it!  Easy peasy lemon squeezy heart.  Imagine creating a batch of these for a mixed media canvas...Delight Air Dry is so lightweight that it can be glued to a canvas in multiples and hung on the wall for a lightweight seasonal decoration ❤

On to our next creation: The Rose
To start, pull off a bit of the Delight Air Dry (from the clay wrapped in the damp paper towel) and flatten it on your work surface.  Cut 5 circles (I cut 2" circles for this one).  Place any remaining clay back into the damp paper towel.
Cut each circle in half.  Line them up with the cut edges all in a line.  Overlap the points (as shown) and press together.
In the video tutorial, the pastry artist used a comb to imprint a texture on the curved edge of each petal.  I am a curly-headed girl and do not own a comb, so I found the next best thing: the attachment from personal shaver!  Tiny, but it worked to add a texture to the edge.  In the absence of a "personal shaver", you could add detail with a needle tool (one line at a time), the coil from inside a pen, OR the edge of a spiral binder!  Trust me when I say you will see texture in everything once you get started looking!
(NOTE: I forgot to take a photo of texturing the rose, so this is the same tool being used in an upcoming tutorial)

Once each petal has a texture, it is time to roll up the rose.  Begin at one end and roll tightly.  I did not press the petals at the top.  Instead, I focused on pressing the bottom of the petals (the flat edge) together.  This will allow the top of the petals to begin to flare out.
 

Once the rose is completely rolled up, place it face up on the work surface and gently flare out the petals to create a lovely rose (see above photo).  Leave to dry and then paint if desired.  Wouldn't this make a lovely pin for Mother's Day??

Next up: The Braided Feather/Leaf
This is probably one of the easiest of the ideas!  Pull off another piece from the reserved clay (damp paper towel).  On your work surface roll out a snake.  
Coil the snake, gently tucking the end into the center (as shown). 
Use a needle tool (I used a darning needle) to impress a line down the center of the coil without cutting through.
Pinch the top end and it is done!
Please note: After impressing the line, the feather/leaf can be curved to create a more natural effect.  Of course, set aside to dry and then paint as desired.

One last one: The Butterfly
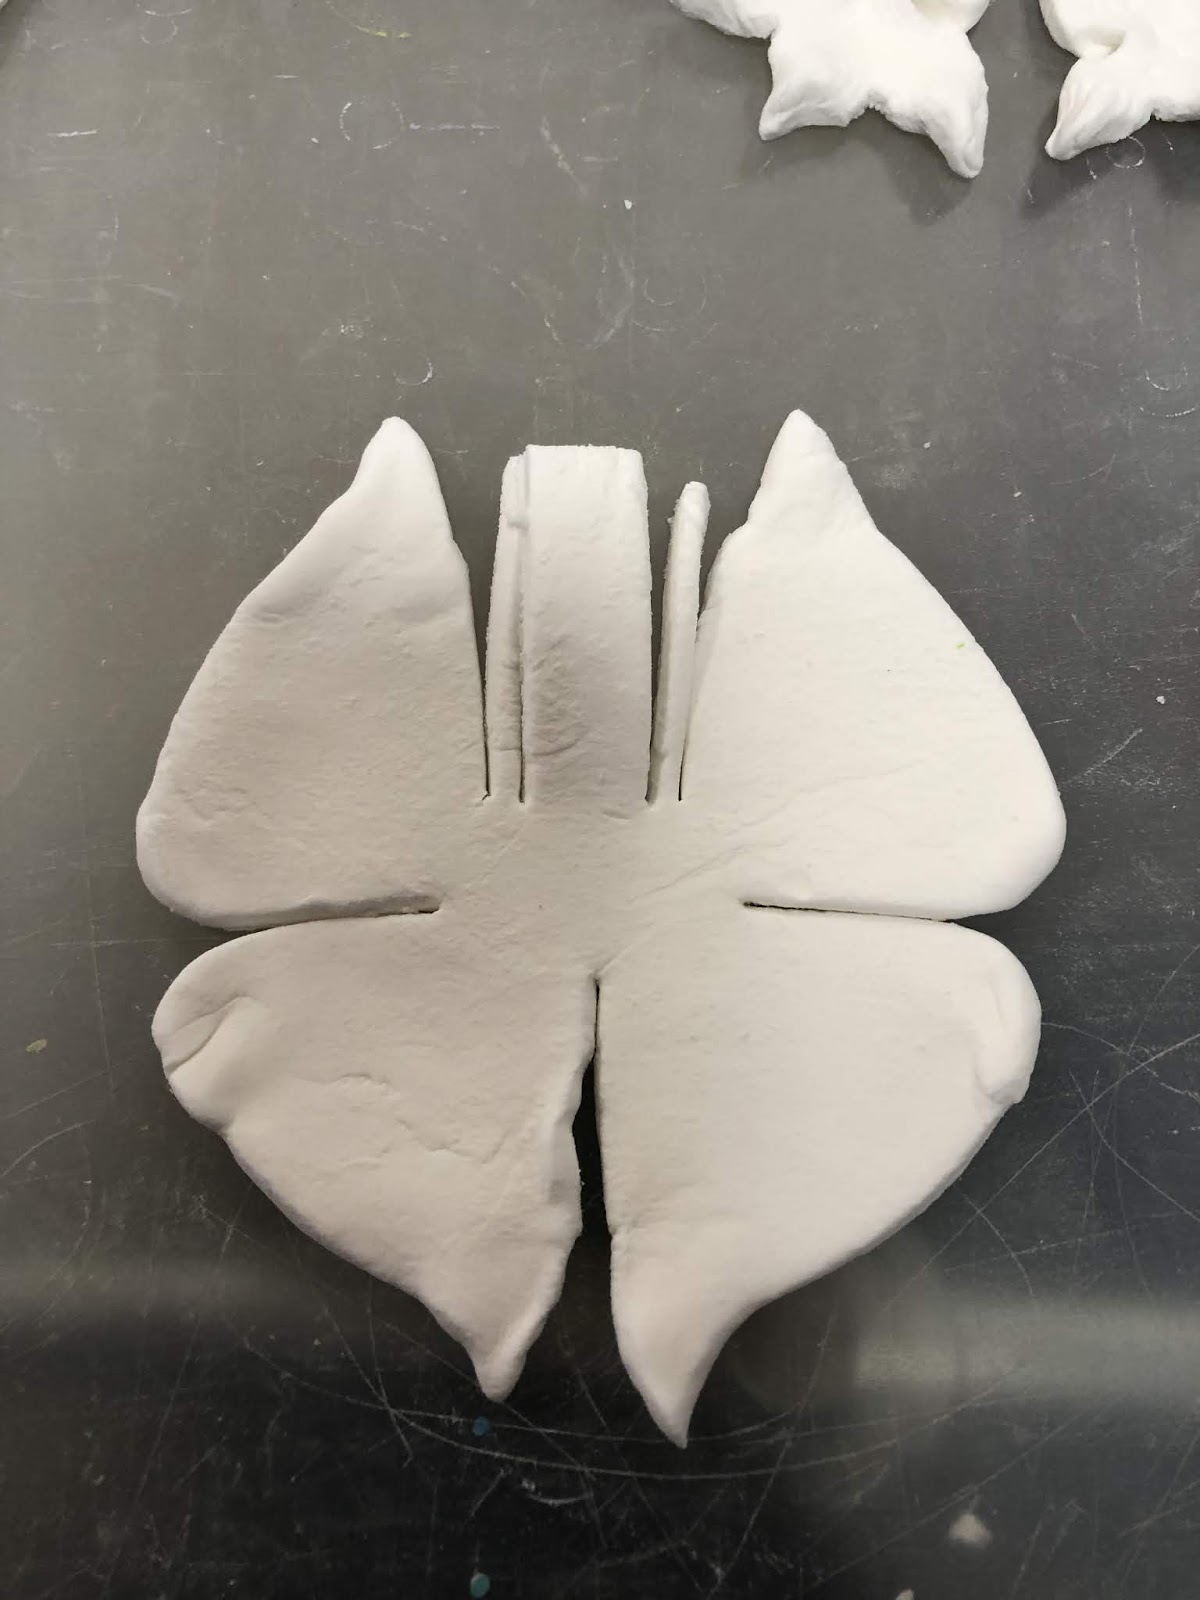
Begin the butterfly in the same way as the others by grabbing a bit of the reserved clay.  Flatten the clay on your work surface and then cut out a circle.  I used the largest of the cutters (approx 4") for this one.  Use a cutting tool (a plastic knife or butter knife will work well) to cut lines as shown below.
Next, manipulate the "wings" to add curves and points rather than flat edges.  Can you see the butterfly taking shape??
Fold down the center to create the butterfly's body.  Be sure to pinch the end to help the body take shape.  Curve the antennae.  Add lines to the wings using a needle tool (I used my darning needle, but the back of your knife will work just as well).  As you can see I used the attachment from the shaver to impress lines down the center of the body.
 

The final step? I decided to roll the antennae down onto the top of the body and add a couple of glass beads to give the butterfly sparkly eyes. 
Of course, the butterfly is just as beautiful with the antennae curved between the wings and no visible eyes.
As with the others, set the butterfly aside to dry and then paint as desired.

I hope you have enjoyed these quick and easy creations.  Return next month for a few more of the Delight "pastry creations".

Linda Hess


Monday, May 8, 2017

Live a Beautiful Life Mixed Media Canvas

Hi friends: Today is my very first post for the Creative Paperclay® Design Team and I'm so excited to share my project with you.

Have you ever wondered how to use Creative Paperclay® embellishments in your canvas, cards, or journaling projects?  It's really easy to add them to your projects - here's a quick tutorial for creating this Live a Beautiful Life Canvas using Creative Paperclay®, Delight­™ modeling compound, and lots of fun mixed media supplies:

Canvas Using Creative Paperclay®

Here are detail shots of the Creative Paperclay® and Delight™ embellishments:

Mindscapes Stamp Stamped Into Creative Paperclay®
Rustic Harmony Stamp Stamped into Delight™

Creative Paperclay® from Prima IOD Fleur Mould


Instagram
Pinterest


Directions: Here's the video tutorial - I hope you enjoy watching my first ever video:


Supply List:
Creative Paperclay®
Delight™ Air Dry Modeling Compound
Creative Expressions Cosmic Shimmer Metallic Gilding Paste - Powder Blue (Amazon)
Prima Marketing Art Alchemy-Sparks-Mermaid Sparkle (Amazon)
Prima Marketing Art Alchemy-Sparks-Fairy Wings (Amazon)
Prima Marketing Art Alchemy Acrylic Paint, Metallique Steampunk Copper (Amazon)
Prima Finnabair Art Extravagance Texture Paste Clear Crackle (Amazon)
Prima Art Stones (Amazon)
Prima Mini Art Stones (Amazon)
Prima Marketing Art Alchemy-Metallique Wax-Bronze Age (Amazon)
Prima Marketing Art Alchemy-Metallique Wax-Aged Brass (Amazon)
Lindy's Stamp Gang Sprays (Amazon):  Mission Bells Brown, Steampunk Sepia, Shabby Turbine Teal
Kaisercraft Rustic Harmony Clear Stamps (Amazon)
Inkadinkado Mindscapes Clear Stamps (Amazon)
Liquitex Gesso - White (Amazon)
Liquitex Professional Clear Gesso (Amazon)
Wendy Vecchi White Embossing Paste (SSS)
Tim Holtz Layering Stencil - Flourish (Amazon)
Wooden Frame with Scalloped Edges (Michael's)
Liquitex Professional Matte Gel Medium (Amazon)
Recollections Sweetwater Roses (Michaels)
Beacon 3-In-1 Advanced Craft Glue (Amazon)
DCWV Old World Paper Stack
American Crafts DIY Shop Paper Pad
8x10 Canvas, Lace, Metal jewelry piece

Thank you so much for stopping by the blog today.  I hope you enjoyed my tutorial and that you learned some new ways to incorporate Creative Paperclay® into your mixed media projects.

Have a great, creative day! -Patti

Friday, July 18, 2014

Simply Perfect Creative Canvas Layers with Rachel Whetzel


Hello, out there in Creativeland!! It's Rachel Whetzel, here. Once in a while, I feel like a project is so simple, it's probably TOO simple. Then I remember that simple can sometimes be totally AWESOME, and this is that kind of simple. My project today is part of a project I'm working for Gauche Alchemy, and it is the background canvas for a different piece of artwork. Today, I'll show you just how simple it is to use Creative Paperclay® as part of a mixed media canvas. This is the kind of project you can have your kids do. It's also great for beginners who want to amp up their art work, and make something they are pleased with. It's also perfect for projects with limited time. It's Simply Perfect. (see what I did there...?)

WHAT YOU'LL NEED to make your own canvas:

  • A sturdy canvas. I have plywood cut at my local hardware store, then I cover it with dictionary paper
  • Creative Paperclay®
  • Paints. I use Folk Art acrylic craft paints.
  • Stain. I used Valspar antiquing stain
  • Paint brushes
  • Embellishments. I used a butterfly wall cling I bought from the Dollar Tree years ago.
  • Texture. For this piece, I used a doily I bought at a yard sale.
Get your canvas surface wet, and layer your clay onto it. In order to get the right shape for my doily, I traced it onto the canvas before I started putting on clay. 
 Next, I pressed my doily into my still moist clay.
 Then I carefully lifted it out of the clay. If you find that clay has stuck to your cloth, rinse well with water while the clay is still wet, and it will come out easily. Allow your clay to dry, and then get to work painting on some layers!
I painted my colors on, and then used stain to add dimension to the doily. Topped off with a butterfly and some dotted swirls, and my canvas is ready to go!! Be sure to check in at  Gauche Alchemy in August, to see the completed piece I am creating using this background! 

Thanks for reading! If you'd like to keep up with me, and see more of what I'm up to, I'd also love it if you'd visit MY BLOG and Subscribe! You can also find me on FACEBOOK!

Tuesday, April 15, 2014

Easy Butterfly Spring Mobile by Gloriann Irizarry


Welcome Back to the amazing Creative Paperclay® 
Is me once more Gloriann Irizarry a great tutorial to celebrate the starting of the spring.


Spring is finally here so lets celebrate by crafting a cute little mobile.
With the help of my little one we decided on butterflies. These cute butterflies will fly around with the warm breeze and make you smile every time. Ready! Ok them, lets begin.  


Materials

1 bar Creative Paperclay®

(Pastel Blue, Green and Pastel Pink)

Acrylic Paints 
(Pearl pastel blue, Gold, Yellow, Purple)

Clay texture sheets


Flower Cutter

Lace Border Cutter 

1 Spool of  1/4 wide Ribbon 

Glass bowls 

Drill Tool

Needle Tool

Clay Roller

Flat Toothbrush

Solar night lamp

and the Top and drill template.


Sized to your desired mobile and print 2 to copies.

Cut one for the Top of the mobile and cut the other to know where to drill the holes 


Roll a clay sheet to a 1/4 thickness large enough for the template to be trace and cut off. 


After the template is cut use your border cutter to give a nice shape. 


Use your clay texture sheet and roller to give it some character.


Place your clay sheet over the glass bowl and give it a little shape and let it dry overnight.


Now choose your favorite butterfly style cutter.

Stamp and cut 15 mobile pieces.

\

Use your needle tool and open the holes. 
You can use a single hole or the double hole depending on your taste.


Fold them in half and let the butterflies dry over night.


Cut one of each size of the flower.


Lets now grab the dried mobile top and use the template to mark the placement of the holes.


Use your drill toll to mark each one and  drill the whole 1/4 thick sheet. 


Make you you clean the holes out.


Grab all yours dry clay pieces and it is time to pain.


I use the pastel blue to paint an even layer and let it dry.


To give it an aged look I watered down the gold tone paint and added  to the already
 painted blue mobile top and removed the excess with a damp paper towel.


I wanted to give the mobile top some texture so I watered down some of the acrylic purple.
Use a flat toothbrush and use the splatter technique all over the mobile top.


I used the bright yellow and painted all the butterflies and the purple for the flowers


I added some veins and details to the butterflies with the Sakura Crystal Lacquer 
3D Pastel blue and Pastel pink pens.

I added some accents to the button of each flowers with the green  3D crystal lacquer pen.


And used the Pastel Blue and Pastel Pink for detailed the tops of each flower.


I wanted to crate a contrast on the mobile top so i used a Purple Crystal lacquer
3D pen and started to free hand drawn on the border.


Cut 2 long pieces of ribbon for you to thread so your able to hand your mobile .


Now choose your desire length size so you can cut the ribbons out and tight the butterflies to each end. 


My little one is afraid of the dark so I decided to add a special feature to her to enjoy this mobile at night too. I purchase a outside solar power lamp to give her a ever after light. 


I removed the top were the light with the solar panel was located and discarded the rest. 

Place it on top of the mobile and feed the light down from a carved hole .


Now she will have a everlasting mobile night light.
It will go on automatically every night and will last enough to put her to sleep. 
Looks very good at night too. 


Now that this project is completed you are ready to have a nice piece that will guard
 any kinder gardener dreams. 

My friends thank you for reading this tutorial and feel free to leave us any comments,
 Questions or suggestions at the button of this screen


Have a bless day and like always happy crafting. 

Sincerely
Email Gloriann@byglori.com