Showing posts with label 2017 Creative Paperclay Design Team. Show all posts

Monday, October 23, 2017

Wings of Love Mixed Media Canvas Featuring Creative Paperclay®

Hi Friends:  It's time for a new mixed media canvas featuring Creative Paperclay®!  I found this great wings mold at Michaels, paired it with a heart mold that I picked up on sale at JoAnns, along with my favorite Creative Paperclay® and a few metal pieces, and I created this Love Wings mini canvas.

Creative Paperclay® Love Wings Canvas


I really love using Creative Paperclay® with molds to create focal pieces on my mixed media canvases.  It's also great for adding texture and stamped images onto the background.

This project uses black gesso and lots of yummy mixed media products!


Please see my video tutorial for full instructions for this project:


Supply List:
Creative Paperclay® Modeling Material
Prima Marketing Art Alchemy Acrylic Paint, Opal Magic Aqua-Rose (Amazon)
Prima Marketing Art Alchemy Acrylic Paint, Opal Magic Yellow-Blue (Amazon)
PrimaMarketing Art Alchemy-Antique Brilliance Amethyst Magic (Amazon)
PrimaMarketing Art Alchemy-Metallique Wax-Vintage Gold (Amazon)
PrimaMarketing Art Alchemy-Opal Magic Wax - Royal Robes (SSS)
Prima Marketing Art Alchemy-Opal Magic Wax-Blue Velvet (Amazon)
Stampendous Glass Glitter (Amazon)
Studio 71 Black Gesso (JoAnn)
TimHoltz Ideology Quote Chips (Amazon)
Liquitex Professional Matte Gel Medium (Amazon)
Other:  Mini Canvas, beads, metal frame


I hope you enjoyed my project and learned some new ways to use Creative Paperclay® in your mixed media projects. Thank you so much for stopping by the blog today. Have a great, creative day! -Patti


Monday, October 9, 2017

Kitty in the Window Canvas Featuring Creative Paperclay®

Hi Friends:  Do you love the image of a kitty in the window?  Here's a video tutorial that uses  Creative Paperclay® to make a cute kitten and window frame canvas.  I used a favorite ceramic kitten with Mold-N-Pour to make the kitten mold.  I used a Prima IOD mould and the Wilton Lace mold for the window frame, and a favorite butterfly mold for the butterflies.  I also used some favorite stencils, paints, and waxes to finish my canvas.  Here are some photos of the project - you can watch the video tutorial, below, for full instructions to create the canvas.


Here are some detail shots of the kitten and butterflies made with Creative Paperclay®


Please see my video tutorial for full instructions for this project:


Supply List:
Creative Paperclay® Modeling Material
Prima Marketing Art Alchemy-Opal Magic Wax-Vintage Silk (Amazon)
PrimaMarketing Art Alchemy - Metallique Wax - White Gold (SSS)
Prima Marketing Art Alchemy-Metallique Wax-Old Silver (Amazon)Prima Marketing Memory Hardware Artisan Powder - Vausseroux (Amazon)
Prima Marketing Memory Hardware Artisan Powder - Trianon Patina (Amazon)
Prima Marketing Memory Hardware Artisan Powder - La Chapeliere (Amazon)
Prima Marketing Art Alchemy-Sparks-Unicorn's Hair (Amazon)
Prima Marketing Art Alchemy-Sparks-Raven Black (Amazon)
Prima Marketing Art Alchemy-Sparks-Butterfly Spells (Amazon)
Prima IOD Moulds - Baroque No. 6 (Amazon)
PrimaMarketing Mini Art Stones (Amazon) 
Prima Marketing ART STONES (SSS)
Prima Finnabair Art Extravagance Texture Paste Clear Crackle (Amazon)
Wilton Fondant and Gum Paste Silicone Mold, Lace (Amazon)
Butterfly Mold (Amazon)
Liquitex Gesso - White (Amazon)
Liquitex Professional Matte Gel Medium (Amazon)
Beacon3-In-1 Advanced Craft Glue (Amazon)
Aleene's Fast Grab Tacky Glue (Amazon)
Tsukineko IRIDESCENT BLUE CREATIVE MEDIUM Texture Paste (SSS)
Wendy Vecchi White Embossing Paste (SSS)
Tim Holtz Idea-ology MELANGE Tissue Wrap Paper (SSS) 
Ranger Paint Dabbers, Pearl Metallic (Amazon)
Lindy's Stamp Gang Sprays (Amazon):  My Mojito Green, Blue Hawaiian Blue, Azure Sea Asters, Sea Mint Green
Heidi Swap Shine Stencil
Making Memories Scrapbook Colors - Blush
Making Memories Embossed Charms - Friends
Ranger Melt Art Mold-N-Pour
Other:  8X10 Canvas, cloud stencil, ribbon, bell

I hope you enjoyed my project and learned some new ways to use Creative Paperclay® in your mixed media canvas projects. Thank you so much for stopping by the blog today. Have a great, creative day! -Patti


Monday, September 25, 2017

Make Jewelry Charms with Creative Paperclay®

Hi Friends:  Creative Paperclay® can be used to make great lightweight charms for your home-made jewelry pieces.  Just roll the clay, stamp into it with your favorite stamp sets, then cut with cookie cutters or metal clay cutters to create charms / pendants to use on necklaces, earrings, or bracelets. Once dry, you can paint them to match your favorite outfits or to give as gifts.

Here are some pictures of the jewelry pieces that I made using Creative Paperclay® charms:


The beads on this last one didn't photograph very well - they are lovely iridescent purple/blue beads that really work well with the purple in the charms.

Please see my video tutorial for full instructions for this project:


Supply List:
Creative Paperclay® Modeling Material
Prima Marketing Art Alchemy Acrylic Paint, Opal Magic Yellow-Blue (Amazon)
PrimaMarketing Art Alchemy Acrylic Paint, Opal Magic Violet-Green (Amazon)
Prima Marketing Art Alchemy-Sparks-Fairy Wings (Amazon)
Prima Marketing Art Alchemy-Sparks-Iris Potion  (Amazon) 
Prima Marketing Art Alchemy-Sparks-Magical Pond  (Amazon)
Prima Marketing Art Alchemy-Sparks-Mermaid Sparkle (Amazon)
Prima Marketing Art Alchemy - Metallique Wax - White Gold (SSS)
PrimaMarketing Art Alchemy-Metallique Wax-Brushed Iron (Amazon)
PrimaMarketing Art Alchemy-Metallique Wax-Old Silver (Amazon)
Prima Marketing Art Alchemy-Metallique Wax-Vintage Gold (Amazon)
Liquitex Gesso - White (Amazon)
Prima Marketing Art Alchemy-Metallique Wax-Aged Brass (Amazon)
Studio 71 Black Gesso (JoAnn)Darice 1MM Black Leather Cord (Amazon)
Darice Necklace Kit 1MM Light Brown (Amazon)
Darice 1 inch Silver Fish Hook Earrings (Amazon)
Darice 1 inch Gold Fish Hook Earrings (Amazon)
Beadalon Stringing Wire 19-Strand .015-Inch (Amazon)
Bead Landing 9MM Silver Jump Rings (Michaels)
Bead Landing Assorted Gold Jump Rings (Michaels)
Premo Diamond Metal Cutters (Sculpey)
Premo Circle Metal Cutters (Sculpey)
Faber-Castell Glaze (Amazon)
Versamark Ink Pad (SSS)
Blue Moon Metal Bead Strands - Gold and Silver
Vintage Rose Garden background stamp from Quick Cards Made Easy
Stampendous Tiled Quad Cube stamp
Other:  misc. beads and jewelry findings from my stash


I hope you enjoyed my projects and learned some new ways to use Creative Paperclay® to make charms for your jewelry creations. Thank you so much for stopping by the blog today. Have a great, creative day! -Patti

Sunday, September 17, 2017

Making Spooky Spell Bottles with Creative Paperclay®


HELLO! Halloween is just around the corner so I thought what better to make than a Halloween craft? I love creepy crafts, don't you?

HalloweenHalloween

These spell bottles are so easy to make and you can decorate them any way you choose. Here is the list of supplies:

Empty bottles and jars

Acrylic paints
Golden Acrylic:

Sculpting tools
Paint brushes
water

Part 1

  1. First you cover the bottle with paper clay, taking care to push down firmly so no air is trapped. Let that dry. 
  2. When it is dry you add all the decorations such as the words and the eyeball, using some PVA glue of course.
  3. Put that aside to dry.


You can watch the video below to see how I did this.


Part 2


Now its time to paint!
  1. Apply a coat of gesso. This seals the clay so it doesn't absorb all the paint.
  2. Paint the bottles in whatever color you choose.
  3. Apply a wash of black paint and a wash of red paint.
  4. Wipe off.
  5. Keep going until you are satisfied. 
  6. Paint the eye on the Frog Eyes Bottle. I also added some brown stain and green paint to this one.
  7. When dry, varnish.
  8. Add any other embellishments you choose.


You can see how I painted my bottles in the video below.


I do hope you enjoyed this tutorial. Thanks for stopping by!

Suzette


Monday, September 11, 2017

Elephant Wonder Tag Featuring Creative Paperclay®

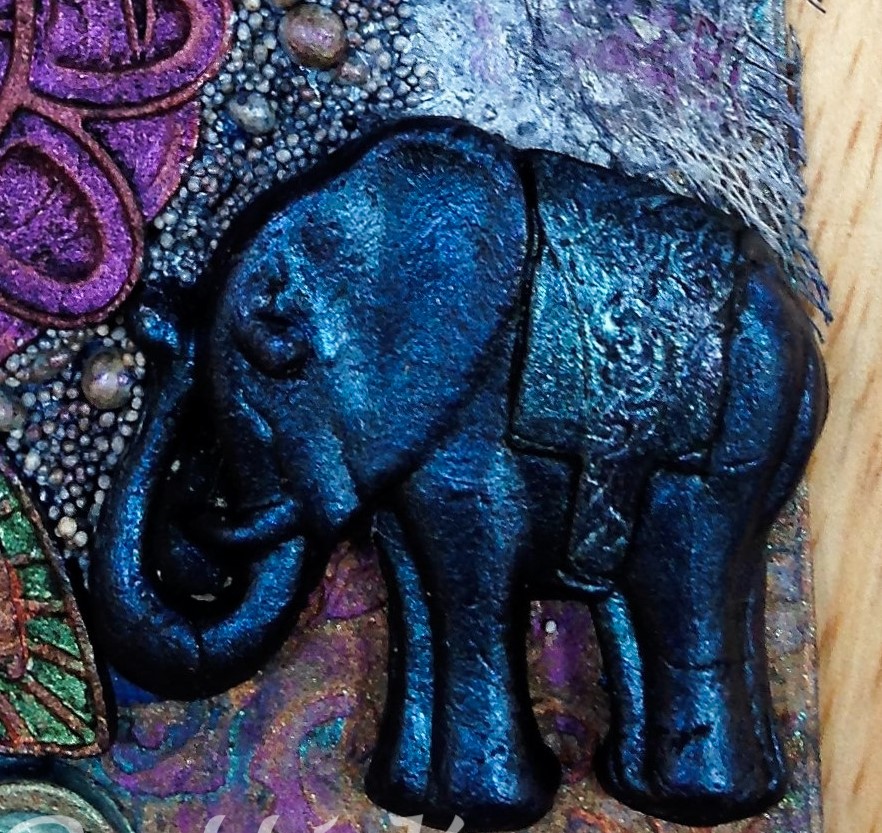
Hi Friends:  Did you know that you can make your own Creative Paperclay® molds from favorite objects that you have around the house?  It's really easy with a product called ImPRESSive Re-Usable Putty.  The Creative Paperclay® design team was given the opportunity to try using this reusable putty with our paperclay.  It was great!  I chose to create a mold of a favorite elephant pin that belonged to my mom.  I followed the directions on the package to prepare the putty, then pressed the elephant pin into the clay, let it harden using the package directions, then removed the pin.  I created this great elephant mold that I can use any time I want.  And, if I decide that I want to make a mold of something else, all I have to do is reuse the putty with another charm/item that I choose.

Once your mold is ready, you can use Creative Paperclay® to make a clay embellishment to use on your projects.  Here's a project that uses my elephant mold with other Wilton molds to make this fun tag:


Here are some detail photos of the cast elephant and flowers, along with the sentiments that I used:


Here's the original pin and the mold that I created:


Directions: Please see my video tutorial for full instructions for how I created the mold and the tag.  I do have to confess that, in the middle of filming the tag project, I spilled a large amount of ink on my craft table.  So the final background colors changed a bit during the filming. LOL.  But, I decided to make the best of the happy (?) accident and just go with the change in the colors.


Supply List:
Lindy's Stamp Gang Sprays (Amazon):  Brushed Nickel, Opal Sea Oats, Afternoon Delight Denim
Liquitex Matte Super Heavy Gel Medium (Amazon) Liquitex Professional Clear Gesso (Amazon)
Prima Marketing Art Alchemy-Antique Brilliance Amethyst Magic (Amazon)
Prima Marketing Art Alchemy-Antique Brilliance Lucky Emerald (Amazon)
Prima Marketing Art Alchemy-Antique Brilliance Mystic Turquoise (Amazon)
Prima Marketing Art Alchemy-Metallique Wax-Rich Copper (Amazon)
Prima Marketing Art Alchemy-Opal Magic Wax-Turquoise Satin (Amazon)
Ranger Adirondack Metallics Acrylic Paint Dabbers, Silver (Amazon)
Tim Holtz Small Talk Stickers (Amazon)
Studio 71 Black Gesso (JoAnn)
Wilton Doilies
Basic Grey Out of Print 6X6 paper pad
Other:  cheesecloth, fibers

I hope you enjoyed my project and learned how to use homemade molds in your projects. Thank you so much for stopping by the blog today. Have a great, creative day! -Patti


Monday, August 28, 2017

Beach Therapy Canvas Featuring Creative Paperclay

Hi Friends:  Do you love the beach?  Do you like reminders of the great times you've had there? I know I do!  Here's a tutorial for creating a Beach Therapy mixed media canvas project using seashells made with Creative Paperclay® and some Wilton molds.


I love using Creative Paperclay® with molds in my mixed media projects because it is so easy to make clay accents to use on projects.  Just add the clay to the mold, pop it in the freezer for a few minutes to help it set, remove from the mold and let it dry for a day or 2.  Once dry, I can easily add them to my projects, paint them to match my design ideas, and create lovely mixed media canvases, cards, or other altered art items.

I used some yummy Prima paints and waxes, and lots of pearls, beads, and glitter on this project. It was so much fun to create the canvas, and I love how I used the sand paste with my Creative Paperclay® letters to create the effect of letters in the sand.  Here are some detail photos of the canvas:

Please see my video tutorial for full instructions for this project:


Supply List:
Creative Paperclay® Modeling Material
Wilton Fondant and Gum Paste Silicone Mold, Sea Life (Amazon)
Wilton 2115-1561 Seashell Candy and Lollipop Mold (Amazon)
Wilton 417-7554 Alphabet & Numbers Fondant Cut-Outs Set (Amazon)
Prima Marketing Art Alchemy-Sparks-Ginger Magic (Amazon)
Prima Marketing Art Alchemy-Sparks-Magical Pond  (Amazon)
Prima Marketing Art Alchemy-Sparks-Butterfly Spells (Amazon)
Prima Marketing Art Alchemy-Sparks-Fairy Wings (Amazon)
Prima Marketing Art Alchemy-Sparks-Mermaid Sparkle (Amazon)
Ranger Paint Dabbers, Pearl Metallic (Amazon)
Deco Art Media Texture Sand Paste (Amazon)
Golden Fiber Paste (Amazon) Liquitex Matte Super Heavy Gel Medium (Amazon)
Liquitex Professional Gloss Heavy Gel Medium (Amazon)
Liquitex Gesso - White (Amazon)
Beacon 3-In-1 Advanced Craft Glue (Amazon)
Cousin Jewelry Basics Brown Seed Beads (Amazon)
Stampendous Glass Glitter (Amazon)
Heidi Swapp Marquee Love Distress Paint Kit-Rust (Amazon)
Darice Pearls - White - Assorted (Amazon)
EKTools Powder Tool (Amazon)
ArtMinds™ Wood Parenthesis Frame, 4" x 6 (Michaels)
A Touch of Glass Beads
Other:  8X10 canvas, glass gems and seed beads, grip shelf liner, cheese cloth

I hope you enjoyed my Beach Therapy canvas and learned a new way to use Creative Paperclay® on your mixed media projects. Thank you so much for stopping by the blog today.

Have a great, creative day! -Patti

Wednesday, August 16, 2017

Adding Dimension to a painting with Creative Paperclay®

I wanted to paint a face with raised areas so after sketching in the face with a pencil, I started adding in Creative Paperclay® to the features of the face.

SUPPLIES
Creative Paperclay®
Panel
Acrylic paint
Cookie cutter
Mark making tools


After the paper clay dried the next step was to block in the face with paint. Because my paintings are like doing a puzzle, I started placing objects for size and to see if they would add to the story.


I rolled out some clay on a sheet of plastic and used the cookie cutter to create the shape. Use different mark making tools and stamps, I added the design in the clay. Last, I took a wet paint brush to smooth out the edges. Normally, I use my fingers but because of the detail I used the brush.

This is how I work when I paint. A little here and a little there.

Dream in color!

Darlene Olivia McElroy

Monday, August 14, 2017

How to make Butter Slime with Delight™ Clay and Contact Solution

Hi Friends:  Did you know that you can make Butter Slime with Delight™ Modeling Compound and Contact Solution?  It's pretty easy to do, and it makes your Slime flexible while still allowing it to hold it's shape - and it spreads like butter!  I really thought that Slime was just for kids, but I had so much fun making this Butter Slime - it made me laugh and giggle just playing with it!

Butter Slime


Here are some photos showing how well it holds it's shape:

Butter Slime Shapes


Butter Slime Pretzel

Earlier this month, Creative Paperclay® DT member Suzette used a recipe with Borax.  Today, I'm going to use a recipe with contact solution - something many of us may already have on hand.  I tried a couple of different recipes - here's the one that worked best for me:

Recipe:  Mix together the following ingredients in the order shown
1/2 cup white glue
1/2 cup water
Coloring medium / food color
1/2 teaspoon baking soda
1-2 tablespoons Contact/Saline Solution - it must contain Boric Acid to work - add slowly until the Slime starts to pull away from the edges of the bowl

Remove from the bowl, then knead in:
1/4 cup Delight™ Modeling Compound

HAVE FUN PLAYING!!!

Directions: Please see my video tutorial for full details on making this Butter Slime:


Supply List:
Delight™ air dry modeling compound
white glue
water
Stampin' Up! Reinker - Brilliant Blue
baking soda
Contact/Saline Solution

I hope you enjoyed learning how to make Butter Slime with Delight™ and Contact Solution. Thank you so much for stopping by the blog today. Have a great, creative day! -Patti


Tuesday, August 8, 2017

Owl creative paperclay tutorial

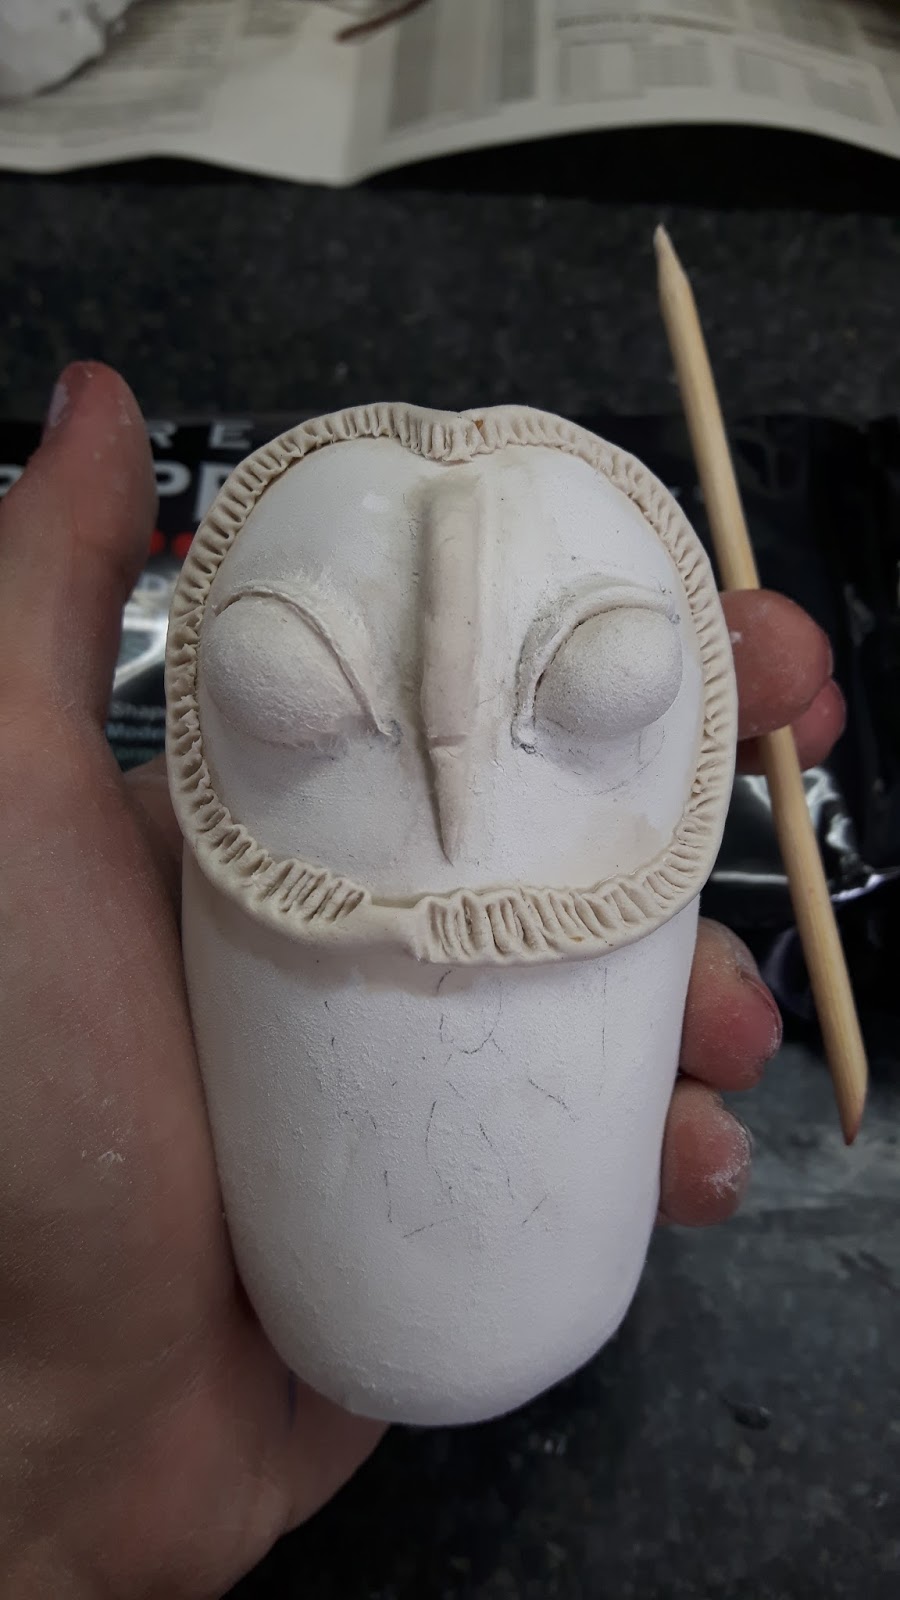
Hi! This time we are going to sculpting a beatiful owl with Creative paper clay.
¡Lets have fun!.
Materials needed :
-Creative Paperclay
-Alumine foil
-Acrilyc paints
-250 sand paper
-Masking tape
-Wire
1-Make a roll with alumin foil and cover it with a masking tape


2-Then cover it with the paperclay

3-Draw the next pattern:
4-Start with making tiny rolls and put them over the eyes.
5-Make some balls and put htem in the place.
6-Make ther nose with a roll
7-Put some big roll around the head.
8-Make the texture with a wood pencil
9-Put some rolls under the eyes.
10-Start to make the lace


11-Start making the Owl's feet with the wire in two sections like this:
12-Make this pattern for the wings

13-Now cover the Owl's feet with paper clay and  paste the wings to the body with some water

And now you can paint it like you want,here is mine!