Showing posts with label autumn. Show all posts

Friday, November 14, 2014

Kid's Project: Molded Acorns

Autumn decorations are getting a lot of attention in our house right now, so we decided to make some clay acorns to display.

I had these silicone molds from another project, but they were perfect for working with the clay. 
Silicone acorn molds
For this project, we used Delight™ air dry modeling compound because it releases from the silicone molds so easily.

We pressed a small ball of Delight™ into the molds, turned the mold over (open side down) and pressed the top of the mold to ensure the compound completely filled the mold. Then, we gently pulled away the excess from the edges of the molds.
Delight™ in the acorn mold
When the mold was flexed, the acorns popped right out. We set them aside to dry overnight. Here is a sample of our dried acorns, ready for trimming, sanding, and painting.
Acorns ready for trimming, sanding, and painting
I used scissors to trim the acorns, and jeweler's files to sand some of the cut edges. The Delight™ molded beautifully!! No sanding at all required on the surface of the acorns. Yeah!! I'm not a sanding fan. And it captured the details of the molds.
Trimmed and sanding acorns

I used acrylic paints on these acorns. While the paint was still wet I sprinkled some with mica dust. Here's a sample of our autumn acorn decorations.
Finished acorns made with Delight™
With the addition of some hardware, these would also make great refrigerator magnets or pins and pendents. 

Carole

Chloe

Table Cell Table Cell

Friday, October 24, 2014

Kid's Project: Gilded Leaf-shaped Bowls

The autumn weather is definitely here in Ohio!! This project takes advantage of all those beautiful leaves laying on the ground. Chloe and I gathered leaves on one of our walks. We looked for the largest leaves that we could find.

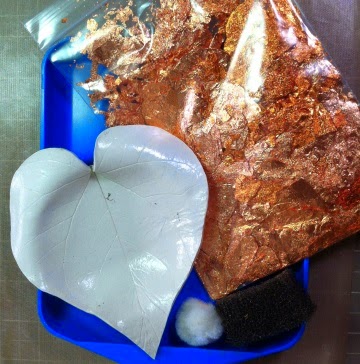
To begin the project, we rolled out a ball of Creative Paperclay® to a thickness of 1/8", and a little larger than the leaf we were using. Place the leaf vein-side down on the clay. With one motion, roll the rolling pin over the leaf, using plenty of pressure to capture the veining. I started at the base of the leaf and rolled all the way to the top without stopping.


Next, gently peel away the leaf. Use a craft knife or scissors to cut around the outer edge. To cut down on finishing sanding, at this point I smooth the edges by dipping a finger or artist brush in water and "painting" along the edges of the clay leaf.

I used bowls that I already had as molds and supports for the clay leaves. I made a donut ring out of plastic kitchen wrap to support the clay leaf while it dried.

Lay the clay leaf into the bowl, and gently form the well of the bowl. I let my leaf bowls dry longer than usual before turning them over. I didn't want to risk the bottoms collapsing by flipping them over too soon.

After the pieces were completely dry, I began the gilding process. The first step was to seal the clay surface with matte PPA. Next, was a coat of Duo adhesive. Duo goes on a milky white liquid, but when it dries clear, it provides a very tacky surface for the gilding. I followed the steps in this short video to gild each of the bowls.

Gilding is a very forgiving process. Here you can see that I missed applying the Duo adhesive to a spot. No problem—I just painted Duo over that area, let it dry, and gilded again. I gilded the top and bottom of the bowls in two step, because you want to avoid touching areas that are coated with Duo.

Hint: Since the Duo is milky white, it's hard to see just where it has been applied when you're gilding white surfaces—like Creative Paperclay®. I found a way to avoid missed spots in the future. Just add the tiniest spec of acrylic paint to the Duo. Now you have tinted Duo, and you can see were you've applied it. 

Here are the finished bowls. The smaller ones are about 5" long and 4 3/4" wide. The larger ones measure 7 1/4" long and 5 1/2" wide.


Carole

Chloe

Table Cell Table Cell

Wednesday, August 6, 2014

Ghost Pumpkin Patch Thinking ahead for Autumn Project by LuLu Lancaster


My Favorite pumpkins to use are not the traditional Jack-o-Lantern Orange giants. I love the white pumpkins or ghost pumpkins ;) They can come in many hues of white almost green or blue sometimes an ivory with a nit of yellow. They are all amazingly beautiful to me. 
This year I thought I would add to my collection and create a Ghost Pumpkin Patch for a shelf in the house. 

With a few items you can have a cute and bit spooky tiny Ghost Pumpkin Patch of your own.

Here is what you will need.

6 regular 2" styrofoam balls
1 package of Creative PaperClay®
small bowl of water.
acrylic paints in white, green, black and yellow 
gesso
2 small paint brushes
and clay wipe out tool and that is it ;)
This project will use the entire package of paper clay or you can create more or less pumpkins.


Simply cover your styrofoam balls. I do this one at a time so the clay will not dry out.


Using your wipe out tool create the lines/grooves on the pumpkin by just dragging the tool down the sides in sections

next create the top of where the stem will come out using your wipeout tool create swooshes.

Next create a stem


with a little water attach the stem and create the lines/grooves on the stem in the same way you created the lines on the pumpkin


Give your stem a little twirl

Now create a face. It can be any kind of face the simpler the better ;)
2 small balls for the eyes one for the nose and a long piece for the mouth.

smooth out the facial features with water and your finger.

using the wipeout tool create teeth by pulling down with the wipeout tool just like you did creating lines and grooves.


Repeat each step changing up the facial features and stems a little each time and soon you will have a whole patch of pumpkins.
Allow to dry thoroughly and apply gesso
allow gesso to dry 

start painting your pumpkins using the darker colors in the grooves and finishing with the lighter colors. Paint the eyes and teeth white.

using black paint and a small paintbrush create pupils you can even outline the eyes like I have done here ;)


Next set up your patch!!! Boo!


Thank you for Following along and Happy Early cannot wait for Fall!

LuLu


Monday, July 7, 2014

Animal Tassels July Project with LuLu Lancaster


Hello! This is LuLu with a cute animal project.
I love red foxes and thought adding some around my home would be an adorable whimsical touch. You can create these tassels with any sort of animal head you can think of. :)

For this project you will need 
Creative PaperClay®
assorted ribbons
wire 
craft glue
 1 small paint brush and acrylic paints

Start by sculpting a small head.
These are easy about the size of a pingpong ball. 
The features are in the paint so a rough head is fine :)
Make a ball and with wet fingers pull up ears and shape.
Pull out the nose and two points below for the "fur"

Take a small section of wire and create a loop.
insert the loop into the top of the clay.
Let dry :)


using orange acrylic paint cover the fox head ;)
create two eyes with dots of black and a crescent shape black nose.
with white paint create some fur at the nose ears and bottom "tufts of fur"


take lengths of assorted ribbons simply glue to the bottom of the fox head

Now you have an adorable little animal head tassel!

Thank you so much for reading along. I hope I have inspired you to create your own animal tassels just think of the mini zoo you can make <3

LuLu


Thursday, November 7, 2013

Acorn Elf Cloth Doll

Hi There I am LuLu ;) I am a new member of the Design Team. I would like to share with you how to make a simple cloth Art Doll using Creative Paperclay ®
With Halloween behind us and Christmas fast approaching I thought an Autumn Acorn Elf bridging the gap would be fun!


Supplies you will need
1.Creative Paperclay®

2. a face mold 
You can make an easy face mold using a pre sculpted face and 
http://amazingmoldputty.com

3. tools
scissors
xacto knife
dental tool
wire cutter
needle and thread
fine grit sand paper 
pencil


4. 18g galvanized wire

5. cotton muslin
6. cotton batting or polyfil
7. Tacky glue
8. assorted fabrics, trims, wool for hair and acrylic paints
9. acorn tops


First Let us Create the head, arms and legs.
Using a presculpted head Create a mold from Amazing Mold Putty.
Fill the mold with Creative Paperclay ® leaving some hanging off the sides. You will use this part to gently pull the face from the mold.


After approx. 10 minutes gently remove the head. The Creative Paperclay ® may have hardened a bit on the outside and that is fine.


Using your dental tool define the facial features adding nostrils and lip features.
Trim the remainder of Creative Paperclay ® from the edges of the face.


Cut lengths of wire to run from the top of the head to the base of the torso.


Placing wire at the back of the head place enough Creative Paperclay ® to form a nice rounded head.

Finish by adding the neck and pointy elf ears.


Sculpt arms and legs
You will only need the lower limbs.
After your pieces have dried use a fine grit sander and gently sand smooth.

Part 2 creating the cloth body.

Take your dried and sanded pieces and lay them on 2 squares of muslin fabric.

with a pencil draw a basic body shape without arms.


Cut out the 2 pieces of muslin. Sew 2 pieces together to create the body, you can either hand sew or machine sew the muslin pieces. Without turning inside out stuff very full with cotton batting or polyfil.


Insert head by putting wire down through the torso into the batting.

 Fold down the front and back fabric at the top by the neck.
using your tacky glue run a fine line around base of neck where fabric meets.

sew the fabric around the neck to secure.

Cut two  rectangles of muslin slighter longer than the arm length.


Using the tacky glue place the arm at the end of a rectangle and "roll" the sleeve around the arm.
sew the fabric around the arm to secure


Add tacky glue to the upper part of the legs and insert into the the leg portion of the body.
Sew the fabric around the leg to secure.


Now you will add the arms. Take the rectangle fold over the shoulders, sew at the shoulder repeat for other side.

Now you are ready to paint and dress!

Paint the faces :) basic acrylic paints work wonderful. Water them down a bit for a blushed look :)


Dress your new Elf with old trims and scraps of fabric 
Be sure to add the acorn top on her head with a bit of tacky glue.

Thank you so much for following along. 
I hope I have given you some inspiration to create your own Acorn Elf from Creative Paperclay ® Please visit me at my blog LuLusapplesauce and at my Facebook Page LuLusAppleDolls