Showing posts with label Delight. Show all posts

Thursday, September 7, 2017

How To Make Some Amazing Embellishments With Impressive Putty and Creative Paperclay Delight®

Hello, Friends and fans of Creative Paperclay®!! My name is Jenn and today I want to show you how you can combine this two wonderful and versatile products. I will be showing you how to make some amazing embellishments with Impressive Putty and Creative Paperclay Delight®!!
In the picture above you can see that I used the Impressive Putty and a wooden cutout to create a mold. You may ask. "why didn't she just use the wooden piece?" The answer is simple, I wanted something thinner and lighter. By creating a mold I was able to then use the mold and Delight® to make a much lighter, flexible and cuttable embellishment!
Now I can cut this into exactly what I want and use it on my project. This stuff is true to its name, Impressive for sure! I love it and I am sure you will too!


 Clay Products Used:

Others Products Needed:
Black gesso
acrylics


The next embellishment is a frame. I am a thrift store lover and recently found these beautiful vintage Victorian frames. Again, they are bulky and heavy and I really wanted a lighter more flexible frame for my project. In the next few pictures, you can see the process of creating the mold with Impressive Putty and then molding it using Delight®.
Push the putty with a medium pressure to ensure that it is evenly distributed. Trim outer and inner excess putty. Place the molded piece into your freezer for 15-20 minutes. You can leave it in longer if it does not feel like it will pull easily from metal.

One of the greatest things I have found using Impressive Putty is its ability to pick up such great details as shown here.
Just look at all the amazing, intricate details it picks up!

Roll out some Delight® air dry modeling compound and work it into a flat strip. Next, press it into the mold and allow it to sit for a few minutes.
Pull the modeling compound gently from the mold. Next, trim unwanted edges with small sharp scissors and allow your frame to dry. There are all those wonderful details again!


 Once your frame is dry apply a coat of black gesso to front and back. Let this dry.


Now you can use an array of gold tone acrylics and paints to decorate your frame and bring it to life!

I hope you have enjoyed my tutorial! For all of your Creative Paperclay® be sure to visit the website here.
For your Impressive Putty shop here. Available in 4 convenient sizes for all of your molding needs!
Delight® is also available at Michael's, Hobby Lobby, and Joann's.
Thanks So Much for viewing!!
Jenn


Monday, October 31, 2016

Happy Halloween!

Happy Halloween! I've made 2 more accessories to complete my costume. I used the lighter "Delight" clay. It was very easy to work with and dried in a fraction of the time. The basic instructions for creating the shells is the same as the belt I created on my October 10th post.   These instructions are also posted below. My apologies for the shadow, I couldn't get a true color shot without one.
*SEE the entire costume at the end of this post.


SUPPLIES:
"Delight" Modeling Clay by PaperClay
Mold N Pour, Color Mist: Stream - Ranger Ink
Glimmer Mist: Suede - Tattered Angels
Colorful Glossy Cardstock: Deep Sea - Murdock Country Creations
Blue Metallic braided thread-Kreinik
Other: Velcro, Clear Acrylic Spray Sealant, faux pearl beads, sea shells, beading wire, plastic tiara, mini brads or eyelets, needle.

INSTRUCTIONS:
1. Create various molds of real shells with Mold N Pour.
2. Cast multiple "Delight" molds of each shape, 2 starfish are needed, one for the head piece and one for the necklace. You will need 4 clam shells and 2 other shells.  Let air dry completely.


3. Using a wet brush and a bit of water, brush the shells with Stream Color Mist then spritz with Glimmer Mist.


 4. The starfish was colored by first spraying with the Glimmer Mist, then brushing Stream Color mist on the peaks only. Let dry or use a heating tool.

5.  Glue a starfish to the center of the tiara and flank with 2 clam shells.
6.  Glue a few plastic pearl beads in the empty spaces.
7. Use a needle and beading wire to string the remaining shells and starfish. Place 3 or more beads between each piece.
8. Poke the needle through the clay shells, add one bead and exit front to back.  You can add jewelry closures or just tie off the beading thread.

The finished costume!  A paper doll mermaid :o)


Happy Monday!
Make art every day :o)
Becky

Thursday, March 10, 2016

Play House Delight-fully

Delight is a great product to make doll house furniture with. If you have small children or grandchildren, this is a great way to spent a rainy or snowy day. All I used here was styrofoam for the bed structure and a spool for the table, some stamps for texture and Delight®. I like shabby chic white but you may prefer painting them to add color.

Have fun and dream in color.

Darlene Olivia McElroy

Friday, December 11, 2015

Snowball Ornament

Hello, Ann here from the Creative Paperclay® Design Team and the blog: Annmakes.  Today I have a fun altered project for you.  Here it is:


To make this glittery snowball tree ornament I actually rescued a broken tacky christmas decoration from last year.  By itself the gold plastic ball looks, well, blah.  It was part of a very nicely decorated gift wrapping, once upon a time.  Now, it was going into the bin or I was going to save it and transform it into a usable ornament for a Christmas Tree.


So, I started with this gold plastic ball.  I covered it with Delight™ and purposely left the bumps so it would look more like a real icy snowball.  The kind you make on a wet snowy day.  Yes, here in Canada we have names for the several varieties of snow we get.  LOL.


I also made a new hook by inserting half of a paperclip into the top part and secured that with a dab of glue.


Once the Delight was dry I covered the top part of the snowball with some shiny sealer that already has a golden glitter incorporated into it.


Once the sealer dried I glued on some acrylic snowflake table scatter, a piece of gold ric-rack and a bow.


Finally, I strung a piece of ribbon through the hook to hang the snowball from the tree's branch.

I hope that you are inspired to make some ornaments or other winter decorations of your own.

Supplies used:
Repurposed tacky gold ball/decoration (my own)
Paperclip (Staples)
Ric-Rac in gold (my stash)
Acrylic snowflakes (my stash)
Piece of white and gold cord (my stash)
Glitter Mod Podge (Plaid)
Glue (Tombow)
Delight™ (Creative Paperclay®)

Please stop by my blog at: http://annmakes.blogspot.com some time and check out my other projects.

Thank you for stopping by.  Happy Holidays.

Sunday, November 15, 2015

Fun Key Chain - By Lynda

I had a lot of fun last month creating the scene for Halloween with my husband, in fact I am hoping to make another one for Christmas!   but there isn't a lot of time left to get it all done, and they take a lot of time to create, let me tell you - even with 2 people doing them!  Today's project, is a bit easier to make, and won't take as much time to finish up!  


I really love easy projects...this one, is no different!  I recently got a new smart phone, being a klutz, I knew I would need a case for it!  I also needed a key chain for some of my keys and it had to match my phone case!  And since I change my phone case a lot, then I needed something that was cheap enough to make, and that I could customize for each of the cases I bought!!!


Supplies needed:
Delight product 
Flower (or alternative) mold
Floss or ribbon
Key chain ring
Acrylic paint 
Silent setter (or something to create a hole)

Directions:
Step one:  Using your mold - take a piece of the Delight product, and mold your piece.     


Step two:  Using your Silent Setter - create a hole while the piece is still wet, allow to dry completely.  Push the extra Delight product out of the chamber of the piece that created the hole!


Step three:      Place dry creation in microwave for 10 seconds ONLY!  The piece will start to raise just a bit, and will really look cool when you start to paint it! 
  
Step four:  Start to paint your piece, I used a black on the bottom, with a red on top - wiping some of the red off with water as I went.  I wanted a bit of black to show through, so I played a bit with the paint and water to achieve the look I got here!  Same with the other colors shown here - the darker color is on bottom, and the accent colors on top!


Step five:  Braid colors of bakers twine together to create the string to hold it all together.  Put it through the hole, and then through the key ring.  

This was another fun project, using the Delight product this time!  I love how each one turned out, and can't wait to make more!  I have another project using molded flowers up on my blog, so make sure you click the link and check out the fun cards I ended up making!  Click the link below!
Lynda Jeffs
Creative Paperclay Design Team 2015  
   

Thursday, October 22, 2015

Play with Techniques

I love to see how different surfaces take techniques and I hadn't played with Delight very much. So in the spirit of the season, I rolled out Delight and used my Halloween cookie cutters to make little skulls.

SUPPLIES

Skull cookie cutters
Delight
Paint
Glitter
Micro Beads
Objects
Curry powder


Left to right: Skull coated with polymer medium followed by a wash of Quinacridone Nickol Azo Gold when dry. My favorite. Clear glitter with typewriter keys, black with a metallic pearl rub, and burnt umber with curry powdered applied while wet. Now, I have to run to the fabric store. I think collars out of netting would be cool.

Part of being an artist is being a mad scientist.

Dream in Color and Take Time to Play — Darlene Olivia McElroy

Sunday, August 16, 2015

Cat Paw Print Wall Hanging


Last month I showed you a recycled box, with my cat's paw prints (each of them) - on the front of the box!  It is on my ledge in front of my sink in my kitchen, to hold all of their cat treats and things in, instead of all over my counter and house!  This sparked another fun idea - a wall hanging - with the same paw prints, only adding photos to this one!!  Great idea you can recreate for a fun gift, using a favorite pets picture and paw prints!   


As you can tell, our cats mean the world to us!  Our mamma cat Tygress, will be 15 on 9/5 - the boys will be 10 on the same day!  I wanted a way to keep their paw prints - without having to ink them to keep them!!!  This was the BEST thing I could do - and easy enough for me to do with the cats!  Ty won't be alive forever, I didn't want to loose her without having something of just hers!   


Supplies for this project:
Delight product for the ornaments
Brown cardstock
Cricut cartridge - Ashlyn's Alphabet
White ribbon
11 x 14 photo matt with space for 6 photos
Frame (optional)

Directions:
Step one:  Using the Delight product - roll out enough product to let your cat (or dog) walk on it, giving you the paw prints you need.  *Make a few extra - for use later on)  
Step two:  Using a circle of some sort - cut out the paw prints individually, as well as add a hole at the top for the ribbon to feed through.   Repeat step one and two for enough cats (or dogs) you have, labeling which pet it is on the back with a permanent marker after it has dried.  
Step three:  While the Delight product is drying - cut out the alphabet letters you need for your photos and projects, add them to your photo matt.  
Step four:  Cut 3 3.5 x 3.5" squares for 3 of the squares, set aside.  Cut 3 photos to the same size to place in the squares.  
Step five:  Take 1 of the photos, add it to the top using tape to keep it in place.  Put another photo at the bottom in the middle, and another at the top right - again, using tape to secure it.  Add the brown squares in the other squares, taping ONLY to the bottom. 
Step six:  Using a hole punch of some sort (I used a Silent Setter with the middle hole punch for my creation, it worked best), add a hole to the top middle square, bottom left and far right squares at 1.5" - all at the top of the squares. Feed through the ribbon before you tape the squares off.
Step seven:  After the Delight ornaments have dried, feed the ribbon through, tying a knot at the top.  Also add a small bow to the top where the hole is to conceal it!   

**Tip - if you do not have specific supplies, such as the die cut machine, feel free to substitute...stickers can also be used!    
  
This project was so much fun to make, and with my cat being as old as she is - a great way to add something of "hers" to something I will keep forever!   Thanks for letting me share this project with you today!  I hope you will make one of your own, and share it with me! 
Lynda Jeffs
Creative Paperclay Design Team


Tuesday, December 9, 2014

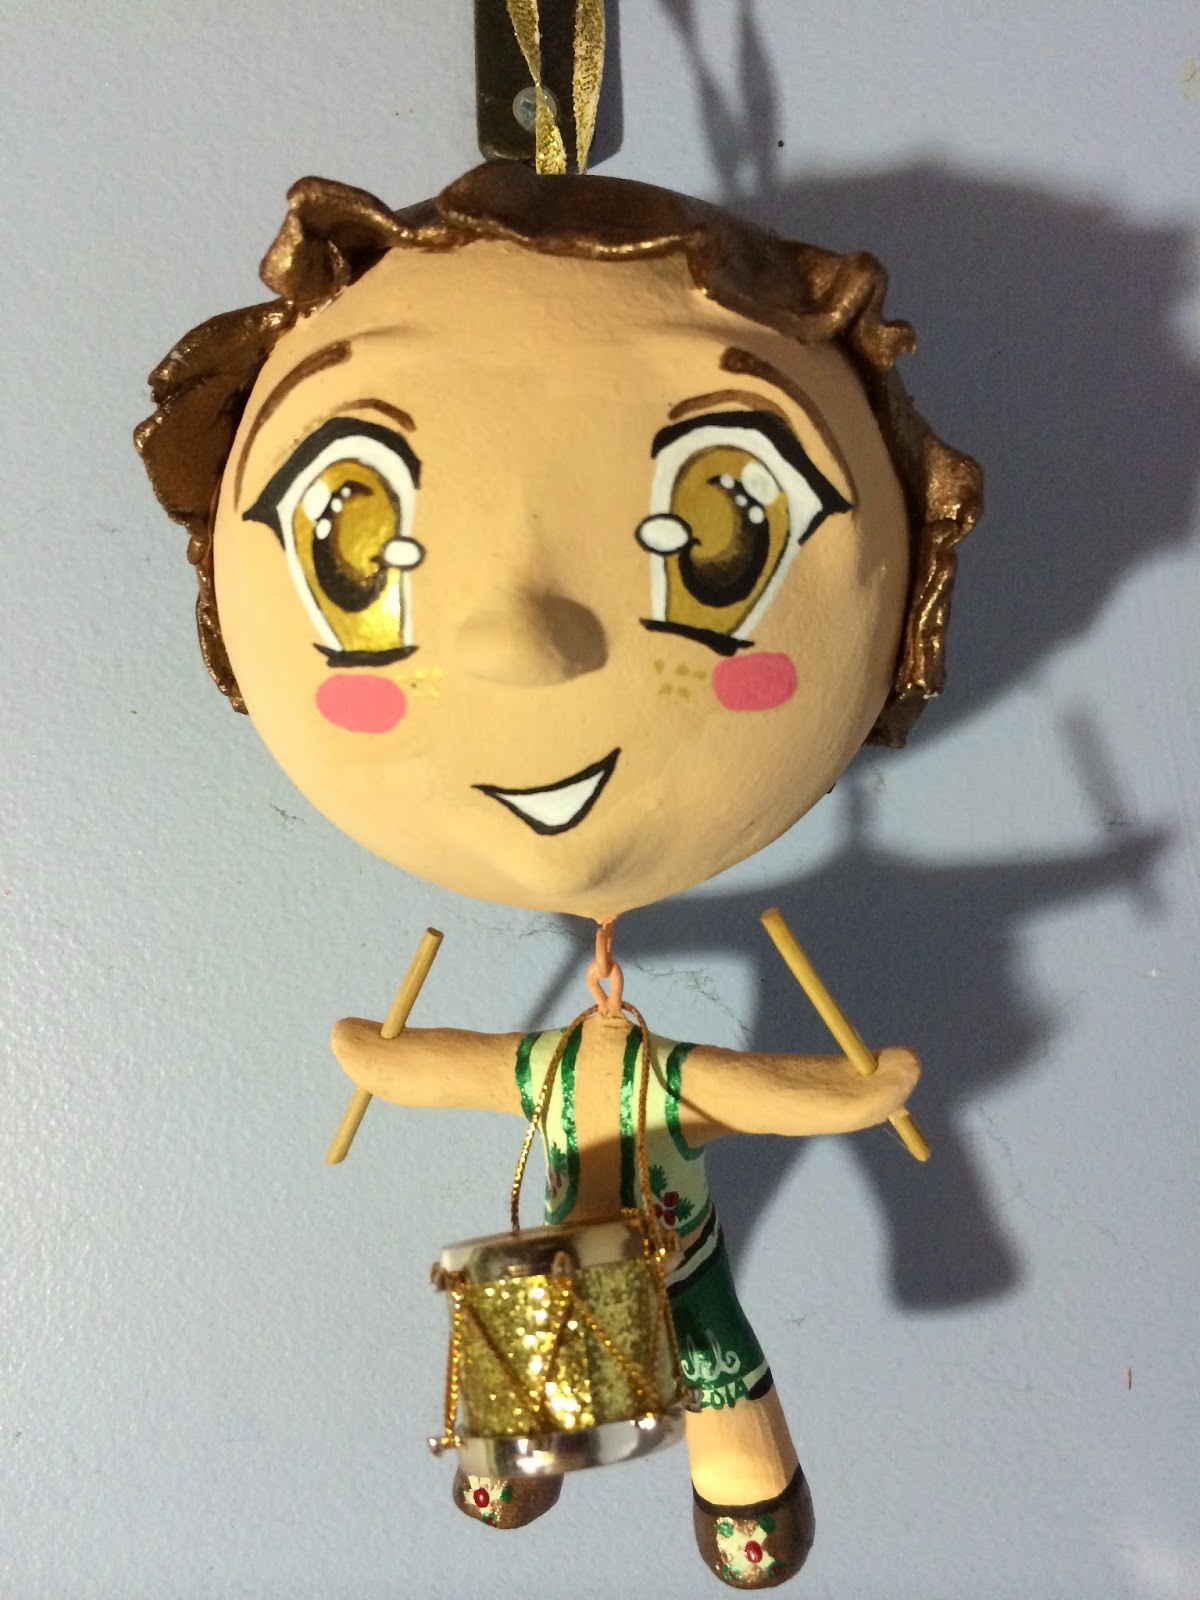
Sing A long Christmas Ornament The Little Drummer Boy by Gloriann Irizarry


1


Happy holidays to all and a bless new year to all my wonderful friends, followers and collectors.
This season is full of the family gathering, food, decorations and many Christmas Songs.
Thanks to these beautiful songs and to show the holiday spirit why not make an ornament. I have to say been part of crafting groups sure help to inspire you. These groups challenge you to create and make your gears turn. This is how this Sing A Long ornament took shape. With the help of my girls we choose The Little Drummer Boy we give him a Anime Manga better know has Chibi style and brought him to life in a cute ornament to hang from your Christmas tree or anywhere you want.


Materials
 
Delight™ Modeling Material
Foam round ornaments
Mini Drum Christmas Ornament
Wires
Multi use pliers
Aluminum foil
Acrylic paints
Brushes
Scissors
Water Mist bottle
Tacky Glue
 #2 Pencil


Cut a small piece of wire to create the small body armature.
Since is a chibi body it doesn't have to be big.
Chibi is a style of Anime/Manga drawing style used in characters to show smaller children as the actual meaning of the word is "short person" or "small child." have very small bodies with large heads.  


Is very important you pay attention to the neck piece a hop is required to hang the head from it.
Just bend the wire in half and shape a hoop with the pliers.
Now cut a strip of the aluminum foil and start wrapping around the armature.
 
 
Make sure your press the foil secure to the armature to shape the belly and back. 

 
Used your pliers cut a 3 inches long wire and curl it up like in the photo above.


Twist the wire inside the foam ball.
This will anchor the wire on your ornament head.
These ornament balls are seasonal items and I found these at Walmart fairly priced $.48 each
 
 
Now time to cover the ball with the Delight™ Modeling Material . Start by rolling a big ball flat to be able to cover the entire doll head.
I choose Delight™ Modeling Material due to be one of the most light weight clay I ever seen.
It help when your making a ornament because it is easy to use and once it dry has a foam like texture.

 
Once you have the sheet all rolled out like a pizza dough cover the ball and cut any excess out.
Smooth the edges with your finger and some water.
 
 
Do the same with the body.
Roll some clay out and cover all the body making sure all the foil and wires are cover in clay.


Shape all the body parts like the hands, belly and feet.
Chibi style doesn't required many detailed feet or hands so have fun


To make the hair just roll a smaller ball and once flat mist the head and attach the whole rolled clay on top and style to your like. You can also cut any excess out .

 
Move the the clay around roll it a little to give the hair the natural flow and it looks nice once it dry.
Set aside and let it dry.


Once the head is completely dry. Use your favorite acrylic paint in your chosen skin color.
Here the Peach Rose was applied.

 
Make sure your entire body is all painted with at least 2 coats of acrylic paint.
Water the paint down with water to minimized the brush strokes when the paint dry.
 
 
Now that the body base paint is dry you can start by painting the top vest and the little shoes.
Vest is light mint green and the shoes Renaissance Metallic brown 

 
Use the same Renaissance Metallic brown for the hair and apply 2 full coats.
Make sure you always wait for each coat to be completely dry before adding the other .

 
Do the same on the vest add to full coats of the light mint green.


Use Metallic Green for the pants and also use 2 full coats of paint.

 
Line up the vest with the Dark Metallic green.
Create some holly leaf detail on the vest and add dots to the shoes. 

 
To give the final touch to the vest use the Tuscan red and add the holly berries.
3 simple dots will be enough to achieve this look.
Here you can also add some belt detail. Also you can sign and year your ornament.

 
One more red dot of Yellow to create the buckle and a center dot of Tuscan red to make the shoe pop. .

 
For the drum sticks you can use toothpicks.
Stab thru the hand and cut to size.
Use a little dot of Tacky Glue or  Elmer's glue to secure the sticks in place.

 
Now to make the signature Chibi big eyes. Start by lightly sketching the eyes over the dolls head
 with a regular #2 pencil. Make sure the placement is were you want them to be. If the placement r not were you want them to be lines  can be easy removed with a school eraser.

 
Cover the whole iris with white. White is a base to make the top color pop and looks more vibrant.
Wait for them to dry.


Now add 2 coats of  the Teddy Bear FolkArt acrylic paint to create the iris.
Make sure is completely dry before each coat is apply.


Now to give the eyes some shine use Gold acrylic paint  to the final third coat.
For the Pupils use Renaissance Metallic brown to finish the eyes.
Paint 2 coats in a half moon shape. Make sure you wait for the pupils to dry between coats.


After the pupil had dry use the white acrylic paint to finish the eyes.
Water the white paint down to minimized the strokes out.
Paint 2 coats or more depending on the skin color of the doll you might need more. Now again make sure the paint is all dried before the other coat is added to achieve a nice bright eyes. 


Now use the Black acrylic paint to accent the eyes. Water the black out and with a small brush start outlining the eyelashes and pupils.

 
To finish the eyes add some whites to give them some shine.
Use the gold paint and add some freckles.
Use the black to out line the mouth and rose to blush the cheeks.
 
 
To finish the doll out use Black acrylic to outline the belt, pants and shoes.


Before your add the head to the body make sure to thread your cute mini drum ornament.
Use a pair of plier to twist and shape the head wire into a nice hoop and thread it to the body.
Secure it in place with the pliers. Paint it with acrylic paint to cover the wire and give it clean look.
 
Seal the ornament with any matter acrylic sealer to protect the paint over time.


 Now your Little Drummer Boy is ready to be display.
 
Are you ready for the holidays? Let just remember the true meaning of these holidays and make sure we spend time with all your loves ones. Don't be afraid to have fun and let them know how much your love them so they can have great memories to treasure.


Thank you kindly for join us for this Sing A long Christmas Ornament The Little Drummer Boy and if you have any questions feel free to leave us your comments below or email me here
 
 
scan or visit my blog at