Showing posts with label gold rub. Show all posts

Thursday, November 12, 2015

Winter Story


I am feeling cold with all the news stories about the upcoming winter so I took out on old canvas to put down a story of how I feel about winter. Brrr. I am such a summer girl that I cringe just thinking about cold weather.

SUPPLIES

Creative Paperclay® slurry
Waxpaper
Soft gel matte
Wax paper
Toner image
Colored pastel pencils
Gold rub


I start with pouring a paper clay slurry on my canvas then brayering it flat. I put a sheet of wax paper before brayering and leave it on until the slurry is totally dry.


I apply a layer of gel over the dry slurry and let it dry. Because I plan to do a dry gel transfer and will use moisture to remove the paper, it is important that I seal the surface. Next I apply gel to both the face of the image and the surface, lay the image face down and brayer flat. I let this dry overnight. I usually do this at night so I have something fun to do while the coffee is percolating.


I slightly sand the paper, then spritz with water and rub the paper off. The ink will stick to the dry slurry.
After it has dried, you may see some paper ghosting just spritz again and rub it off.


I then add paint, gold rub and some pastel and more soft gel matte to ghost the image more. I wanted that cold, ghosty of feel of a show storm. I finished by patching up a few areas of where the slurry got rubbed off with my enthusiasm.

Tell your story with imagery and paper clay.

Dream in Color and Play Hard.


—Darlene Olivia McElroy

Thursday, January 8, 2015

Add Depth to Your Painting

Starting the year with a narrative of freedom, taking flight and unlocking our personal cages in this piece, Set Me Free.  Affranchis (the letters on the bottom right) comes from the French meaning to liberate or free. The piece evolved from that concept.

Supplies
Collaged surface
Creative Paperclay®
Alphabet stamps
Cast lock
Lace
Red oxide & Burnt umber acrylic paint
Gold & Silver Rub


I started by taping off an area and laying Creative Paperclay® on to the surface. I then embossed it with lace and stamped with my alphabet stamps. I then removed the tape and the lace (which I glued back on later). 


When the first paper clay application dried I added more to make the shape and stamped with a liquid latex mold I had previously made. Then I cast a lock with the paper clay in a press mold from a previous project.

Sorry about the color changes. I took the photos at different times of day. The finished piece has accurate color.


Here is a detail of the cast vintage lock and the stamped paper clay that was painted red oxide then rubbed with both gold and silver rub.

May the new year give you wings to fly high and the key to open your heart to new experiences.

Darlene Olivia McElroy
darleneoliviamcelroy.com
darleneoliviamcelroy.comdarleneoliviamcelroy.com

Thursday, December 25, 2014

My Rusted Heart

I believe that giving someone a gift of your heart should reflect who you are. I am a rusty ole broad who has the eternal hope of spring and if you have the right key you can have my heart.

 I come from a fine art rather than a craft background so I approach art differently. I am shooting a video for a class with Artful Gathering later in the year on molds, casting and armatures so this is a sample of one of my project ideas.


SUPPLIES
Paper Maché Mold
Creative Paperclay®
Burnt Umber Acrylic Paint
Tumeric (yes, the spice)
Gold Rub
Lock
Twigs
Stamp

The start was this simple paper maché heart from a craft store.


I covered it with Creative Paperclay® and embossed it with some vintage wallpaper. Then I painted it burnt umber and sprinkled Tumeric on it while it was still wet for a faux rust look. I then added a little gold rub, a keyhole and some twigs from my yard.

What would your heart look like?

Darlene Olivia McElroy

Thursday, September 11, 2014

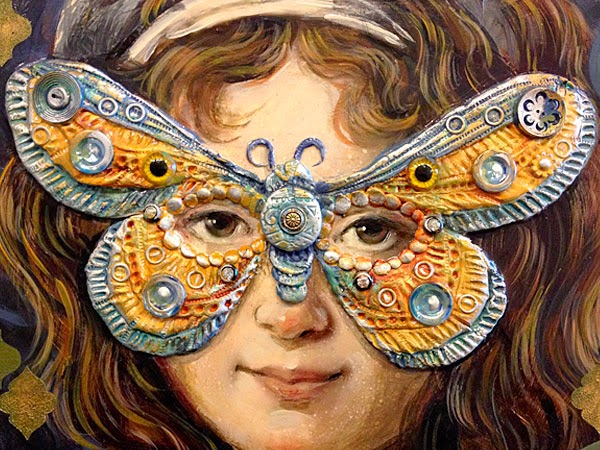
Creative Paperclay® Masquerade

I have been invited to show my art in an invitational show, Masquerade, and decided to add a Creative Paperclay® mask and cast butterflies to my painting. I marked on my art where I wanted the mask to go with a water soluble crayon. See the light white line on the left. Then I started adding the clay.

Creative Paperclay®
Paint or metallic rub
Silicone Mold
Small Round Objects
Supplies:
Silver & Gold Rub

BTW - The name of the piece is Fly Bye and is a 12" x 36" mixed media on panel.
I completed my design and added small round objects. I thought they might pop off but they are well stuck into the clay. Then I let the clay dry.

I tend to work in very thin layers so this is a comfortable way for me to add texture and dimension to a piece. Plus it is always fun to mold something from scratch.

Once it was dry, I painted the piece then added both gold and silver rub.

Hope this added more ideas to try on your art.

— Darlene Olivia McElroy


Thursday, August 14, 2014

Make a Fun Creative Paperclay® Bowl

The universe brings interesting ways to bring art into your life. I bought a huge bag of oranges the other day and figured I couldn't eat them all so I wrapped Creative Paperclay® around the top of the orange to make a small bowl. It is great to use for incense, to hold rings or ????

Supplies:
Creative Paperclay®
Paint or metallic rub
Doilie
Orange
Orange Creative Paperclay® is rolled out then laid on top of an orange. Pat down to mold shape.


Next stamp with a doilie to give it a pattern. Obviously you can use whatever pattern is your favorite.
 
Roll a coil of the clay to make a base for your bowl. Then let the clay dry thoroughly. Either cut the orange off (and eat it) or let it dry out and shrink.


I painted the inside gold to pick up the orange's dimpling. The outside was stained brown with a gold rub added.


Thanks and hope you can find a place for this in your art.
—Darlene Olivia McElroy

Thursday, July 10, 2014

Adding Rope Letters to Your Art


This quick and easy trick allows you to create letters of any size or numbers in your art with Creative Paperclay®. It adds dimension plus adds to your visual story.

Supplies:
Creative Paperclay®
Alphabet stamps, texture plates
Paint or gold rub
Embellishments

Roll the clay into ropes and make them into letters directly on your art. Sometimes I dampen my surface slightly for better adhesion. If you want to keep the rope look I would let them dry then glue onto your surface.
Press a texture plate into the clay. I used a texture plate with handwriting on it.
Now I let the clay dry before adding color.
I finished it off with a gold rub and embellishments.

Hope you enjoyed learning rope letters. You can't add enough ticks to your art arsenal.
— Darlene Olivia McElroy

Wednesday, June 25, 2014

Adding the Narrative to Your Art with Creative Paperclay®

As a narrative artist my work is about visual storytelling. I often add words to my art as a background or an accent. It may be handwriting, collaged words or dimensional words either store bought or made with Creative Paperclay®. Using it as a sweet spot in a painting, I find it is a great element for drawing the viewer into the art. These samples are details from three separate paintings I added it to.

Supplies:
Creative Paperclay®
Alphabet stamps, texture plates
Paint

So easy — the clay was applied to the art and stamped. When clay was dry, I added a burnt umber or red oxide acrylic paint then applied a gold rub when the paint had dried.

As always, thanks and dream in color! — Darlene Olivia McElroy