Showing posts with label image transfer. Show all posts

Saturday, September 30, 2023

Making Faces!


I love people and painting them. This is my first attempt at a dimensional character and it was enjoyable experimenting and adding the humor in creating this piece. And, what a great way to gift your friends with a crazy portrait of themselves.

SUPPLIES
Creative Paperclay®
Delight®
Acrylic paint
Chartpak colorless blender
Laser print
Scissors
Brayer

I started by laying Creative Paperclay® into my basic shape on a panel I had laying around the studio. I could have smoothed it out with a little water but I wanted it be remain clay-like. It was left to dry overnight.


Wet clay was added to the dry clay shape to give dimension to my character and texture was added to the bow tie and eye. When this was dry, I applied gesso to my character. This sealed the clay and prepared it for painting.


I always sit with a piece before I decide if it is finished or not. After painting it with acrylics, I felt it needed more elements to tell the story of this crazy guy.

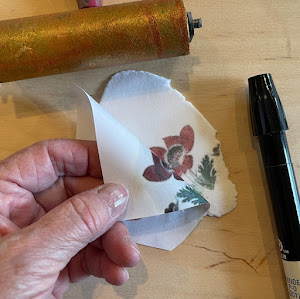
I brought out Delight® and rolled out a thin sheet. Next, came a laser print and a Chartpak colorless marker so that I could make an image transfer. The laser print was placed face down and the blender was applied to the back of the print several times. This was then cut into a shape and added to the painting. I have shown this to you previously but it is my latest favorite technique.

Here is the finished piece, Flowery Words. You never know what you will discover when you experiments with your art tools.

Dream in Color!

DarleneOliviaMcElroy.com

Saturday, February 23, 2019

Creative Paperclay® Tea Party

I like to push my art skills and what I can do with different techniques. And, of course, as a mixed media artist I have to glue something dimensional onto my pieces.

In this lesson I am going to create an abstracted still life with Creative Paperclay® and image transfers.

SUPPLIES

Creative Paperclay®
Toner image (lase/xerox) (reverse image)
Chartpak Admarker colorless blender
Acrylic paint
Button & rhinestones
Wood panel or canvas
Lace


I started with a light tan wash on my surface then added the Creative Paperclay® that I had cut into shapes and embedded a lace design into the tea pot and cups. I let the clay dry overnight.


Make sure your toner image is reversed because you will be flipping face down on your surface. Then rub the Chartpak colorless blender over it and burnish it immediately. Repeat. You will want to do small areas at a time and repeat the process several time until you get a good transfer.

Note: The transfer was done on unsealed clay.


Depending on the look you are going for, you can either leave the soft transfer look or paint on top of the transfer for a more finished look.

Using a Molotov pain pen, I added the white marks then collaged painted paper, rhinestones and an old civil war button to the piece.

Dream in Color!

Darlene Olivia McElroy

See more of my work on Instagram and DarleneOliviaMcElroy.com.


Thursday, November 12, 2015

Winter Story


I am feeling cold with all the news stories about the upcoming winter so I took out on old canvas to put down a story of how I feel about winter. Brrr. I am such a summer girl that I cringe just thinking about cold weather.

SUPPLIES

Creative Paperclay® slurry
Waxpaper
Soft gel matte
Wax paper
Toner image
Colored pastel pencils
Gold rub


I start with pouring a paper clay slurry on my canvas then brayering it flat. I put a sheet of wax paper before brayering and leave it on until the slurry is totally dry.


I apply a layer of gel over the dry slurry and let it dry. Because I plan to do a dry gel transfer and will use moisture to remove the paper, it is important that I seal the surface. Next I apply gel to both the face of the image and the surface, lay the image face down and brayer flat. I let this dry overnight. I usually do this at night so I have something fun to do while the coffee is percolating.


I slightly sand the paper, then spritz with water and rub the paper off. The ink will stick to the dry slurry.
After it has dried, you may see some paper ghosting just spritz again and rub it off.


I then add paint, gold rub and some pastel and more soft gel matte to ghost the image more. I wanted that cold, ghosty of feel of a show storm. I finished by patching up a few areas of where the slurry got rubbed off with my enthusiasm.

Tell your story with imagery and paper clay.

Dream in Color and Play Hard.


—Darlene Olivia McElroy

Thursday, October 8, 2015

Rosy Creative Paperclay® Bouquet

I love adding Creative Paperclay® and dimensional objects to my paintings to give them texture and depth. Creative Paperclay® was used three different ways. - stamped, embossed and image transfer applied circles.

SUPPLIES
Creative Paperclay®
Chartpak Admarker colorless blender
Toner images of roses
Bottle caps in different sizes


I used different size bottle caps to make the circle shapes on the Creative Paperclay® rolled onto my art panel. Once the shape was made, I trimmed off the excess Creative Paperclay®. I then let it dry before sanding.


Showing before and after the circles were made.


I taped an edge of the toner image of a rose and transfered it to the clay disk with the Chartpak Admarker colorless blender. I work in small areas with the blender, burnish it down and repeat until I have covered the complete disk. You can add color glazes and colored pencil after this is done.


Detail of finished roses. Of course, the art was sealed with an isolation coat of polymer medium before finishing it off with a MSA satin spray by Golden. Now it's off to my dealer in California.

Dream in Color and Take Time to Play

— Darlene Olivia McElroy

Thursday, August 27, 2015

Bling Your Creative Paperclay® Project

The two things I love most are Creative Paperclay® collage elements and metal leaf. I have been using these for years and the best trick is color usage underneath the metal leaf.

Traditionally, red oxide paint is used under the gold colored metal leaf and a celedon green is used under the silver leaf. Copper looks great over a burnt umber but really pops when laid over a turquoise blue. The reason you pay attention to the underlying color is because it will show through if your coverage is not solid. These colors make the metal leaf look richer.

SUPPLIES
Creative Paperclay® collage elements
Metal leaf (use your favorite color)
Water based adhesive size
A painting to work one
Soft gel or Modge Podge for glue
Golden's MSA varnish

Start with making your Creative Paperclay® collage elements. Fondant molds were used here to great my garden elements.
Since I am going to apply gold colored metal leaf, I painted the collage elements with a red oxide paint.


Next, I applied the water based adhesive size. This is a glue made for metal leaf. It goes on white and when it turns clear and it tacky to the touch, it is ready to apply the leaf.

Note: My students always ask if they could just use glue or Modge Podge and the answer is no. Neither of them get tacky. You can use spray adhesive as an alternative but in this case it would be more awkward to use.


When the adhesive size is clear and tacky, you can apply the metal leaf. Here I am using Simple Leaf which is a paper backed metal leaf and easier to use. I lay it over the object and rub it down onto the object. Repeat the process if you do not like the underlying color to show.


Apply a little soft gel or Modge Podge to the back of the element and glue down to your art. All metal leaf will tarnish except for the silver. I spray Golden's MSA varnish to prevent the tarnishing and to seal the surface.


Not only do the metal leafed collage elements add bling, they also add texture.

Dream in Color and Play all Day!

Darlene Olivia McElroy