Monday, February 28, 2022


Earring Holder


Let’s make a fun DIY earring holder today.


All you need is:

Creative Paperclay 

Acrylic paint 

Knife

Rolling pin

Stamp or something to make a design 

Skewer or needle to make the holes


Take about 1/3 of a package of Creative Paperclay (More if you want to make a larger earring holder) and using your rolling pin flatten out the clay.  


Once the clay is flattened as thick as you would like (Don;t make it too thick or your earring won’t stay on it) cut out the shape of the holder.  For mine I just cut off the ugly edges but followed the rolled shape of the clay.  You could try cutting it rounded or leaf shaped.  Get creative!  Make sure to cut out a squarish base that is atleast 3” wide, the size will depend on how tall your top section is since this is what the holder will stand up on.


Now imprint the pattern.  You could use a stamp, like I did, a piece of lace, or maybe freehand draw a design onto it.


Next use a skewer, needle or even a pencil to create holes for the earrings.  You can group them in pairs or scatter them about like I did.


Using a box place the holder on the box with the bottom hanging over the edge to get the bend in the holder.


Keep an eye on it and once its about halfway hardened, but still pliable at the bend, remove it from the box and bend it a little deeper so that the top leans back away from you a little more.  Let it dry the rest of the way by sitting it on its base.  You may need to prop something against the from at first to keep it from slouching.


Let it finish drying.  It should take a day or two depending on your home.


Now grab your paint and paint it!  For mine I did an ombre look.  Start with your preferred color.  Then add a little white to lighten it slightly and paint a section.  Then add more white and paint another section.  Repeat until you reach the top.


Once the paint is dry it is time to add the earrings!  


I would love to see what designs you come up with!  Comment your photos below.


Cheers until next time!

Kelly Martin

Paper Hibiscus

www.Instagram.com/PaperHibiscus

www.PaperHibiscus.etsy.com

Thursday, February 24, 2022

How to Create a Bas Relief Sculpture: Revisited


Hello everyone, Cinnamon here and I am going to show you how I created this relief sculpture portrait.


I've done this tutorial sometime last year for the piece on the left, but I wanted to revisit this project to push the details a bit further. It's always a good idea to be critical of your work and see where you can make improvements as an artist. 

Supplies:

  • Creative Paperclay®
  • Small hand roller or something to flatten out clay
  • Exacto knife 
  • Sand paper
  • Wire bristle brush
  • Saran wrap
  • plastic knife


I chose to create my own silhouette from an image I found online in a computer illustrating program, you can make a sketch by hand if you want instead. This is a portrait from the project when I first did I last year. I chose to add some flowers to the neckline.


I took the silhouette and printed it out to the size that I wanted the portrait to be. Again, you can just do this by hand and not get on the computer to do this step if you choose. I put some saran wrap over the print so that the clay doesn't stick to the paper. This allows me to move my piece around and be able to check the progress without damaging the paper guide underneath.


I began to take my clay and started working on the shape over the portrait guide. You can use a plastic knife or anything that allows you to sculpt little details while the clay is still pliable. It's important to get your basic shape down at this point so that you don't have to do as much sanding and cutting into the clay later.


Keep building up the piece and focus on getting the profile to the point where you would like it to be.  


I used this ball point tool to add some texture to the hair by slightly pressing it into the clay


I knew that I wanted the piece to have a headband and a lot more details then the last one, so I kept building the pieces up as I went long and making adjustments as I go. 


Here I am experimenting with adding flowers to the base of the sculpt and I started experimenting with earrings to add to the piece. I also filled in some of the face like in the cheek area and around the forehead.


I was not happy with the hair at this point, I used this wire bristle brush to add some texture for a new hairstyle. 


I changed the hairstyle into dreadlocks to challenge myself since I've never sculpted them before. I used the wire brush here to give the type of texture that looked like real hair to me for the dreads. I set the piece aside to allow it to dry. I changed the earrings as well.


After the piece dried, I used a 1600 grit piece of sandpaper to get the piece to have a high gloss sheen to it. This is how she turned out.

Thank you all once again for stopping by, and I hope that you enjoyed 
today's tutorial! You can find Creative Paperclay® at the following 

See more of my work at Melandolly.com, catch updates on 
my Instagram page and here is a link to my shop!


.  


Monday, February 7, 2022

A Mixed Media Canvas using Delight Clay™

 Hello!

Welcome to another tutorial. Today I will show you how to make a mixed media canvas using Delight Clay™. 


Delight Clay™ is so light that it is perfect for embellishments. In the video tutorial below, I will show you how I made the embellishments for a mixed media canvas. I will also demonstrate how I put this canvas together. 

The supplies I used are:

Delight Clay ™

Dylusions Ink - or any you have on hand. I used Poster Red. 

Gesso - I used Liquitex Basics

Pencil

Acrylics Paints - I used Golden Acrylics Fluorescent Green and Pink

Black acrylic paint

Credit glue

Washi tape

Gold marker

Metallic spray ink - I used Art Anthology Gilded Gold 


Follow along in the video below:


Thank you for stopping by. You can share your creations with us on our Facebook page. We would love to see them! For more inspiration have a look around the blog. There are tutorials for many levels using Creative Paperclay® and Delight Clay™. You can also visit my blog Paper Mache Patch.


You can find Creative Paperclay® online at Creative Paperclay Co and also at Michaels, Hobby Lobby, Dickblick and Amazon. 


Thanks for stopping by!


Suzette


Blog/website: https://www.papermachepatch.com

Instagram: https://www.instagram.com/papermachepatch/

Pinterest: https://www.pinterest.com/suzettehussey/

YouTube: https://www.youtube.com/c/PaperMachePatch

Skillshare: https://skl.sh/2QyIn93


Friday, January 28, 2022

How to Create a Peg Couple


Hello everyone! My name is Cinnamon Willis and I am going to show you how I created these two Peg figures!


Supplies:

Creative Paperclay®
Pencil
Plastic knife or flat clay tool
Acrylic paint
Sanding paper
Masking tape or artist tape
Protective varnish or clear coat covering


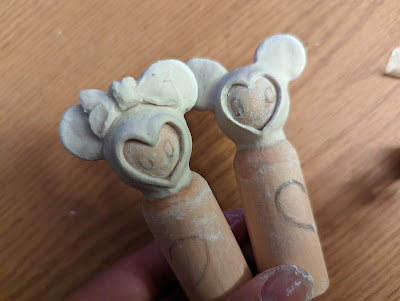
Start by planning out how you want your pieces to look. Get a pencil and draw on the peg to plot where you will add clay. Don't worry about making mistakes at this stage, you can cover them up later with paint or clay.


I knew that I wanted to put some kind of embellishment on the head. Take a dab of water and rub it on the part of the peg that you would like to add clay to. This will help it stick to that part.


I wanted to add ears to these pieces to make them look like everyone's favorite mouse couple. I shaped pieces of clay into disks and pushed them down into the head. After pushing the ears onto the head, I took a flat tool and went all around the base of the ear to secure the ears in place. The ear will lose it's shape at this stage, go back and rework the ear while it is still in the pliable stage.


I did the same ear shaping process with the girl version and added a bow to her head. Set the pieces aside and allow them to dry for around 24 hours or more. The drying time will vary depending on the moisture in the air.


When the pieces are dry, get your sanding paper and smooth out the lumps on your pieces to the texture that you would like.


Begin painting your pieces how you would like.


I used masking tape to get straight lines on this piece. Tape off the part that you don't want to have paint on and paint the other side. Carefully pull back the tape after it dries.


I wanted to add polka dots to the other piece. I free styled the dots on this piece but I am sure that you can find or make a stencil to get perfect dots!


And here they are. I decided to keep them faceless and I used gold acrylic paint. Don't forget to seal your work with protective varnish! 


Thank you all once again for stopping by, and I hope that you enjoyed today's tutorial! You can find Creative Paperclay® at the following retailers Creative Paperclay® Online Store, Michael's, Amazon, Joann's.


See more of my work at Melandolly.com, catch updates on 

my Instagram page and here is a link to my shop!


Sunday, January 23, 2022


Potted Hearts and Ornaments


Valentine’s Day is quickly approaching and if you are looking or an easy and fun way to decorate check these out.  Have the kids help too!


All you need is:

Creative Paperclay 

Acrylic paint - I used red and pink

Knife

Rolling pin

Small pot

Foam 

Moss 

Skewer

Stencil, lace or something to make the pattern 


Take about 1/3 of a package of Creative Paperclay (More if you want to make a lot of hearts) and using your rolling pin flatten out the clay.  


Once the clay is flattened as thick as you would like your ornaments to be gently roll over your lace or stencil so the pattern becomes part of your heart.  Next,  draw a heart on scrap paper and then cut it out for a pattern (HINT: choose a side you like best of your heart and fold it in half before cutting it out so that both sides are the same).


Now using your heart pattern, use a knife to cut out hearts.  Have the whole heart covered in a pattern or only a portion of it.  Push a skewer into the bottom of your heart if you want to pot it up and then set it aside to dry.  Alternatively, use a skewer to create a hole near the top of the heart to create an ornament.


Let them dry out for a day or two!  Hint: Flip them over and use a book or two to help keep them flat as they dry.


Now grab your paint and paint them!  For mine once they were painted and still wet I used  a paper towel to remove most of the paint on the patterned sections to highlight them.

Once the paint is dry it is time to pot them up!  

Cut the foam so it fits into the pot and glue it in (I used hot glue).  Next poke the skewer with the heart on it into the foam (Add some glue to keep it in place).  Then put moss on top to hide the foam and complete the pot.


For ornaments just add yarn or string to hang them and you’re done!


I would love to see all your hearts!  Comment your photos below.


Cheers until next time!

Kelly Martin

Paper Hibiscus

www.Instagram.com/PaperHibiscus

www.PaperHibiscus.etsy.com

Monday, January 3, 2022

How to Make an Incense Holder with Creative Paperclay®

 Hello and happy new year! I hope you had a wonderful holiday season. To start off the new year, I have a fun tutorial using Creative Paperclay - an incense holder. How exciting is that?


Isn't it beautiful? It is very simple to make and I have a video tutorial showing you how!

Here is a supply list for you:

Creative Paperclay

Diluted white glue

Rolling pin

Craft Knife 

Bowl


Gesso

Fine-grit sandpaper


Plaid paint  - Flag Red, White, and Bright Yellow

Golden Glazing Medium 

Gloss Varnish


Follow along in the video below:


Thank you for stopping by. You can share your creations with us on our Facebook page. We would love to see them! For more inspiration have a look around the blog. There are tutorials for many levels using Creative Paperclay®. You can also visit my blog Paper Mache Patch.

You can find Creative Paperclay® online at Creative Paperclay Co and also at Michaels, Hobby Lobby, Dickblick and Amazon. 


Thanks for stopping by!


Suzette


Blog/website: https://www.papermachepatch.com

Instagram: https://www.instagram.com/papermachepatch/

Pinterest: https://www.pinterest.com/suzettehussey/

YouTube: https://www.youtube.com/c/PaperMachePatch

Skillshare: https://skl.sh/2QyIn93

Tuesday, December 28, 2021


Clay Tree Luminaries

These are perfect for Christmas and also wintertime decorating.  Place a tea light candle underneath for some gorgeous mood lighting on the upcoming frosty nights.  I recommend battery operated lights.


All you need is:

Creative Paperclay or Delight

Acrylic paint - green (Or whatever color you want your trees to be!)

Knife

Rolling pin

String

Pencil sheet of paper

Drinking straw or other circular hole cutter


Wrap the string around the pencil and hold it tightly then hold the other end of the string in you other hand at one corner of the paper.  Draw a half circle on the paper to create a tree template (The longer the string the larger the tree).

Take about 1/2 of a package of Delight and using your rolling pin (You can substitute a drinking glass if you don’t have a craft rolling pin) flatten out the clay.  


Once the clay is flattened as thick as you would like your tree to be use your tree template and knife to cut it out.  (note if you use Delight it does seem to really like sticking to paper so don’t press down hard on your template when cutting it out or else you will get clay stuck on your paper).  


After cutting the tree out use a straw or other cutter to cut out holes in the tree for the light to shine through.  I created more holes lower and less higher.  Be careful how close to the sides you put holes since you will need to blend the sides to create the final 3D freestanding tree shape.

Now lets make our molds into cones by rolling and taping them (and putting wax or other nonstick paper on them if you are using Delight).  Next using the cones as a base create a cone with the clay and press down to seal the trees in their 3D shape.  Now is also a great time to make any needed adjustments so that the trees will sit flat on their bases.


Let them dry out for a day or two!  


Now grab your paint and paint them!  Don’t forget to get in the holes so you don’t see the white shining through.


Once the paint is dry it is time to try lighting them up and enjoying the magic!


I would love to see all your trees!  Comment your photos below.


Cheers until next time!

Kelly Martin

www.Instagram.com/PaperHibiscus

www.PaperHibiscus.etsy.com