Showing posts with label scissors. Show all posts

Saturday, June 24, 2023

Stranger Things with Delight® and Creative Paperclay®

Stranger Things artI have created a Stranger Things series (https://www.darleneoliviamcelroy.com/stranger-things) where I reach into my inner child and come up with strange creatures and happy little monsters. There is a simplicity to them but things don't have to be complex to have beauty to them. The art piece will use both Delight® and Creative Paperclay® but in a simple manner that is fun and creative. Plus I will also show you how to fix a ornate vintage frame.

SUPPLY LIST
Creative Paperclay® & Delight®
Mark Making Tools
Modern Masters 2 part Rusting Kit
Glue
Found Objects
Scissors
Brayer
Amazing Molding Putty
Acrylic Paint

Delight®
I love the fact that you can roll out Delight® into a thick paper and then cut it with scissors or an exacto knife. I already have ideas for some future projects using the Delight® paper (as I call it). 


Found objects and cut/textured Delight®


When working on my Stranger Things series, I start blocking in my design with objects I would like to use. I cut out my Delight® paper with both regular scissors and pinking shears prior to giving it texture with my tracing wheel. The left shape at the bottom is a paint skin that I made. 

The Delight® shape I made in the last step is now painted with a base color that will eventually be rusted. I made a circle of Creative Paperclay® that I added an eye to and which I will glue down when the clay dries. Texture was added with a rubber shaper. The found metal object will be rusted and embellished. This is the first in my Stranger Things series where I have added these two air drying clays and I am really enjoying it.
All Dressed Up
I finished my cute little monster with painting, rusting, adding found elements and hair made with Delight®. The rusting was done using the Modern Masters 2 part Rusting Kit. 


An ornate frame plays off the contemporary minimalist art but it is hard to find one that is in mint condition however they are fixable with Creative Paperclay®.
two part Amazing Molding Putty
I used two part Amazing Molding Putty to make a mold of part of the frame that was in good condition. Once both parts of the putty are blended together, I laid it on the frame. It sets up in approximately 15 minutes.


Creative Paperclay® was applied to the frame in the areas that needed to be fixed then I laid the silicone mold matching it up to the good areas of the frame. When I am happy with how it looks and it is thoroughly dry, I coat it with polymer gloss medium to seal it and then decide whether to spray gold or black.

Dream in Color!

Darlene Olivia McElroy
NARRATIVE MIXED MEDIA ARTIST
www.darleneoliviamcelroy.com


Friday, February 9, 2018

Creative Paperclay® slurry + Scissors = WOW

Want to cut Creative Paperclay® slurry with scissors? Sounds weird but always great to know all kinds of little tricks to expand that ever growing art arsenal.

SUPPLIES

Creative Paperclay® slurry
Wax paper
Soft gel or Modge Podge

Start by thoroughly mixing Creative Paperclay® slurry and soft gel together. I add approximately 40%-50% soft gel to the clay slurry.


My work table is cover with a plastic tarp. I spread the mixture on the plastic and cover with wax paper before rolling it out with a rolling pin. Because no air is getting to it because of the wax paper and plastic it will take 1-2 days to dry depending on humidity and thickness. I live in the desert so things dry faster than other places.


 When it has dried, it can be peeled off the plastic and cut with scissors. Great way to cut shapes for mobiles, gift tags, collage elements for art, etc. A small idea with endless possibilities.

Dream in Color!

Darlene Olivia McElroy


Wednesday, April 4, 2012

Making a ring and a Cameo

Hello all.
Wow, would you believe it?
This is the last post in this six month DT position I will post..... Good luck to all those that are applying.

Ring Tutorial:

The wire is from an old wire bracelet that snapped at the join.
Here is how to make a ring using Creative Paperclay® and Terri Sproul Mixers.


And the ring is finished.


Cameo Tutorial:

I have also been playing around with Cameo's. They tend to be making a come back....

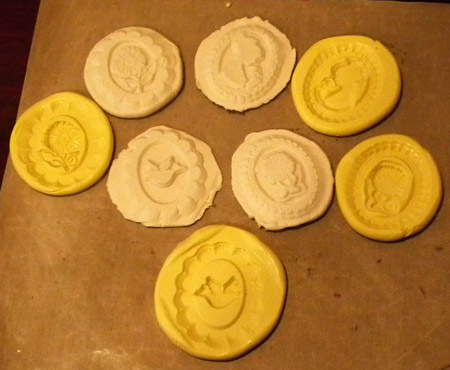
 First get some Amaizing Mold Putty and mold some Cameos with stamps.
Next put your Creative Paperclay® into the molds then carefully take them apart and wait for the clay to dry.


 Trim off the edges of the cameo
 Optional step:
if you are not confident enough to keep the white bits white then use a masking fluid.
 Paint on black ink to background (or Terri Sproul Mixers)
 Take off the Masking fluid if you used it.
Use a versamark pen to go around the frame of your Cameo and apply Gold embossing powder, heat to finish it off.


or alternatively paint on Gold Terri Sproul Mixers.


See you can actually do the background in any colour. And you can use these embellishments for cards, Scrapbooking or off the page project.

Well all the best to you, our awesome readers - please leave a comment.
Maybe this is farewell...... who knows?
I do know that I am re-applying, but be best assured that there will be more  Creative Paperclay® projects on my blog either I make it or not. Love this stuff to much to stop using it. Its been a pure pleasure being on this team. And I thank all my wonderful, friendly team members. So glad we could work together. Its been a pleasure.


Happy Crafting all
Debbie Buckland Signing off.... for now.
artycrafty.wordpress.com