Showing posts with label 3D flowers. Show all posts

Sunday, January 1, 2017

Altered Can Tealight Holder (Or Anything Holder)


I love candles - I always have, life "prior to husband" that is!  He is completely the opposite I am, and hates having anything with flame near me (I'm not sure if he thinks I will burn my house down or hurt myself.....)!!!  I decided I wanted to use the tealights we bought for something else - and light a candle when I simply want to relax, and alter a tuna can I did!!!  Now, if you look back a couple of posts down, you will see another AMAZING tealight holder project!!!  Totally different idea's, but absolutely can be created together, in fact - I am going to be using this for inspiration for sure!  
This is the kind of project that is easy enough to use with any cans that are small like this, such as tuna or cat food cans!!!  It is also easy enough to customize it to the person receiving it - this one was for me!!!!  For this project, make sure you look in your stash for supplies you can use, before you go out and purchase them:

Supplies needed:

  • Can of your choice
  • Creative Paperclay product 
  • Paint of your choice
  • Sand paper
  • Embellishments for the outside of the can
  • Hot glue gun
  • Water
Directions:
Step one:  Take the can you are using, and make sure to wash it thoroughly.  If it takes a couple of times to wash it so there is no smell, do so!  

Step two:  Flatten out the Creative Paperclay product very thin - you want to wrap the to the inside of the can.

Step three:  Before you let it dry - take the water and your index finger, and smooth out the Creative Paperclay product as best you can!

Step four:  After fully dried, sand the product once at least, maybe twice if you see it needs it!  Paint it after you are done and you have wiped off the item!  Paint at least 2 coats, letting it dry enough between coats!

Step five:  After the holder has completely dried, start to create the outside edges!  I started with leftover beads and things I had from other projects - and started to add the wire - a few beads....and then a flower between each of the sets of beads.  I went around the item twice, hot gluing the wire and the flowers as you go! 


I have a few more of these in my head - ready for more tealights and things I simply need to keep!!!!  I always like doing one thing, because it makes the next thing I do go much smoother because I have learned the little things NOT to do!  Easy project, grab some fun tealight candles for your favorite friend - and an easy gift is made!  I hope you enjoy this one as much as I have enjoyed making it!  
Lynda Jeffs
Creative Paperclay Design Team 2016


Friday, June 6, 2014

First Friday Fan Day with Rachel Whetzel

WELCOME!!
It's time for First Friday Fan Day on the Creative PaperClay® blog! Rachel Whetzel here, and I have been browsing the web today, looking for things that YOU have shared on line using Creative PaperClay®
I hope you hop over to the links I'm sharing with you today, and let your fellow Creative PaperClay® lovers know you saw what they shared too!
FACEBOOK
On Facebook this month,
Rogene Manas shared THIS flower project! 
David Everett shared HIS CLASS with us! 
 
PINTEREST
There was SO MUCH fun on Pinterest this month!! Check these pins out!! 
Virginia Twedell shared THIS adorable glittered snowman by Linda Silverthorne.
Lerryn Meza pinned THESE cool mini masks.
K Moonshadow shared this adorable KNITTING CHICKEN.
Aimee Villalobos shared her NEST HEAD creation.
A {tiny} Cottage In The Woods shared these WHITE SHEEP.
Gini Cagle shared her paper creations in CARD form.
Karen Griffith pinned her adorable SNOWMAN that will make you wish it were Winter already! 

HELP ME FIND YOU!!
Use the hashtag #CreativePaperclay on all your social networks. Be sure, when using Facebook, that you make your posts and images using the Creative PaperClay® hashtag are set to public, otherwise, I won't be able to find them. You can also share your projects to the Creative PaperClay® FACEBOOK PAGE. Each month, I'll browse the interwebs looking for projects from YOU, that I can share here! Be featured next month! START SHARING NOW!!

Thanks for reading! If you'd like to keep up with me, and see more of what I'm up to, I'd also love it if you'd visit MY BLOG and Subscribe! You can also find me on FACEBOOK!

Friday, March 21, 2014

Dimensional Art Canvas with Rachel Whetzel

HELLO, Creatives!! Rachel here, to share with you, a project that my art student created, and I helped her with. It is a beautiful dimensional mixed media piece that she designed. Originally, when she and I were talking about what kind of projects she'd like to try during our time together, her idea was to create the piece as one dimension. As we talked about her inspiration, and what elements she wanted, I realized that her piece would be really great as a dimensional piece, and of course, I knew we'd use Creative Paperclay® for that!


WHAT YOU'LL NEED to make your own flowers:
  • Canvas that you'd like to add dimension to. Paint the layers that will go behind your dimension before you layer! 
  • Creative Paperclay®
  • Paints. I use Folk Art acrylic craft paints.
  • Glue. I use Crafter's Pick : The Ultimate
To create the roses on this piece, I started by rolling out three small balls of Creative Paperclay®
 Next, start smooshing the edges of the ball, and creating a flat circle. Don't worry about making a perfect circle, just smoosh well.
 Keep working until the edges are thin.
 Once your edges are thin, wrinkle your piece and create petals.
 Roll the center of your piece to create a base for attaching the rest of your petals.
 Repeat the process with each ball, adding the new piece to the outside of the first.

 When you have finished, use some scissors to cut the stem off the flower.
 Once your pieces are dry, you can start painting.
Paint your base with the lightest color that you will use, and then with each layer of darker color, wipe off the layers to expose some of the lighter color. This will help the dimensions show well. When the paint is dry, start layering! 
It was my student's idea to use the chevrons behind the original image she used for her piece! We used a piece of plywood for a canvas, and she drew the anchor onto the piece using a sharpie marker. I really love the way that it all came together. 

Thanks for reading! If you'd like to keep up with me, and see more of what I'm up to, I'd also love it if you'd visit MY BLOG and Subscribe! You can also find me on FACEBOOK!

Thursday, October 10, 2013

"Fall" Back Roses


With the brisk fall weather finally upon us and my toes tucked inside shoes instead of free to enjoy the warmth outside, I decided to bring thoughts of warmer weather out into the studio.  With that in mind, I give you the Creative PaperClay Rose pendant (or ring or bracelet or headband...whatever you would like to attach it to).

The supplies are simple: Creative PaperClay, Prismacolor markers (or any watercolor marker), a damp paper towel, a cutting tool, and your hands

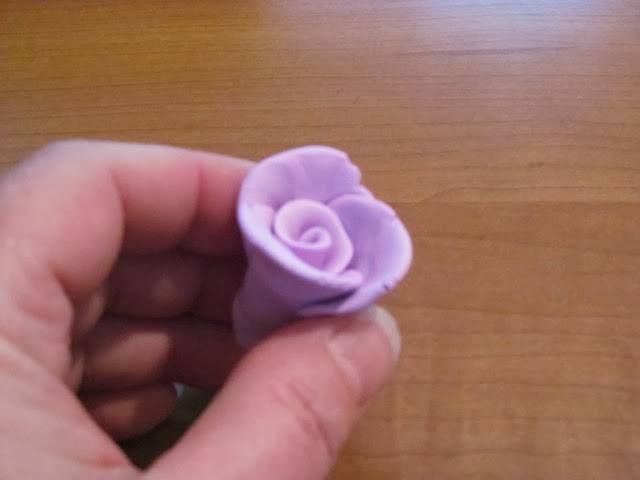
Begin by pulling off a bit of PaperClay from the package.  Knead it a bit and then flatten into a "pancake".  Dab the pancake with your chosen marker color.  Begin folding and squishing the color into the PaperClay.  Once mixed in, look at the color.  Not dark enough??  Repeat the process until you are happy with the color.  Now time to start the rose.

Roses begin with small marble sized balls of clay.  Of course, the size can be adapted depending upon what size rose you would like to end up with.  I will start with a small rose.  Roll 3 marble sized balls from the colored clay.  Cover the remainder with the damp paper towel (this will keep it from drying too quickly). 


Roll 1 of the balls into a short log.  Flatten slightly along the length.
 Then pinch one side firmly between your thumb and pointer finger from end to end (this will thin the edge to give a more realistic rose petal appearance).

Immediately roll the log up from one end to the other (like a cinnamon roll).  Flare out the thinned edge slightly.  This is the center of your flower.  Set aside.

For the other 3 balls, flatten each slightly and then pinch into a teardrop shape.  Along the curved edge, pinch firmly to thin the edge.  Be sure the center of the petal stays thick as this gives your finished rose stability and strength.  Repeat process until you have 3 "petals". 

Now, retrieve the center of your flower.  Place one petal next to the center and press into place at the base. 
Add a second petal, overlapping the first one slightly and press into place.  Finally add the third petal overlapping edges with the other 2.  Press into place. 
Flare out the upper edges by pulling back and pushing up (all one motion)...I hope that makes sense!


Once the rose is complete, use the cutting tool to even up the bottom so your rose will sit flat. 
Repeat process until colored clay has been used.  Larger roses can be accomplished by adding a second layer of petals (5 marbles instead of 3).  Set aside your rose garden to dry (about 24 hrs).  Once dry, glue onto pins, pendants, headbands, etc using tacky glue (I use The Ultimate by Crafter's Pick).

I hope this brings a bit of warmth to your day.
P.S.  The process also works with Delight Air Dry Modeling Compound ;-)

Thursday, September 12, 2013

Mary, Mary, Quite Contrary....


I have fallen in love with Mixed Media pieces!  They allow me to use a bit of THIS and a bit of THAT accumulated over the years in my studio.  Last week, after a visit to our local Farmer's Market such a piece was born. 
 I fell in love with these flowers.  The fuchsia pink with bold orange centers screamed to come home with me.  Come home with me they did, BUT (as we all know) cut flowers only stay with us for so long :-(  Why not extend their life with a custom piece of art??  An idea began to formulate in my mind (do you hear the cogs turning??)

I went first to the Delight Airdry modeling compound to create some beautiful flowers, just opening pods, and green leafy components.  I rolled a piece of the clay through my pasta machine to flatten (for those of you without a pasta machine, 2 Popsicle sticks and a rolling pin will work just as well).  Then I used teardrop shaped Kemper cutters (2 different sizes) to start my petals. 

To shape each petal I pinched the edges between my fingers to thin and then used a needle tool to create veining down the center of each.  As each petal was complete, I placed them next to each other on my work surface and the flower began to take shape.  **Please note: pinching the petals gently together or overlapping a bit will help your flower to stay together as you build.**

After one layer of petals was completed I began with a second and then a third (note: 3rd layer used a smaller teardrop cutter), stacking layers as they were completed.  A final touch for my flower reproduction was a vintage glass button pressed into the center.  Once completed, the flower was set aside to dry (about 24hrs). 
I began work on the pod in the same way, but with a much smaller teardrop cutter.  I created the leaves first, pinching and veining just as with the flower petals.  I then rolled a ball of Delight clay about 3/4" round.  The top edges were shaped and veined with the same needle tool until I was happy with the look.  The pod was then pressed into place on the leaf ruffle and set aside to dry with the flower.
 
What to do while waiting for the flower components to dry?  Why work on the canvas, of course!  I sponge painted the canvas using 2 or 3 different green acrylic paint colors.  I used the edge of the sponge brush to add some gold veining.  Never known for letting something be so simple/plain, I knew it needed something more.  Time to pull out the Paperclay!!

I recently purchased a Delta stencil (Checkerboard Medley) and knew that would add the perfect background for the flowers.  I mixed a bit of the Creative PaperClay with some water to make a soft paste.  With the stencil placed on top of the painted canvas the paste was smeared into the open spaces.  Be patient...a light touch will lead to less frustration than a heavy hand.  Work the palette knife back and forth scraping paste into and out of the stencil.  Add more paste as areas need it.  Once all open areas are filled the stencil can be removed to reveal a raised texture.  WAY COOL!!  (**please note: the stencil cannot be replaced once removed without much smearing!**)
Set canvas aside to dry.


Flash forward 24 hrs...
...the flowers have dried and now it is time to paint!  Painting the flowers tends to be a messy process.  Normally I use Pinata inks and rubbing alcohol for this, but I wanted the flower color to be a bit more intense.  In my box of inks I found my Color Box Crafter's Pigment Ink Refill in a gorgeous color called Peony.  I mixed a little of the ink refill with rubbing alcohol and began to paint.  Areas where the color was too harsh were softened by going back over it with a bit of plain rubbing alcohol.  During this process my layers began coming apart :-(  Bummer!  No worries...as each portion was painted they were put back together before drying.  Be sure all areas are painted: top and sides especially.  The bottom will be glued down to the canvas eventually, so it really doesn't need to be painted...just a time saving thought. 
 

The process was repeated for the green leafy pods using Color Box Ink Refill in "green".  As I looked at the color, it was a bit brighter than I wanted, so I mixed a bit of Pinata Color in "Burro Brown" and added that on top of the green.  The brown seemed to soften the bold green.  A few dots of "peony" ink refill placed directly onto the pod center finished the look.

Placing the flowers on top of the canvas I waited for it to "speak" to me...Please, do not call the white coats yet :-)  The canvas asked for a few things: something along the edge, wording, some additional texture, and a few polymer clay components (you didn't think I would get through a whole project with out at least one, did you??)

Back to the studio to search....
...where I found some beautiful decorative leaf components, multiple alphabet rubber stamp sets, and a FABULOUS Mrs. Grossman's metal "Fall Vines".  The vine edging was the perfect touch both in size and color!! 
Woohoo...I placed a few leaves behind the flower and placed the green pod in the corner...Hmmmm, something not quite right.  I added a few decorative leaf accents behind the flower...getting better, but still something not quite right.  Hmmmm, I think some words are needed.  To the clay and stamps I go....

Perfect.  But still something is not quite right.  I searched through my polymer clay components and found a beautiful butterfly and a flower.  I finally realized that as much as I like the painted leaf pod, it just wasn't working the way I wanted.  Remove the pod, add the butterfly and polymer clay flower, plus some more wording...FINALLY!!! 
Use tacky glue (I use "The Ultimate" from Crafter's Pick) to affix everything to the canvas (note: Vintage glass button made need to be attached with super glue rather than tacky glue).  Let dry, the hang and ENJOY.

Materials list:
Delight Air Dry Modeling compound, Creative PaperClay modeling material, Kemper cutters, stretched canvas, acrylic paints, Color Box ink refills, rubbing alcohol, Ancient page ink pad, Mrs. Grossman's "fall vines", Delta decorative stencil,  Crafter's Pick "The Ultimate"glue, palette knife, q-tips, small mixing cups, miscellaneous components


Tuesday, June 4, 2013

Scrapbook Embellishments by Lynda

My first love was card making - buying every stamp I could from 1990 until I moved back home.  I think at one time I counted and I had over $6000 worth of stamp sets easily!  Over the years I learned I only needed a few that could do the trick!  This was in Colorado - then I moved back home in 1997 to Salt Lake City Utah...Scrapbooking heaven!  Where the magazines are at, or a lot of them anyway...  A lot of the manufacturers are there - and sales... oh you have no idea when they have their warehouse sales the stuff you leave with!!! 
I have recently started working with clay products - and to say I am hooked is an understatement!  Also being in temporary quarters for just a bit longer - makes it so I can't do a lot of the fun things I have planned for you until we actually are in our own place!!!  
This project is a vertical paper bag album, with this for the cover!  I used Creative Paperclay product and a mold I have to create the flower!  This is actually one of my favorite flowers now, along with a daisy I painted and embossed...  For the flower, I painted it with two different colors I had of Radiant Pearls paint and then let dry!  This is the paint I happen to have...use what you have!  I am still experimenting with what can be done with this awesome stuff!  
Here are some things I will recommend for you to work with this clay:
  • Make sure your hands and surface is clean - using gloves if you have them.  Since I do not, I make sure I have a dry towel (or paper towel) and wash cloth available to wash my hands and surface often.  
  • After you open your package up - make sure you have a big enough Ziploc style bag to put the rest in.  This way it is nice for you to have your clay in one place and not exposed to dry out.  
  • Look for something to put all the stuff you are working with in one place.  This way you can take it someplace if you have to wait for a long period of time.  A clear shoe box is perfect for this reason!  
  • Look through this blog's previous posts - to see the different things you can do with this clay if you are just starting out!  Take the time like I did and learn all the fun things you are able to do with this fun stuff!!!  
Thank you for checking out my project and a few tips today!  You can check out the entire project at Memories in Tyme blog, just scroll down on the right side - looking for the Vertical Paper Bag Album links!  This was one of my funnest albums done so far!  I really like how the flower looks on top of the bow - which made me think of a few other fun ideas I can do using this clay and mold!!!  I hope you are enjoying it as much as I am!!!  

Thanks for stopping by,

Lynda Jeffs
Creative Paperclay Design Team


Tuesday, May 21, 2013

Lynda's Flower Cards

Hello everyone,
My name is Lynda Jeffs, and I am one of the newbies here!!! I am so excited to bring you my very first project for you guys - I hope to bring you a lot of different inspiration for your scrapbooks and cards!  I love to alter things - using clay as a great 3 dimensional embellishment versus purchasing my own!  With this clay - I love how I can paint on it, and with my Radiant Pearls paint (no longer on the market) I can emboss on it as well!  
With the cards I create, I use scraps left over from other paper crafting projects that I have done, making them way more cost effective than purchasing them at the store.  I used left over papers from this project to complete the red card using the other side of the papers!   I rounded the corners on the top mat - and embossed the saying on the front of the paper!  For the flower I started with the Creative Paperclay product and a mold I had for the flower.  I used Radiant Pearls paint to create the look I wanted, and though the scan does not show it as well, it has a bit of a gold shimmer to it that matches the flowers in the paper.  I added a simple red bow and I was done!  
For this next card, I wanted to use the clay flowers in the middle of the card but also wanted more dimension for my flowers.  For the clay flowers, they were painted again with Radiant Pearls paint and added to the middle of the flowers and then I turned up the edges of each of the petals to create that dimension I was talking about!!!   For embellishments on cards, layouts - or altered projects...Creative Paperclay is the best! 
Lynda Jeffs
Creative Paperclay Design Team 


Tuesday, May 14, 2013

Garden Basket of Flowers Shadowbox

Hello everyone, and welcome to the blog.  I am Barbara Rankin.  This is my first post as a new design team member for Creative Paperclay® and I could not be more excited to be here.  My first project that I want to share with you is a fun little garden basket full of flowers.  I had so much fun making this, and I love how it turned out.


Supplies used:

Creative Paperclay® air dry clay
Silicone Molds (Martha Stewart)
Garden Basket rubber stamp (Impression Obsession)
Secret Garden 8x8 print paper pad (Graphic45)
5-1/2" x 8-1/2" wooden shadow box (Dollar Tree)
Glue n' Seal (Ranger)
Acrylic Paints (Ceramcoat Purple, Tahiti Blue, Spice Tan, Lt Ivory) (Folk Art Spring Rose, Pure Orange, Sunflower, Basil Green, Leaf Green, Glazing Medium)
Peeled Paint Distress ink (Ranger)
Glue gun
Moss embossing powder

I like to first work the clay into a ball and push it into the mold  Allow it to dry a bit, maybe 30 minutes, before removing it from the mold.

In some instances, I prefer to work the Paperclay® into an oval shape, as I did for this leaf mold.  It seems to make it easier to push the clay into the mold and get better coverage.
Next, I inked up the basket stamp with archival black ink.  It is not necessary to ink your stamp first, but if you do, I recommend using a waterproof ink so it will not run.  I rolled out a piece of the Creative Paperclay® to approximately a 1/8" thickness.
I then stamped into the clay.
Using a craft knife, I cut the excess Paperclay® away and returned it to the package.
Here is what it looked like after trimming.  I used my fingers to smooth the edges and my fingernails to make tiny indentations along the bottom.
I wanted my basket to look more realistic, so I allowed it to dry over a piece of sponge.
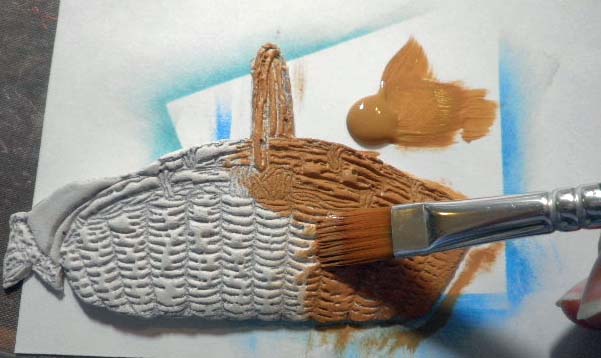
Paint basket with tan acrylic paint.  Allow to dry.
Make a charcoal acrylic paint wash and cover basket.  Allow to dry.  Dry brush tan acrylic paint over basket, just hitting the high spots.
I continued molding flowers, leaves, birds and butterflies, and here is a picture of my desktop filled with  Creative Paperclay® goodness.  It is so easy and so much fun to play with Paperclay® that I could do this for hours.
I painted each piece of Creative Paperclay® with a mixture of acrylic paints and glazing medium.  This helped blend my colors, as well as making the paint more translucent.  
The reason I wanted my paint more translucent is so that my second layer of paint would not completely cover up the previous color.  It would, instead, go into the crevices and darken the nooks and crannies perfectly. Then, after that dried, I could come back and hit the high spots with a dry brush technique.  

With all of my pieces painted and drying, I found a small wooden shadow box I had purchased from the dollar store.  I sanded it a bit, then painted the sides of box, inside and out, with my acrylic paint mixture of Basil Green, Light Avocado, and Glazing Medium.  When the paint was dry, I sprinkled Moss embossing powder here and there on the sides of the box and heat embossed it.   Then I sponged a bit of Peeled Paint distress ink on top of that to bring out the color variations.

I found just the right paper to use for the background, i.e., the Graphic 45 Secret Garden from the 8"x8" paper pad.  It fit perfectly inside the box with just a bit of trimming off the top and bottom. 
I then adhered printed Secret Garden paper to the inside bottom of box with glue n' seal.

Now that all of my Paperclay® embellishments are ready, I simply arranged them inside the box and glued them using a hot glue gun.  Oh my goodness, this was such a fun project.  Here are a few closeup  photos of the Paperclay® and the dimension I easily achieved with this product.


Thanks so much for joining me for my first project post for the Creative Paperclay® design team.  I hope you have been inspired to try out this fabulous and fun product.  There are so many ways to use it, and you will be amazed at how much fun you will have "playing" with this product.  So, I encourage you to visit the Creative Paperclay® blog often, because the other designers have so many wonderful creations to share with you.

Until my next post, I hope you will find some time to visit my blog to see how I continue to use this product.

Have a wonderful week, and happy crafting!

Barbara