Showing posts with label stencil. Show all posts

Monday, September 11, 2017

Elephant Wonder Tag Featuring Creative Paperclay®

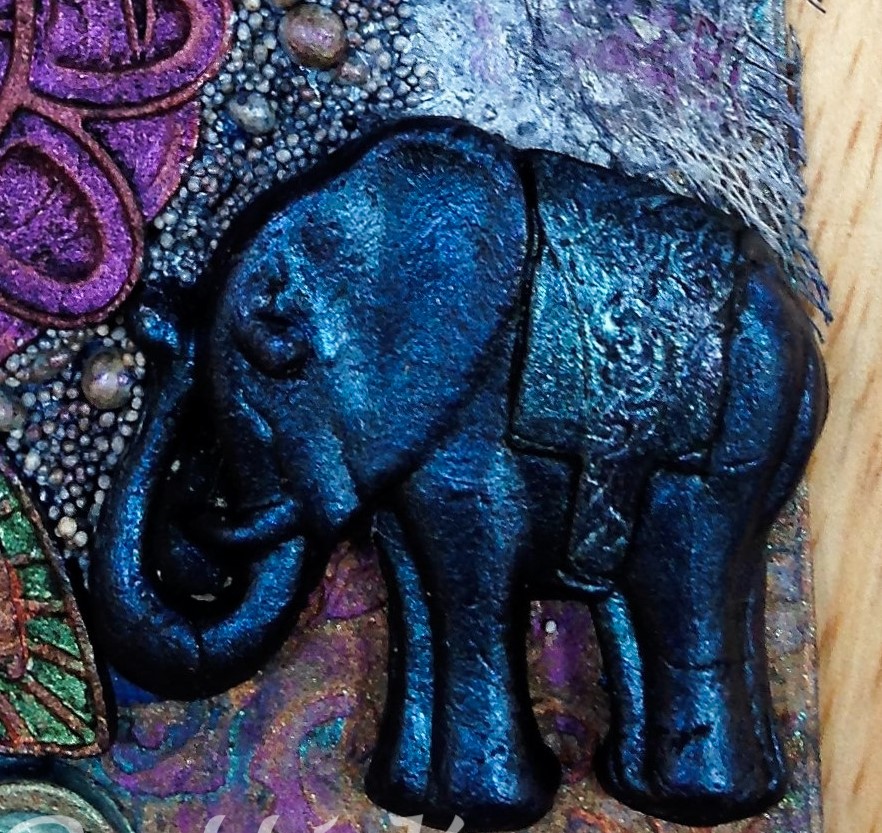
Hi Friends:  Did you know that you can make your own Creative Paperclay® molds from favorite objects that you have around the house?  It's really easy with a product called ImPRESSive Re-Usable Putty.  The Creative Paperclay® design team was given the opportunity to try using this reusable putty with our paperclay.  It was great!  I chose to create a mold of a favorite elephant pin that belonged to my mom.  I followed the directions on the package to prepare the putty, then pressed the elephant pin into the clay, let it harden using the package directions, then removed the pin.  I created this great elephant mold that I can use any time I want.  And, if I decide that I want to make a mold of something else, all I have to do is reuse the putty with another charm/item that I choose.

Once your mold is ready, you can use Creative Paperclay® to make a clay embellishment to use on your projects.  Here's a project that uses my elephant mold with other Wilton molds to make this fun tag:


Here are some detail photos of the cast elephant and flowers, along with the sentiments that I used:


Here's the original pin and the mold that I created:


Directions: Please see my video tutorial for full instructions for how I created the mold and the tag.  I do have to confess that, in the middle of filming the tag project, I spilled a large amount of ink on my craft table.  So the final background colors changed a bit during the filming. LOL.  But, I decided to make the best of the happy (?) accident and just go with the change in the colors.


Supply List:
Lindy's Stamp Gang Sprays (Amazon):  Brushed Nickel, Opal Sea Oats, Afternoon Delight Denim
Liquitex Matte Super Heavy Gel Medium (Amazon) Liquitex Professional Clear Gesso (Amazon)
Prima Marketing Art Alchemy-Antique Brilliance Amethyst Magic (Amazon)
Prima Marketing Art Alchemy-Antique Brilliance Lucky Emerald (Amazon)
Prima Marketing Art Alchemy-Antique Brilliance Mystic Turquoise (Amazon)
Prima Marketing Art Alchemy-Metallique Wax-Rich Copper (Amazon)
Prima Marketing Art Alchemy-Opal Magic Wax-Turquoise Satin (Amazon)
Ranger Adirondack Metallics Acrylic Paint Dabbers, Silver (Amazon)
Tim Holtz Small Talk Stickers (Amazon)
Studio 71 Black Gesso (JoAnn)
Wilton Doilies
Basic Grey Out of Print 6X6 paper pad
Other:  cheesecloth, fibers

I hope you enjoyed my project and learned how to use homemade molds in your projects. Thank you so much for stopping by the blog today. Have a great, creative day! -Patti


Tuesday, February 7, 2017

Tori's Tip - Stencils Aren't Just for Painting


I was recently looking through some of the stencils in my file and found this old and well-used heart stencil that I cut from card stock.  With Valentine's Day coming up, I thought it might be fun to try it with Creative Paperclay and one of my favorite texturing tools - scrunched up aluminum foil!


and since I saved the cut-out, I can try it in reverse!


I might use these for card embellishments or a special project for my sweetheart!

This fun technique can be used with just about any stencil and texture tool or texture sheets.


Thanks for joining me here again!  As always, play, experiment, and have fun!

Tori
Find me on Facebook, or peruse & ponder pics with me on Pinterest

Friday, April 24, 2015

Quick Tip Time

Hi, it's Ann (http://annmakes.blogspot.com) today with a neat tip for our Creative Paperclay® peeps!  Did you know that Creative Paperclay® sticks to many surfaces without needing extra adhesive?  Isn't this cool?  Well I tried this on a canvas and I was delighted to see the results.  Which made me try to use the product as a stencil paste.  It worked!


So there you go lovely peeps, Creative Paperclay® can be used like a paste on canvas.  Once it dries it can be sanded and painted.  It is a great way to add dimension to an otherwise flat surface and create some interesting art work.


 Thanks for stopping by, and please share your own discoveries with us.

Friday, January 16, 2015

Stenciling on Canvas

I've been thinking about this project for awhile now, and decided to put the thoughts into action. I wondered if Creative Paperclay® could be used as a stenciling paste. Good new—it certainly can!! This can be a great project for an older child, but it was beyond what my five year old partner was able to manage. I think this would be a more appropriate project for an eight or ten year old.

I started with an 8" x 6" Artist's Loft canvas (available at any of the big box craft stores). I colored it with a wash of Purple Mist and Burnt Umber acrylic paints.


While the canvas was drying, I worked with the Creative Paperclay® to make a smooth paste. I added water—a little bit at a time—until it was the consistency of smooth cake icing. Remember: it's easier to add the water a bit at a time than to get the mixture too runny. This step did take a considerable amount of blending to get a smooth, creamy consistency with no random lumps of the Creative Paperclay®. When I reached the consistency I wanted, I added a couple drops of Mars Black acrylic paint.


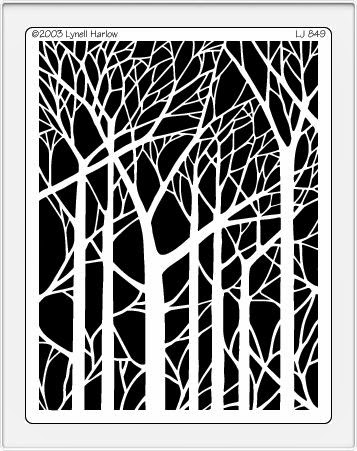
Next, I used painter's tape to tape the stencil onto the canvas. It is important that the stencil stays securely in place when you are applying the Creative Paperclay® cream/paste. I started with the top, then taped the two sides, and lastly, taped the bottom.


I used one of my favorite stencils—Bare Trees from Dreamweaver Stencils.


This is the tool that I used to apply the paste. Smooth a layer of the paste about 1/8" to 1/4" thick over the stencil. Next, scrape off the excess paste making sure all the openings are evenly filled and the stencil surface is smooth.

Next, carefully remove the tape and lift the stencil off the canvas. I removed the tape from the bottom, then the two sides, and then, every so carefully, lift the stencil, using the top piece of tape as a hinge. When the stencil is clear of the design, I peel the stencil and the tape off the canvas. Using the top piece of tape as a hinge insures that even if you do happen to drop the stencil, it will fall right back in place, and not damage your stenciled surface.

Immediately, wash the stencil or soak it in a shallow dish filled with water until you can properly clean it so that the clay doesn't harden on it. 

While the clay was still wet, I sprinkled fine onyx mica flakes on the surface. Here's my finished canvas. 


Carole

Thursday, September 12, 2013

Mary, Mary, Quite Contrary....


I have fallen in love with Mixed Media pieces!  They allow me to use a bit of THIS and a bit of THAT accumulated over the years in my studio.  Last week, after a visit to our local Farmer's Market such a piece was born. 
 I fell in love with these flowers.  The fuchsia pink with bold orange centers screamed to come home with me.  Come home with me they did, BUT (as we all know) cut flowers only stay with us for so long :-(  Why not extend their life with a custom piece of art??  An idea began to formulate in my mind (do you hear the cogs turning??)

I went first to the Delight Airdry modeling compound to create some beautiful flowers, just opening pods, and green leafy components.  I rolled a piece of the clay through my pasta machine to flatten (for those of you without a pasta machine, 2 Popsicle sticks and a rolling pin will work just as well).  Then I used teardrop shaped Kemper cutters (2 different sizes) to start my petals. 

To shape each petal I pinched the edges between my fingers to thin and then used a needle tool to create veining down the center of each.  As each petal was complete, I placed them next to each other on my work surface and the flower began to take shape.  **Please note: pinching the petals gently together or overlapping a bit will help your flower to stay together as you build.**

After one layer of petals was completed I began with a second and then a third (note: 3rd layer used a smaller teardrop cutter), stacking layers as they were completed.  A final touch for my flower reproduction was a vintage glass button pressed into the center.  Once completed, the flower was set aside to dry (about 24hrs). 
I began work on the pod in the same way, but with a much smaller teardrop cutter.  I created the leaves first, pinching and veining just as with the flower petals.  I then rolled a ball of Delight clay about 3/4" round.  The top edges were shaped and veined with the same needle tool until I was happy with the look.  The pod was then pressed into place on the leaf ruffle and set aside to dry with the flower.
 
What to do while waiting for the flower components to dry?  Why work on the canvas, of course!  I sponge painted the canvas using 2 or 3 different green acrylic paint colors.  I used the edge of the sponge brush to add some gold veining.  Never known for letting something be so simple/plain, I knew it needed something more.  Time to pull out the Paperclay!!

I recently purchased a Delta stencil (Checkerboard Medley) and knew that would add the perfect background for the flowers.  I mixed a bit of the Creative PaperClay with some water to make a soft paste.  With the stencil placed on top of the painted canvas the paste was smeared into the open spaces.  Be patient...a light touch will lead to less frustration than a heavy hand.  Work the palette knife back and forth scraping paste into and out of the stencil.  Add more paste as areas need it.  Once all open areas are filled the stencil can be removed to reveal a raised texture.  WAY COOL!!  (**please note: the stencil cannot be replaced once removed without much smearing!**)
Set canvas aside to dry.


Flash forward 24 hrs...
...the flowers have dried and now it is time to paint!  Painting the flowers tends to be a messy process.  Normally I use Pinata inks and rubbing alcohol for this, but I wanted the flower color to be a bit more intense.  In my box of inks I found my Color Box Crafter's Pigment Ink Refill in a gorgeous color called Peony.  I mixed a little of the ink refill with rubbing alcohol and began to paint.  Areas where the color was too harsh were softened by going back over it with a bit of plain rubbing alcohol.  During this process my layers began coming apart :-(  Bummer!  No worries...as each portion was painted they were put back together before drying.  Be sure all areas are painted: top and sides especially.  The bottom will be glued down to the canvas eventually, so it really doesn't need to be painted...just a time saving thought. 
 

The process was repeated for the green leafy pods using Color Box Ink Refill in "green".  As I looked at the color, it was a bit brighter than I wanted, so I mixed a bit of Pinata Color in "Burro Brown" and added that on top of the green.  The brown seemed to soften the bold green.  A few dots of "peony" ink refill placed directly onto the pod center finished the look.

Placing the flowers on top of the canvas I waited for it to "speak" to me...Please, do not call the white coats yet :-)  The canvas asked for a few things: something along the edge, wording, some additional texture, and a few polymer clay components (you didn't think I would get through a whole project with out at least one, did you??)

Back to the studio to search....
...where I found some beautiful decorative leaf components, multiple alphabet rubber stamp sets, and a FABULOUS Mrs. Grossman's metal "Fall Vines".  The vine edging was the perfect touch both in size and color!! 
Woohoo...I placed a few leaves behind the flower and placed the green pod in the corner...Hmmmm, something not quite right.  I added a few decorative leaf accents behind the flower...getting better, but still something not quite right.  Hmmmm, I think some words are needed.  To the clay and stamps I go....

Perfect.  But still something is not quite right.  I searched through my polymer clay components and found a beautiful butterfly and a flower.  I finally realized that as much as I like the painted leaf pod, it just wasn't working the way I wanted.  Remove the pod, add the butterfly and polymer clay flower, plus some more wording...FINALLY!!! 
Use tacky glue (I use "The Ultimate" from Crafter's Pick) to affix everything to the canvas (note: Vintage glass button made need to be attached with super glue rather than tacky glue).  Let dry, the hang and ENJOY.

Materials list:
Delight Air Dry Modeling compound, Creative PaperClay modeling material, Kemper cutters, stretched canvas, acrylic paints, Color Box ink refills, rubbing alcohol, Ancient page ink pad, Mrs. Grossman's "fall vines", Delta decorative stencil,  Crafter's Pick "The Ultimate"glue, palette knife, q-tips, small mixing cups, miscellaneous components


Thursday, January 17, 2013

Jess B's - Valentine's Delight Day Cards

Hello and Happy Thursday

Finally had an opportunity to use
DelightTM 
and it works great!

Valentine's Day Cards
Mixed my acrylic paints red, light pink and black  (not shown)
with DelightTM and lled out a very thin layer
used a heart cookie cutter 

let dry (read instructions)
 DelightTM  it super light and feels like foam!

I had more fun by using stamps and stencils

Hero Arts Zig Zag Cling Stamp
with Tim Holtz Antiqued Bronze Distress Stain
 Creative Workshop - Branches Stencil

Masculine Card


 Feminine Card


Friday's is our family night
I will let them have fun using DelightTM 

 Thanks for 
stopping by