Showing posts with label Pendant. Show all posts
Thursday, October 10, 2013
"Fall" Back Roses
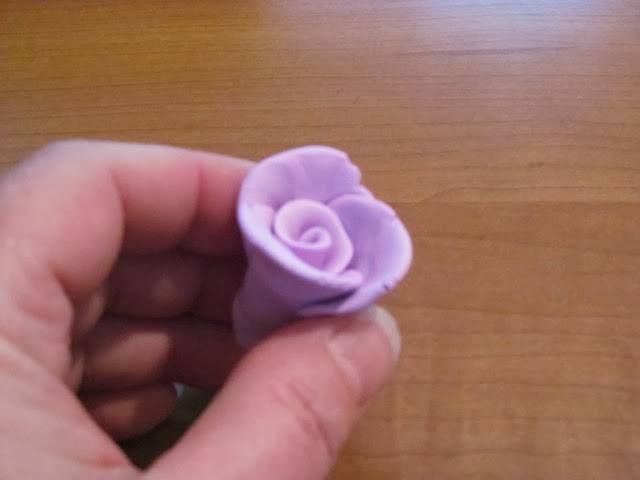
With the brisk fall weather finally upon us and my toes tucked inside shoes instead of free to enjoy the warmth outside, I decided to bring thoughts of warmer weather out into the studio. With that in mind, I give you the Creative PaperClay Rose pendant (or ring or bracelet or headband...whatever you would like to attach it to).
The supplies are simple: Creative PaperClay, Prismacolor markers (or any watercolor marker), a damp paper towel, a cutting tool, and your hands
Begin by pulling off a bit of PaperClay from the package. Knead it a bit and then flatten into a "pancake". Dab the pancake with your chosen marker color. Begin folding and squishing the color into the PaperClay. Once mixed in, look at the color. Not dark enough?? Repeat the process until you are happy with the color. Now time to start the rose.
Roses begin with small marble sized balls of clay. Of course, the size can be adapted depending upon what size rose you would like to end up with. I will start with a small rose. Roll 3 marble sized balls from the colored clay. Cover the remainder with the damp paper towel (this will keep it from drying too quickly).
Roll 1 of the balls into a short log. Flatten slightly along the length.
Then pinch one side firmly between your thumb and pointer finger from end to end (this will thin the edge to give a more realistic rose petal appearance).
Immediately roll the log up from one end to the other (like a cinnamon roll). Flare out the thinned edge slightly. This is the center of your flower. Set aside.
For the other 3 balls, flatten each slightly and then pinch into a teardrop shape. Along the curved edge, pinch firmly to thin the edge. Be sure the center of the petal stays thick as this gives your finished rose stability and strength. Repeat process until you have 3 "petals".
Now, retrieve the center of your flower. Place one petal next to the center and press into place at the base.
Add a second petal, overlapping the first one slightly and press into place. Finally add the third petal overlapping edges with the other 2. Press into place.
Flare out the upper edges by pulling back and pushing up (all one motion)...I hope that makes sense!
Once the rose is complete, use the cutting tool to even up the bottom so your rose will sit flat.
Repeat process until colored clay has been used. Larger roses can be accomplished by adding a second layer of petals (5 marbles instead of 3). Set aside your rose garden to dry (about 24 hrs). Once dry, glue onto pins, pendants, headbands, etc using tacky glue (I use The Ultimate by Crafter's Pick).
I hope this brings a bit of warmth to your day.
P.S. The process also works with Delight Air Dry Modeling Compound ;-)
Saturday, September 22, 2012
Steampunk Earrings with Creative Paperclay
I am a bit into Steampunk this week. Some different addictive sites have me all a buzz about it and ideas flowing like crazy. So I thought....I am going to do a pair of earrings! And then my mind went a bit crazy! Now they are beautiful and light and awesome earrings but, as most of you know, when your mind starts....you are from one end to another of things to do.
Here is what I did. I used Creative Paperclay and stamped a Steampunk image on it. I then cut it out using a lid of a bottle to have circle shape. I added holes where I would want to add hook and hangings when dry.
Once it was dry I then painted all black and did a bit of a wipe off and dab with a paper towel to give a bit of texture. I then took a bit of gold paint and dry brushed it on. I wanted the outlines of the stamp I stamped to be highlighted. The back I painted black and stamped the stamp in gold ink on it. I then glued on a few pieces of old clocks and watches as a collage type feel on the front. I hung a few coordinating beads from the 3 holes on the bottom and added the earring wires. I love the way they came out and had a blast making them!
Sunday, January 15, 2012
Creative Paperclay® Heart pendant
With Valentines on its way my head is filled with hearts so this month I'm going to create an easy but very pretty Heart pendant using Creative Paperclay®.
Material list:
Creative Paperclay®
wire - for the bail
tool to stamp in your texture
acrylic paints
1. Make a paperclay ball, about the size of a walnut. Actually, the amount of clay you use really depends on the size you want your finished piece so play around. If you use too much simply make the ball smaller and reshate again.
2. Start shaping the clay into a heart. I first roll the ball in my hands to form a cone shape and then squish and moosh the clay into a heart shape. This is play time so have fun and don't worry if your heart isn't a perfectly shaped heart. I kinda like the wonky look, I think it gives the pendant more character.
3. Insert your wire bail into the top of your pendant. Since mine is a wonky heart I inserted the bail so the heart will hang at an angle.
4. Next we stamp in our texture. I used a leather stamping tool for my texture but you can use whatever you have handy. Stamp the texture deep enough to make it look like it's inside the heart, not on the surface of the heart.
5. Once you get the look you like let the pendant completely dry. What? We're done? Yep, how easy is this! :)
6. After it dries completely you can paint it . I started by painting the entire pendant black. I then dry-brushed metalic gold and red. That gives the pendant an aged look that I love. After the paint dried I sprayed a couple of layers of polyurathane on it to protect the paint. All that's left to do is sting it on a cord or ribbon and you have a beautiful heart to wear.
Tuesday, June 28, 2011
PaperClay Red, White and Blue Pendant
Good morning all-
Today I would like to welcome you to another Creative Paperclay project. I have been having such a great time making things and experimenting with all different types of projects using paper clay. Today I am showing you how to make a easy, peasy simple pendant.
I am a huge lover of anything Red, White and Blue and I also love jewelry. So I combined those two passions and made this:
First I rolled out my clay and cut a 2 inch by 1 inch rectangle and tiny little stars out of cookie cutters.
I forgot to punch my hole in the paperclay before it dried, but that was an easy fix with my dremel tool. I used a little bit and just "sawed" my way through it. Because paperclay isn't that hard when it dries it took like 2 seconds. Super easy!!! What I also like about using paperclay for jewelry is that it isn't heavy. I've tried other mediums and they can get heavy, especially for earrings.
Then I painted the base of the pendant blue front and back. I painted the tiny stars white just using regular acrylic paint. I tell you, that paperclay takes to paint like nothing else and it dries super fast too. Then I took some puffy paint and added some dimensional stripes with red and placed a few dots in white puffy paint. I let that dry for a couple of hours and then I added the stars with some glue.
I added a jump ring and attached a red,white and blue beaded chain and there you have the easiest and quickest pendant ever. The most time consuming is waiting for the paperclay to dry, but within 24 hours you should have a finished pendant.
I hope I've inspired you to create your own pendant using some Creative Paperclay. You can purchase Creative Paperclay here or you can even get it at Hobby Lobby or Michaels. If you'd like to see some of my other projects jump over to my blog here.
Today I would like to welcome you to another Creative Paperclay project. I have been having such a great time making things and experimenting with all different types of projects using paper clay. Today I am showing you how to make a easy, peasy simple pendant.
I am a huge lover of anything Red, White and Blue and I also love jewelry. So I combined those two passions and made this:
First I rolled out my clay and cut a 2 inch by 1 inch rectangle and tiny little stars out of cookie cutters.
I forgot to punch my hole in the paperclay before it dried, but that was an easy fix with my dremel tool. I used a little bit and just "sawed" my way through it. Because paperclay isn't that hard when it dries it took like 2 seconds. Super easy!!! What I also like about using paperclay for jewelry is that it isn't heavy. I've tried other mediums and they can get heavy, especially for earrings.
Then I painted the base of the pendant blue front and back. I painted the tiny stars white just using regular acrylic paint. I tell you, that paperclay takes to paint like nothing else and it dries super fast too. Then I took some puffy paint and added some dimensional stripes with red and placed a few dots in white puffy paint. I let that dry for a couple of hours and then I added the stars with some glue.
I added a jump ring and attached a red,white and blue beaded chain and there you have the easiest and quickest pendant ever. The most time consuming is waiting for the paperclay to dry, but within 24 hours you should have a finished pendant.
I hope I've inspired you to create your own pendant using some Creative Paperclay. You can purchase Creative Paperclay here or you can even get it at Hobby Lobby or Michaels. If you'd like to see some of my other projects jump over to my blog here.
Subscribe to:
Posts (Atom)