Showing posts with label steampunk. Show all posts

Saturday, July 23, 2022

How to Make a Steampunk Character


Hello everyone! My name is Cinnamon Willis and I am going to show you how I created this cute steampunk sculpture!


Supplies:


Gloves
Mask
Drill with small bits
Copper acrylic paint
Drop cloth or someplace to work on that can support a mess
Small wood circle
Bronze gears and key
Creative Paperclay®
Water
Sanding paper


First start off with getting your materials in order. Cover your work area with a drop cloth (I have a board that I work on instead), gloves,


Get a small drill bit and drill two holes into your wood disk for the feet of your sculpture. Make sure the bit is the same size as the wire so that it fits in snugly.


Begin to make your armature out of the wire. Check to make sure the wire sits snug in the holes that you drilled.


Continue making the armature to how you would like your figure to look. When you are done with the shape, use masking tape to cover the parts that you want to cover with clay. Begin putting the clay on top of the masking tape. Continue building up the sculpture and set it aside to dry before beginning another layer. 


Here I made little nubby hands and a square head.


Sand down the pieces that you would like to get nice and smooth.


Paint the piece black so that you can cover it with the bronze or gold if you like. The coat of black paint makes the metal paint look more like a piece of metal.


Here is a coating of bronze paint that was put on top of the black. Streak the metallic on top of the black sporadically so that it isn't so uniform.


Start getting your gears and key ready to be placed on the piece. Use e6000 glue to put the pieces on the figure and use a small string of wire to hook the key on with to hang from the figure's hand.


Use a protective coating to seal your figure. This is how he turned out.

Thank you all once again for stopping by, and I hope that you enjoyed today's tutorial! You can find Creative Paperclay® at the following retailers Creative Paperclay® Online Store, Michael's, Amazon, Joann's.

See more of my work at Melandolly.com, catch updates on 

my Instagram page and here is a link to my shop!


Thursday, December 5, 2013

Steampunk Christmas Ornament ACEO Frame

Hello There and Happy December, This is LuLu Lancaster with a simple ACEO Steampunk ornament frame.

I love the small original art cards known as ACEO, but sometimes it can be difficult to display them. 
This little frame is easy to make and is versatile where you can create different looks and even switch out the cards ;)

You will need 
~Creative PaperClay®
~an Artist trading card ACEO or small photo size 3.5"x2.5"
~a plastic sleeve for ACEOs
~tacky glue
~small dish of water
~scrap of lace
~metallic paint or mica pigments and glaze

~misc. metal objects~
old jewelry pieces bits of old chain

~a wipe out tool or smoothing tool.
~4 eye hooks or eye pins
~and ribbon

First you will need to make trace your card and create an opening either inside the tracing for a smaller opening and overall frame,
 or outside the tracing for a larger opening and larger frame size.

 Next you will need to roll out 4 small logs to place on your pattern. This will create the frame itself.
Smoothe the logs into one frame with a small amount water by either using your finger or a smoothing tool such as a wipe out tool. 

create a pattern in the clay for some texture. using an old scrap of lace you can gently imprint the clay by pressing down and rubbing a damp finger across the lace. Gently pull up to release and repeat on each side.


push 4 eye pins or eye screws into each corner of the frame. These are used for the ribbon and to hold your misc. bits and bobs.


Allow your frame to dry overnight. and gather your small pieces of metal or bits and bobs ;)


After your frame has dried you can paint it with metallic paint


attach the plastic sleeve to the back of the frame with a bit of tacky glue.

attach your findings to the bottom two eye pins, and add a length of ribbon ties to the top 2.

Slip your ACEO into the opening ;)

You now have a cute steampunk frame ornament.

Thank you so much for following along :) remember you can use this basic template to create any number of different themed frames for your tiny cards or small photographs.
LuLu

Thursday, June 20, 2013

Jess B's Steampunk Salt n Pepper Shakers

Hello Everyone

I went to a beautiful wedding reception
this past weekend in an art museum
full of beautiful antiques and amazing metal architectures


 This could be the perfect venue for anyone who loves steampunk
Gears turning in my brain!
  What a wonderful addition to a reception table

Steampunk
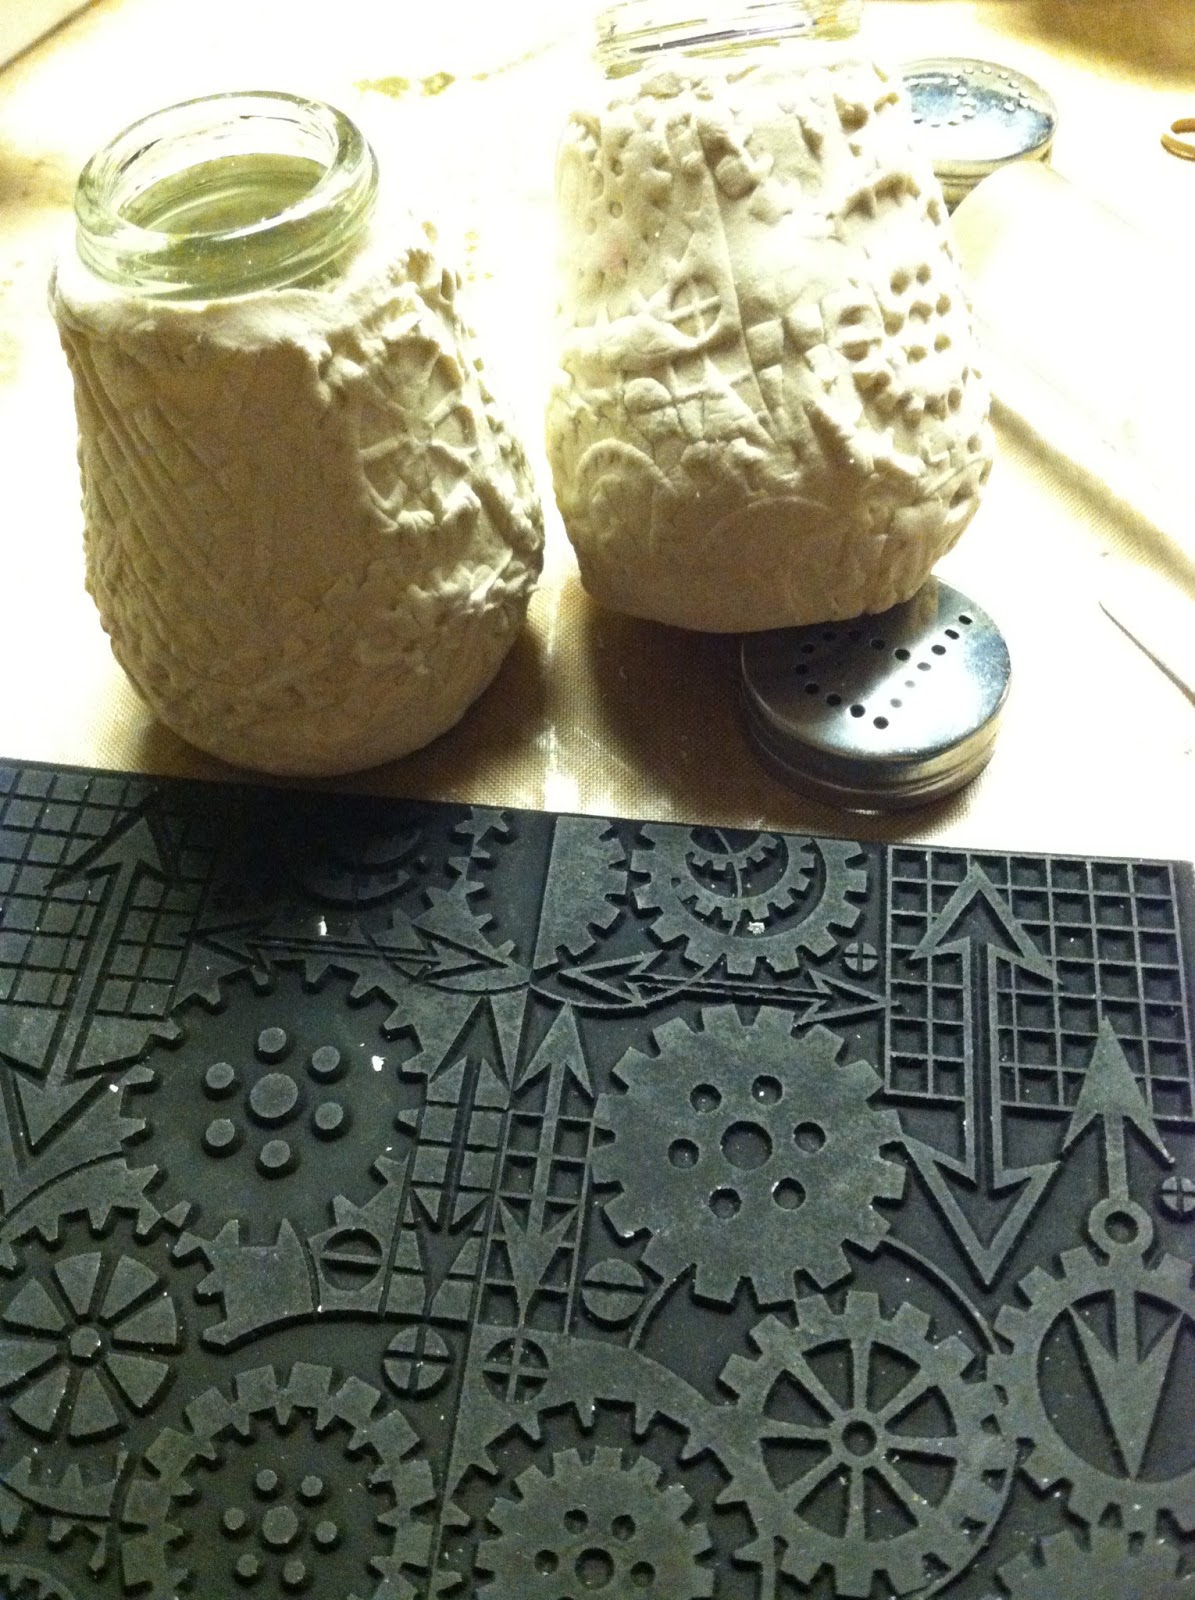
Salt n Pepper Shakers

I took out a pair of salt and pepper shakers from my wedding

Rolled out some Creative Paperclay® and mold it around the shakers
 Bought this awesome Textured Tread Graphic Gears from Ranger
Baked and sprayed Tsukineko Antiquing Solution Terra Cotta
Rubbed Folkart Metallic Gold Acrylic paint
INGREDIENTS
Salt n Pepper Shakers
Tsukineko Antiquing Solution Terra Cotta
Folkart Gold Acrylic Paint
Ranger Melt Art Texture Treads Graphic Gears


Thanks for stopping by

Thursday, June 13, 2013

Tea Party or sTEAm party? by Rachel Whetzel

Rachel Whetzel here! While I was making my Mad Hatter doll recently, I had the idea to create something in a Mad Hatter THEME, with a Hat sitting on a tea cup using Creative Paperclay® modeling material.
 WHAT YOU WILL NEED
To start, I mixed Amazing Clear Cast Resin with brown dye, to make a "tea" in the cup I planned to use.  Be very careful!! A little bit of dye goes a VERY long way as you can see! I've nearly got COFFEE here! (It's not as dark as it looks in this picture in real life. I had a hard time getting a realistic shot.)
 Once the resin was set, I screwed a long screw into the resin as an anchor for my top hat.
Then I used the same technique I have shown in my Gnome and Egg projects, and wrapped a base for my hat around the screw with News Paper and masking tape.
Once the base was ready, I added Creative Paperclay® to the outside of the form to create a hat shape.
I let this dry, and then started adding layers to the piece to create the brim of the hat. This takes a few layers, with time for drying between each one. Once the hat was created, I sanded the piece, and painted it! Then I topped off my resin with one last layer.
I haven't decided if I'm going to add more to the hat or not... I really love the way it looks just like this, and now that I've got it this far, I'm debating on whether or not to add to the Mad Hatter theme, or to create a Steampunk look with it! I'm really thinking I'd like to take a Steam Punk angle... What do you think? Leave me a comment, and let me know what you think!! I would love for you to visit me at my "house" too!! Thank you so much for reading!!  ~rachel

Thursday, May 17, 2012

Quick Tip - dried up clay?

Hi all here is a quick tip....
If your clay is all dried up in a very hard block.... (I mean completely hard for several months)
PLEASE DON'T throw it away!!!!!

draw a shape on it...


carve it carefully with a craft knife or similar
Then sand it with sand paper


decorate it as desired
This is a Pencil topper or in this case it protects a blade from digging into my hand when I want to find something on my desk.

I used Terri Sproul Mixers (steam punk set)
Stampin Up! Early Esspresso ink pad and sponge
Watch parts and 3D crystal Laquer.
and Fiskars craft drill to drill the hole in the bottom. (yes you can drill the stuff when it is dry! cool aye!)


Thanks for dropping by!
Debbie Buckland
http://artycrafty.wordpress.com

Sunday, February 5, 2012

India meets Steam Punk

I really didn't know what this was going to end up like.... I mean mixing two different cultures together.... I must be nuts!!!

I went to India in 1993.... I must say for a first trip ever from New Zealand, it really impacted my life. Seeing all the different culture aspects and the way people lived etc.... That country is amazing and its people are beautiful and creative too.

This piece is dedicated to the people of that amazing country.


This was only possible by using the Articus Mold - Caboshapes II Divas 
and Delight TM clay.

Here is how I made it:
I pressed the Delight Clay into the mold. And popped the clay out carefully to get several shapes the same.... Then let the clay dry. Delight has a polystyrene feel to it when dry.

I got some flower soft wire out and poked it through the shoulders and attached some hand shapes.
I wrapped some ribbon around the body and pinned it at the back. This clay is so soft it allows to be poked and pinned. So cool!

next is when I got out my inks and a water brush then coloured the pieces I needed to colour. Adding glitter only to the crown.
The next step was to glue it all together.... I added the hair (black wool) Glue used was a hot glue gun...
add face... and more hair
Then prepare the base that you will glue it onto....
I used 1" squares, a piece of paper doily and inked the edges....
I then added some cogs made with Delight TM and flowers etc....

Don't for get some bling in the form of glitter glue...


and there you are....Project done!


Thanks for looking!