Showing posts with label clay. Show all posts

Saturday, July 23, 2022

How to Make a Steampunk Character


Hello everyone! My name is Cinnamon Willis and I am going to show you how I created this cute steampunk sculpture!


Supplies:


Gloves
Mask
Drill with small bits
Copper acrylic paint
Drop cloth or someplace to work on that can support a mess
Small wood circle
Bronze gears and key
Creative Paperclay®
Water
Sanding paper


First start off with getting your materials in order. Cover your work area with a drop cloth (I have a board that I work on instead), gloves,


Get a small drill bit and drill two holes into your wood disk for the feet of your sculpture. Make sure the bit is the same size as the wire so that it fits in snugly.


Begin to make your armature out of the wire. Check to make sure the wire sits snug in the holes that you drilled.


Continue making the armature to how you would like your figure to look. When you are done with the shape, use masking tape to cover the parts that you want to cover with clay. Begin putting the clay on top of the masking tape. Continue building up the sculpture and set it aside to dry before beginning another layer. 


Here I made little nubby hands and a square head.


Sand down the pieces that you would like to get nice and smooth.


Paint the piece black so that you can cover it with the bronze or gold if you like. The coat of black paint makes the metal paint look more like a piece of metal.


Here is a coating of bronze paint that was put on top of the black. Streak the metallic on top of the black sporadically so that it isn't so uniform.


Start getting your gears and key ready to be placed on the piece. Use e6000 glue to put the pieces on the figure and use a small string of wire to hook the key on with to hang from the figure's hand.


Use a protective coating to seal your figure. This is how he turned out.

Thank you all once again for stopping by, and I hope that you enjoyed today's tutorial! You can find Creative Paperclay® at the following retailers Creative Paperclay® Online Store, Michael's, Amazon, Joann's.

See more of my work at Melandolly.com, catch updates on 

my Instagram page and here is a link to my shop!


Friday, April 10, 2020

Garden Snail Tutorial


Oh my!  Where did all my color go?  


Welcome to Second Friday Tutorial!  

Today I share with you the sculpting process of creating a fun little garden snail. 
It seems we are all going through changes in our lives in one way or another with current situation effecting the world in which we live.  I think we can agree that some days are more colorful than others, but we are going to get through this.  It was not my intention to create a tutorial without color, but I have to say it doesn't bother me either.  

Come back here for the big color reveal.  I will be painting it on Friday and will post pictures and a video link on this post so you'll have to pop back and see what this whimsical little guy will look like.  


Supplies:

CREATIVE PAPERCLAY®
18 gauge wire
foil
masking tape
water
simple clay tools
Acrylic paints
paint brushes


Click on the link below to see the video tutorial


EMAIL: Susiewhc@gmail.com
FB and IG: @artbysusiek and @artbysusiek4home
WEBSITE:  https://artbysusiek.com sign up for my Creative Breakfast Club 🎨
ETSY: www.artbysusiek.etsy.com
PINTEREST: https://www.pinterest.com/susiewhc/

CREATIVE PAPERCLAY® Design Team Member  https://creativepaperclay.blogspot.com  

Friday, October 25, 2019

Create a Ring holder with Creative Paperclay


Hello everyone! My name is Cinnamon Willis and I am going to show you how I created this sculpture. With Election Day coming up, I was inspired to create this hand with the fingers shaped in a "V" to inspire all who are capable to go out and vote! This sculpture also doubles as a ring holder, you can create this with all five fingers extended to have a full hand of ring holders if you would prefer.

Supplies:

  • Creative Paperclay®
  • E6000 Glue
  • Wire to build an armature with, can be aluminum
  • Pliers
  • Acrylic paint
  • Sanding paper
  • Drill
  • Wooden base
  • Dowel


To begin, take the wire and bend it into the shape of a hand. Do this step with pliers so that it would be easier.


Cover the armature with masking tape and newspaper to bulk it up. If you plan to have any fingers bent, cover them with tape in newspaper and leave the knuckle exposed so that you can manipulate the fingers to get underneath them to sculpt later.


Begin to add the clay onto your hand, leave knuckles exposed if you plan to bend the fingers and pose them afterwards. It will be easier to work on shaping and sanding them last after you are done working on the rest of the hand. When you have worked out the overall shape of the hand, proceed to go back to bend the fingers in place to work on the knuckles. Wrap the wire with masking tape and then cover with clay.


When the piece is dry, sand if you would like a smooth finish and paint with acrylics.


Take the base that you plan on using for the piece and drill a hole in it that would be roughly the same size as the dowel that you plan on using. Take the same drill bit and use it on the base of your sculpture.


Paint the base with your choice of paint before attaching it to the sculpture. When it dries, take your E6000 glue and attach the rod to the base. Sit the base out for 24 hours and allow to dry.


Attach the base to the sculpture with the E6000 glue and allow it to dry.


Take a photo and remember to go out and vote!

Thank you all once again for stopping by, and I hope that you enjoyed today's tutorial! You can find Creative Paperclay® at the following retailers Creative Paperclay® Online Store, Michael'sAmazon, Joann's.

See more of my work at Melandolly.com and be sure to catch updates on my Instagram page


Friday, February 22, 2019

Create a Faux Bronze Bust with Creative Paperclay ®


Hello everyone! My name is Cinnamon Willis and today's tutorial is going to show you all how to create a faux bronze bust using Creative Paperclay®. In honor of Black history month, I am going to introduce you to an African American sculptor who was part of the Harlem Renaissance named Augusta Savage. She was a notable sculptor, teacher and an activist that fought for equal rights in the arts for African Americans. Most of her work was done in clay or plaster and painted to look like it was a bronze sculpture since she couldn't actually afford to work in bronze. Her art was heavily documented, but the location of most of the pieces are unknown. Her most notable work is the bust above called Gamin which is also made of plaster and painted to look like bronze. In today's tutorial, I'll be working in a style that resembles Mrs. Savage's style more so then my own. I hope you enjoy and take time to look at some of Mrs. Savage's other incredible works.


Courtesy Federal Art Project, Photographic Division collection, 1935-1942. Archives of American Art, Smithsonian Institution.

Supplies:
  • Chicken/poultry Wire
  • Thin wire
  • Pliers
  • Scissors
  • Creative Paperclay®
  • Newspaper
  • Masking tape
  • Sand paper
  • Acrylic paint
  • Sealer, Varnish


Start with a sheet of chicken wire, cut it down to the size you would need it to be for the head, neck and shoulders for your piece. Start shaping it with your hands and pliers, be careful not to poke yourself. I usually take the ragged ends of the chicken wire and fold them into each other. Take the lose wire and weave it if needed to fasten the ends of the chicken wire together.


Take your masking tape and wrap it around the chicken wire completely. You could paint a layer of gesso on top of the tape so that the clay could adhere better to it or just stick it on as I sometimes do. You may need to add a drop of water to the surface for the clay to grab hold to better.


Start adding your first layer of clay to the base. Once the piece is dry, which roughly takes 24 hours depending on the thickness of the clay, you could begin working on the details such as the face shape and features. This can be done by adding a drop of water onto the places that you would like to add clay to and blending the new clay into it. Don’t worry about getting things perfect when working with moist paper clay, most of the sculpting is done when it is dry.


When working on a piece like this, I find it easier to build up the face in different intervals and allow each stage to dry before I continue. This allows me to work without worrying about me ruining a part of the doll or bust that isn't dry yet. As I always state in my tutorials, the drying process can be sped up with a toaster oven set to approximately 200- 220 degrees. Make sure to check on it every twenty minutes to ensure it doesn’t get burned! It's great for those who are impatient like me!


While sculpting this bust I began to realize that it more closely resembled a man's face than a boy's. Instead of the painter's cap that was on the original sculpture, I decided to go with the classic Kangol cap.


After building up this piece quite a bit with the clay, I sanded down the parts that I wanted to be smooth such as the face. I use different grits of regular sand paper that you can find in the hardware store to get the results shown above.


I used Craft Smart's metallic brown to get the bust to look bronze. There are many other metallic brands that would give you the same results, this is just the brand that I had on hand. It took about 5 coats of paint to get the color to be even. If you want to take it a step further, you can do a wash with black paint over the piece to give it a worn look instead of this finish that I have.


Seal with varnish and you are done!


Thank you all once again for stopping by, and I hope that you enjoyed today's tutorial! You can find Creative Paperclay® at the following retailers Creative Paperclay® Online Store, Michael'sAmazon, Joann's.

See more of my work at Melandolly.com and be sure to catch updates on my Instagram page!


Friday, January 25, 2019

How to Mend a Broken Heart


Hello everyone! My name is Cinnamon Willis and I am going to walk you through the steps on how I created this mended broken heart sculpture. With 
Valentine's Day quickly approaching, I decided to create a broken heart for those who may be in need of some healing at this time. The gold split in the heart was inspired by the Japanese art of Kintsugi where broken pottery is repaired with lacquer that is dusted with powdered gold to join the pieces back together. These repair lines become a beautiful reminder of the item's resilience, the same can be said about the heart and the scars that are left on it by others. The scars will only add to your brilliance, learn from them, and wear them with pride.

Supplies:
  • Creative Paperclay®
  • Wooden skewer
  • Masking Tape
  • Newspaper
  • Acrylic paint
  • Pencil
  • Sanding paper
  • Exacto Knife
  • Aleene's Original Tacky Glue


I began this piece by balling up newspaper and taping it around my skewer. I start on one side of the heart and then get to work on the other side. I tape them together and wrap them until they begin to resemble the rough shape of a heart.


Once the shape of the newspaper is as close as I can get it to a heart, I began my first thin coat of paperclay around it. I allowed the clay to dry for about 24 hours and I begin to add more clay with a little dab of water until it gets to the shape that I would like it to be for the heart.


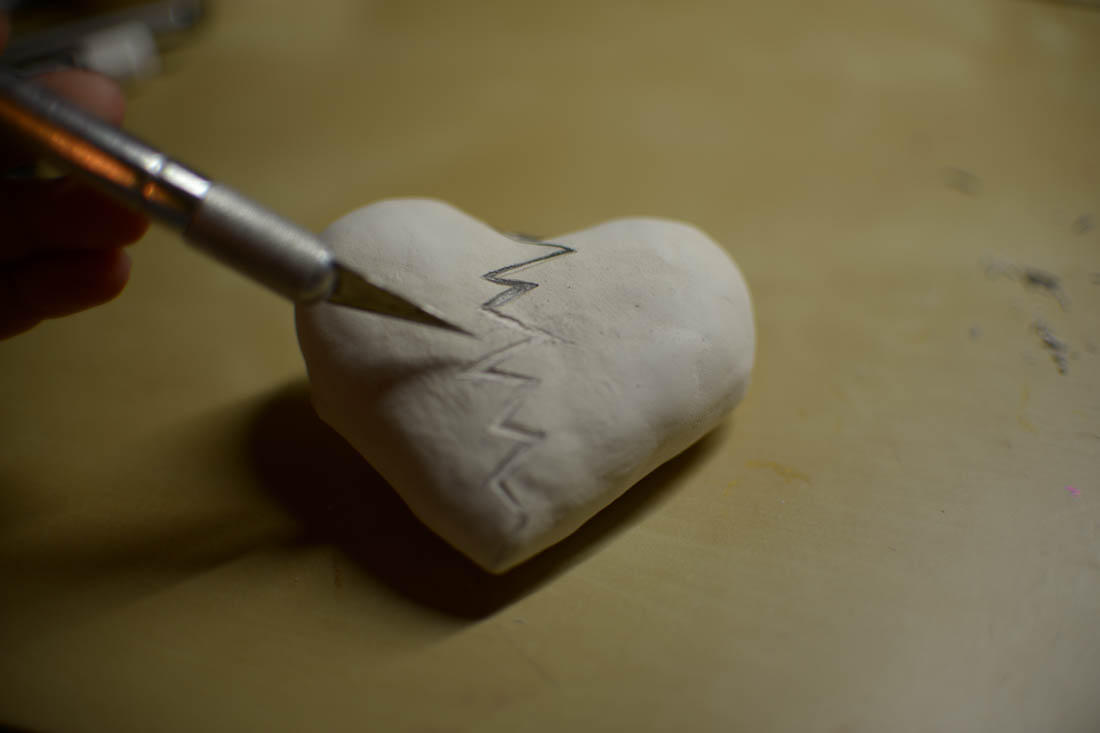
After allowing the second coat of clay to dry, I map out with a pencil where I would like for the split to be for my broken heart. I used a pencil because I always struggle with making zig zagged lines, it usually takes me a few tries.


I am just cutting out my lines with my excato knife here, a utility knife can work as well.


After the lines were cut out, I began to sculpt the front and back end of the arrow. I didn't do as much sanding down with this piece because I wanted the heart to be a little rough looking as if it had a rough journey. I also put a little bit of glue on both ends of the arrow where they join with the heart to keep it in place.


I painted the heart black so that I could blotch some red paint on it with a sponge as shown here. I didn't want the heart to have an even bright red coat of paint, I wanted it to look weathered.


I used gold paint here for the break in the heart to mimic that of the Kintsugi technique that I mentioned above.


I took a piece of nylon and tied it onto both ends of the arrow so that I could hang it on a nail. I sealed it with varnish so that the paint wouldn't chip off.


Here's the piece in it's new home on one of my walls with two of my favorite masks.

Thank you all once again for stopping by, and I hope that you enjoyed today's tutorial! You can find Creative Paperclay® at the following retailers Creative Paperclay® Online Store, Michael'sAmazon, Joann's.

See more of my work at Melandolly.com and be sure to catch updates on my Instagram page!