This my last post for the Creative Paper Clay Design Team. I had a blast working and coming up with so many new ways to work with this product and I had the privilege of working with amazing people.
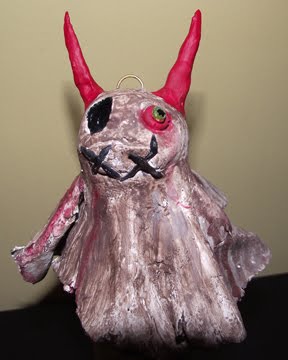
This month I made a Scary Ghost to hang with my Amazing Mold Putty Project. I took the Paper clay and rolled it out and didn't care how it went, the more raggedy edges the better! I rolled a piece of the clay in a ball for head and draped the rolled out piece of clay on top. I used a bottle for it to sit on and drape over. I then pinched the clay on bottom cut out eyes, added horns, added a mouth and added a few stitches by rolling small pieces of clay.
Once dry, I painted it with watered down brown acrylic paint and added details and painted horns red. It was simple but fun and I love these sitting around inspiring me!
My Creative paper clay tip is a bit bizarre but I found out this by accident and then fell in love with it. I love doing dark dolls and art at times. If you make a mold out of your creative paperclay (by sticking a face,doll, bat etc) in it and leave it dry you can then use it as a mold and the small cracks and shrinkage add to the deliciousness of the project, especially when you paint it! Try it! It is fun especially for the kids!
I am a bit into Steampunk this week. Some different addictive sites have me all a buzz about it and ideas flowing like crazy. So I thought....I am going to do a pair of earrings! And then my mind went a bit crazy! Now they are beautiful and light and awesome earrings but, as most of you know, when your mind starts....you are from one end to another of things to do.
Here is what I did. I used Creative Paperclay and stamped a Steampunk image on it. I then cut it out using a lid of a bottle to have circle shape. I added holes where I would want to add hook and hangings when dry.
Once it was dry I then painted all black and did a bit of a wipe off and dab with a paper towel to give a bit of texture. I then took a bit of gold paint and dry brushed it on. I wanted the outlines of the stamp I stamped to be highlighted. The back I painted black and stamped the stamp in gold ink on it. I then glued on a few pieces of old clocks and watches as a collage type feel on the front. I hung a few coordinating beads from the 3 holes on the bottom and added the earring wires. I love the way they came out and had a blast making them!
I am so happy that Halloween is coming and I have my house decorated inside all year long with Halloween stuff. This month I made a ghoul with horns and a mask on his knees lurking. This was so much fun! I love making dolls in general and have made and sold so many but I wanted to do a creepy kind of doll but not too creepy.
First I made the structure from cheap wire. I made the body, arms, legs and head and then taped it with masking tape to add more strength.
Then I took the Creative PaperClay and used it to cover the whole structure with the paperclay. I added a mask and horns and a few other little embellishments that I wanted to give him.
I let it dry and then painted the body part green and the rest black. I textured his face a bit and painted it a black/red and his horns and eyes red. I love my little piece and it will be added to my other clay pieces sitting around that I love to make!
I hope this inspires a Halloween Craft out of you and when you do, you use Creative paperclay to do it with! It is so fun to use with kids!!
I love making dolls and to make a great armature just use pipecleaners! You can even tape around them if you want. You can bend them to match the shape you want and how you want your body to stand and look.
I had a blast with this project! I made a creative plaque for hanging
above my door so I can see it every time I leave the house. I used the
Delight clay for this project along with 3D Crystal Lacquer and Terri
Sproul Mixers.
First, I rolled out a whole package of the
Delight clay and made a very organic shape with it. I flattened it out a
bit and took stamps and imprinted them directly into the clay (I laid a
ruler down as my guide to keep everything straight) and then went to
town embellishing it! I made a few butterflies, flowers and leaves from
the Delight Clay in molds and then even used the Terri Sproul Mixers
with 3D Crystal Lacquer and made even more embellishments!
Once
the plaque was dry, I filled the embedded letters with 3D Crystal
Lacquer and Terri Sproul purple mixer and they just turned out beautiful! I added
different hues of blues and purples and some glitter and embellishments
and coated it all with a quick spray varnish. I am so happy with how
this turned out! Here are a couple of videos I recorded while making
this project. I will post the beginning video on my YouTube channel also
if you want to see how I used this amazing product!
I have been playing with Creative PaperClay for years. This month I had
some of the mixture that I previously made into molding paste left over
that I didn't want to go to waste. While thinking about how I could use
it, I remembered something I made with my son years ago for a
project.... FOSSILS!
After choosing which molds I wanted to
use, I cut the tip off of the baggie that contained the watered down
clay and squirted the mixture into molds. I let the clay dry for 2 days.
The top part of the clay dried but it was still very wet
underneath so I gently pushed down the dry part and smeared (for lack of
better word) the clay that came up through the cracks. Finally, by day 4
it was just where I wanted it to be. I pulled the pieces out and turned
them over let the top finish drying overnight and were ready to be
worked with.
When I did the project with my son, we got real
sand and glued it on foamboard to make a realistic scene. I am using
masking tape and some colored chalk on paper to give you idea and show
what it looks like and what you can do.
The number of child
projects you can use this for with are endless. You can coat these with
3D Crystal Lacquer and put them in one of those chalk balls you can make
for your child to open up or you can hide them in your yard or the sand
box for the little ones to find!!!!
I have had the best time using Creative PaperClay!
I am a Mixed Media Artist and I love using different techniques and
items in my art. In this project I put some paperclay in a baggie and
watered it down very thinly to a paste consistency. Once I did that I
just smooshed it around as if it were dough until it was the consistency
I wanted. I spread on my blank canvas over a stencil i had to make an
imprint and let dry. Here is a quick video from my youtube!
When it was dry (which took 24 hours) I then painted a mustard and bright yellow to get some different colors and textures.
I took my regular paper clay and rolled it out and cut out different circle sizes.
I painted them different colors and glued them on to canvas. I added
dots from bottles of fabric paint as decoration and drew swirls on the
background with glitter glue and more fabric paint. I then put 2 coats
of 3D Crystal Lacquer on to seal it. It is Mod looking and I am so
excited to hang on my wall!!




 Then I took the Creative PaperClay and used it to cover the whole structure with the paperclay. I added a mask and horns and a few other little embellishments that I wanted to give him.
  I let it dry and then painted the body part green and the rest black. I textured his face a bit and painted it a black/red and his horns and eyes red. I love my little piece and it will be added to my other clay pieces sitting around that I love to make!


 I hope this inspires a Halloween Craft out of you and when you do, you use Creative paperclay to do it with! It is so fun to use with kids!!


